Manuals
/
Fujitsu
/
Computer Equipment
/
Laptop
Fujitsu
P8010
manual
Getting Started with Your LifeBook, Connecting the AC Adapter
Models:
P8010
1
43
191
191
Download
191 pages
22.87 Kb
40
41
42
43
44
45
46
47
Troubleshooting
Specs
Install
Bluetooth
Password
Keyboard controller error
Status Indicator Panel
Connecting the AC Adapter
Warranty
Dimension
Page 43
Image 43
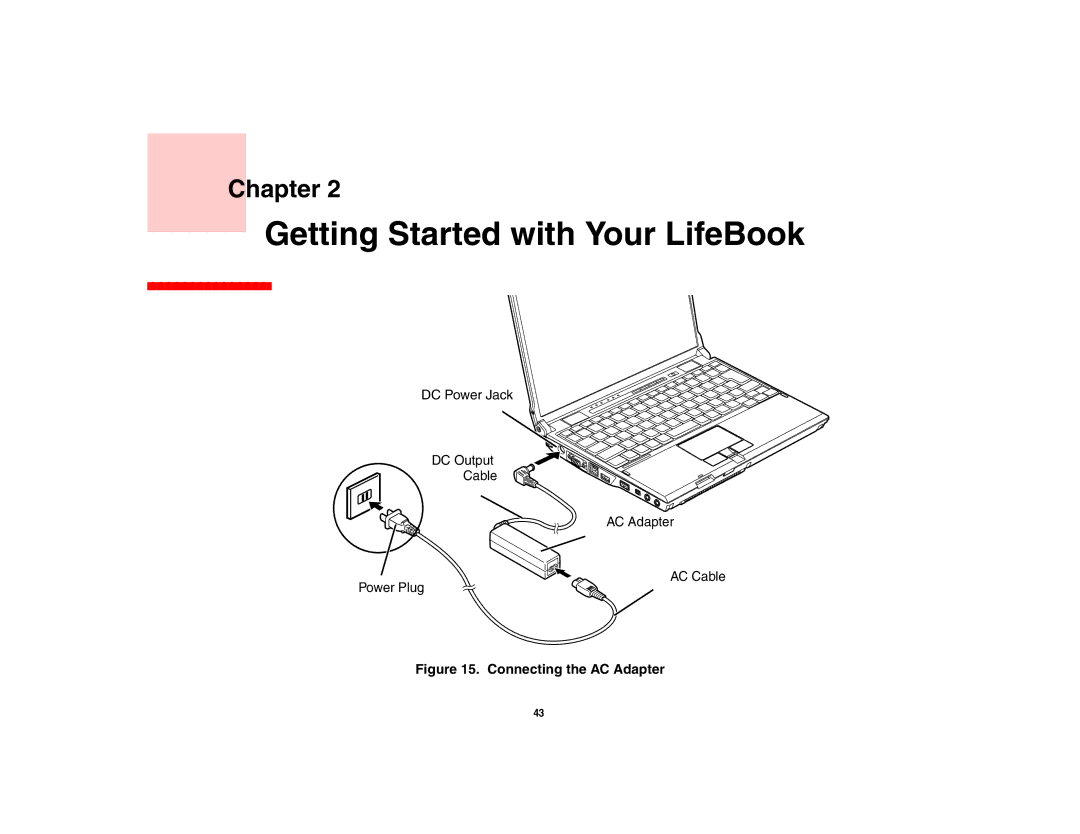
Chapter 2
Getting Started with Your LifeBook
DC Power Jack
DC Output
Cable
AC Adapter
AC Cable
Power Plug
Figure 15. Connecting the AC Adapter
43
Page 42
Page 44
Page 43
Image 43
Page 42
Page 44
Contents
User’s Guide
Copyright and Trademark Information
Declaration of Conformity
For Authorized Repair Technicians Only
Important Safety Instructions
Recycling your battery
Contents
LifeBook Application Panel/Support Button
Getting Started with Your LifeBook
Power Management
User-Installable Features
Device Ports
Troubleshooting Your LifeBook
System Specifications
Care and Maintenance
Appendix a Wlan User’s Guide
Glossary/Regulatory
Index
Appendix B Fingerprint Sensor Device
About This Guide
Preface
Conventions Used in the Guide
Fujitsu Contact Information
Service and Support
Fujitsu Shopping Online
Limited Warranty
Overview
Getting to Know Your LifeBook
LifeBook notebook with display open
Locating the Controls and Connectors
Front and Display Components
Fingerprint Recognition Sensor/Scroll Button
Wireless LAN/Bluetooth On/Off Switch
Touchpad Pointing Device
SD Card Slot
External Video Port
DC Power Jack
Left-Side Panel Components
Anti-theft Lock Slot
Headphone Jack
LAN RJ-45 Port
USB 2.0 Ports
Ieee 1394 Port
Optical Drive Release Button
Right-Side Panel Components
PC Card Eject Button
PC Card Slot
Optical Drive
Air Vents
Back Panel Components
Bottom Components
Lithium ion Battery Bay
Port Replicator Connector
Memory Upgrade Compartment
Status Indicator Panel
Status Indicator Panel
Battery Charging Indicators
Hard Disk/Optical Drive Access Indicator
Battery Level Indicator
CapsLock Indicator
NumLk Indicator
ScrLk Indicator
Keyboard
Using the Keyboard
Windows Keys
Numeric Keypad
Cursor Keys
Function Keys
Touchpad pointing device
Touchpad Pointing Device
Double-Clicking
Clicking
Scrolling
Dragging
Touchpad Control Adjustment
Controlling the Volume
Volume Control
LifeBook Application Panel
LifeBook Application Panel/Support Button
Launching Applications with the LifeBook Application Panel
Configuring your LifeBook Application Panel
Click on Programs, then click on LifeBook Application Panel
LifeBook Application Panel/Support Button
Support tab
Diagnostic Program tab
Opening the Fujitsu Support Center with the Support Button
Manual tab
Getting Started with Your LifeBook
Connecting the AC Adapter
Connecting the Optional Auto/Airline Adapter
Power Sources
Connecting the Power Adapters
Connecting the AC Adapter
Display Panel
Adjusting Display Panel Brightness
Opening the Display Panel
Using Power Management to Adjust Brightness
Using the Keyboard to Adjust Brightness
Using the Fujitsu Menu to Adjust Brightness
Using Power Options to Adjust the Brightness Windows Vista
Power/Suspend/Resume Button
Power On
Starting Your LifeBook Notebook
Boot Sequence
Bios Setup Utility
Hard Disk Drive Passwords
Entering the Bios Setup Utility
Using the TrustedCore Menu
Booting the System
Bios Guide
Starting Windows Vista the first time
Registering Windows Vista with Microsoft
Starting Windows XP the First Time
Registering Windows XP with Microsoft
Registering Your LifeBook notebook with Fujitsu
Installing ClickMe
Windows Vista Systems
Windows XP Systems
Fujitsu Driver Update Utility
Power/Suspend/Resume Button
Power Management
Standby Sleep Mode
From the Control Panel select Power Options
Hibernation Save-to-Disk Feature
Windows Power Management
Enable or Disable the Hibernation Feature
Restarting the System
Powering Off
Windows Vista
Lithium ion Battery
User-Installable Features
Recharging the Batteries
Low Battery State
Replacing the Battery
Removing the Battery
Swapping Batteries when another Power Source is available
Accessing the Memory Compartment
Memory Upgrade Module
Removing the Memory Compartment Cover
Removing a Memory Module
Removing a memory module
Installing a Memory Module
Checking the Memory Capacity
Optical Drive
Optical Drive
Loading Media on Your Drive
Media Player Software
Optical Drive
Loading/Ejecting Media
Removing Media
Opening the Optical Drive Control Panel
Using the Optical Drive Software
Using the Optical Drive Control Panel
Starting a DVD Movie
To Watch a Movie on Battery Power
Using the Optical Drive on Battery Power
Emergency Tray Release
Auto Insert Notification Function
Secure Digital Cards
Installing an SD Card
Removing An SD Card
Inserting SD Cards
PC Cards
Installing/Removing PC Card
Removing PC Cards
Installing PC Cards
PC Cards
Double-clickPhone and Modems
Select Open Volume Select Option/Properties
Device Ports
Modem RJ-11 Jack
Internal LAN RJ-45 Jack
Connecting the LAN
Universal Serial Bus Ports
Docking Port
Microphone Jack
Ieee 1394 Port
Headphone Jack
External Video Port
Connecting an External Video Device
Port Replicator Components
Port Replicator
Headphone/Line-Out Jack
External Monitor Port
USB 2.0 Ports Qty
LAN RJ-45 Jack
DVI-D Port
Detaching Port Replicator
Attaching Port Replicator
Troubleshooting
Troubleshooting Your LifeBook
Troubleshooting Your LifeBook
Problem
Specific Problems
Troubleshooting Table
Using the Troubleshooting Table
Port Replicator Problems optional external device
Problem Possible Cause Possible Solutions Audio Problems
Hard Drive Problems
Keyboard or Mouse Problems
Possible Cause Possible Solutions
Memory Problems
Power Failures
Problem Possible Cause Possible Solutions Modem Problems
USB Device Problems
PC Card Problems
Condition of the battery. See Status Indicator Panel on
Problem Possible Cause Possible Solutions
Status Indicator Panel on
Panel Power Options Properties and clicking on
Shutdown and Startup Problems
Problem Possible Cause Possible Solutions Video Problems
Miscellaneous Problems
Reinstall your device. See External Video Port on
Power On Self Test Messages
Keyboard error
Incorrect Drive a type run Setup
Incorrect Drive B type run Setup
Keyboard controller error
Operating system not found
Keyboard error nn
Monitor type does not match Cmos Run Setup
Press F1 to resume, F2 to Setup
System Bios shadowed
Previous boot incomplete Default configuration used
Real time clock error
System battery is dead Replace and run Setup
Nnnn System RAM Passed
System timer error
Video Bios shadowed
System RAM Failed at offset nnnn
Re-installing Individual Drivers and Applications
Restoring Your Pre-installed Software
Restoring the Operating System for Windows XP Systems
Booting from the Optical Drive
Determining whether Recovery and Utility is pre-loaded
Methods for accessing the utilities
Restoring the Operating System for Windows Vista Systems
Running Recovery and Utility from the disc
Running Recovery and Utility from hard disk
Recovery and Utility tabs
Action
Using the Shock Sensor Utility
Ignore keyboard action
Automatically Downloading Driver Updates
Caring for your LifeBook Notebook
Care and Maintenance
Care and Maintenance
Cleaning guidelines using recommended off-the-shelf cleaners
Cleaning your LifeBook notebook
Storing your LifeBook notebook
Disinfecting LifeBook computers
Outlet Type Location
Traveling with your LifeBook notebook
Batteries
Increasing Battery Life
Caring for your Batteries
Caring for your Media DVD/CD/CD-R
Media Care
Caring for your Optical Drive
Specifications
System Specifications
Configuration Label
Video
Microprocessor
Chipset
Memory
Integrated Pointing Device
Audio
Hard Drive
Media Player
On the LifeBook notebook
Device Ports
Trusted Platform Module
Theft Prevention Lock
Batteries
Power
Keyboard
On the Optional Port Replicator
Popular Accessories
Dimensions and Weight
Environmental Requirements
Manuals
Pre-Installed Software
Learning About Your Software
Tutorials
Google Picasa
Adobe Acrobat Reader Norton Internet Security
ArcSoft WebCam Companion
Google Desktop
Microsoft OfficeReady with Office Assistant
CyberLink PowerDVD
Fujitsu Driver Update Utility
OmniPass Fingerprint application
Operating System Options
Roxio Easy Media Creator
Active-Matrix Display
Access point
Ad Hoc Mode
Glossary
Bps
Boot
Auto/Airline Adapter
Bit
Channel
Bus
Byte
CardBus
COM Port
Command
Configuration
Default Value
Disk Drive
Disk
Diskette
Encryption Key Network Key
Driver
IEEE802.11b
Floppy Disk
Port
IEEE802.11a
IP Address
IEEE802.11g
Infrared
Infrastructure
IrDA
Lithium ion Battery
LPT Port
Modem
MAC Address
Memory
MHz
Operating System
Network name Ssid Service Set Identifier
Open system authentication
Network key
Pixel
Partition
Peripheral Device
Pitch keyboard
RAM Module
Reset
Program
Protocol
Serial Port
Shared key authentication
Standby
Video
Status Indicator
Stereo audio
Subnet mask
Wi-Fi Compatible
FCC Notices
Regulatory Information
Regulatory Information
DOC Industry Canada Notices
Avis Aux Utilisateurs Du Réseau Téléphonique Canadien
Regulatory Information
Regulatory Notes and Statements
Wireless LAN, Health and Authorization for use
Appendix a Wlan User’s Guide
FCC Regulatory Information
Federal Communications Commission statement
Regulatory Information/Disclaimers
FCC Interference Statement
Export restrictions
FCC Radio Frequency Exposure statement
Canadian Notice
Wireless LAN Device Covered by this Document
Before Using the Optional Wireless LAN
Characteristics of the Wlan Device
Ad Hoc Mode Network
Wireless LAN Modes Using this Device
Access Point Infrastructure Mode Network
Access Point Infrastructure Mode
How to Handle This Device
Wireless Network Considerations
Deactivating the Wlan Device
Wireless LAN/Bluetooth Switch
Deactivation using the Wireless On/Off Switch
Click Start Program Files Atheros Atheros Client Utility
Activating the Wlan Device
Configuring the Wlan Using Windows Vista
Configuring the Wireless LAN
Connecting to a Network
Connection to the network
Configuring the Wlan Using Windows XP
Procedure
Double-click on the Wireless Network Connection icon
Troubleshooting
Troubleshooting the Wlan
Problem Possible Cause Possible Solution
Problem Possible Cause Possible Solution
Specifications
Wlan Specifications
Wlan Specifications
What is Bluetooth
Using the Bluetooth Device
Where to Find Information About Bluetooth
FCC Radiation Exposure Statement
Warranty
Introducing the Fingerprint Sensor Device
Appendix B Fingerprint Sensor Device
Getting Started
Installing OmniPass
System Requirements
Verifying Information about OmniPass
Installing the OmniPass Application
Double-clickAdd/Remove Programs
Uninstalling OmniPass
User Enrollment
Master Password Concept
Basic Enrollment
Enrolling a Fingerprint
Remembering a Password
Using OmniPass
Password Replacement
OmniPass Authentication Toolbar
Associating a Friendly Name
Additional Settings for Remembering a Site
Logging in to a Remembered Site
With Master Password
Logging into Windows with a Fingerprint Device
Password Management
OmniPass User Identities
Switch User Identity
Choosing User Identity during Login
Identities and Password Management
Exporting and Importing Users
Configuring OmniPass
Exporting an OmniPass User Profile
Things to Know Regarding Import/Export
Importing an OmniPass User Profile
User Management
OmniPass Control Center
System Settings
User Settings
Cannot add Windows users to OmniPass
Cannot add a User with a Blank Password to OmniPass
Introducing the Fingerprint Sensor Device
Index
FDU 55, 113
190
191
Top
Page
Image
Contents