7.Start each burner by turning the HEATER switch to AUTO. After purging for approximately 10 seconds the burner will fire, and the heater switch will light up indicating that the flame sensing circuit is sensing burner flame. For information concerning burner adjustment see the pre start section of this manual.
8.To properly set the correct DRY, COOL and UNLOAD time for various moisture content grains, see the drying charts for your size of dryer.
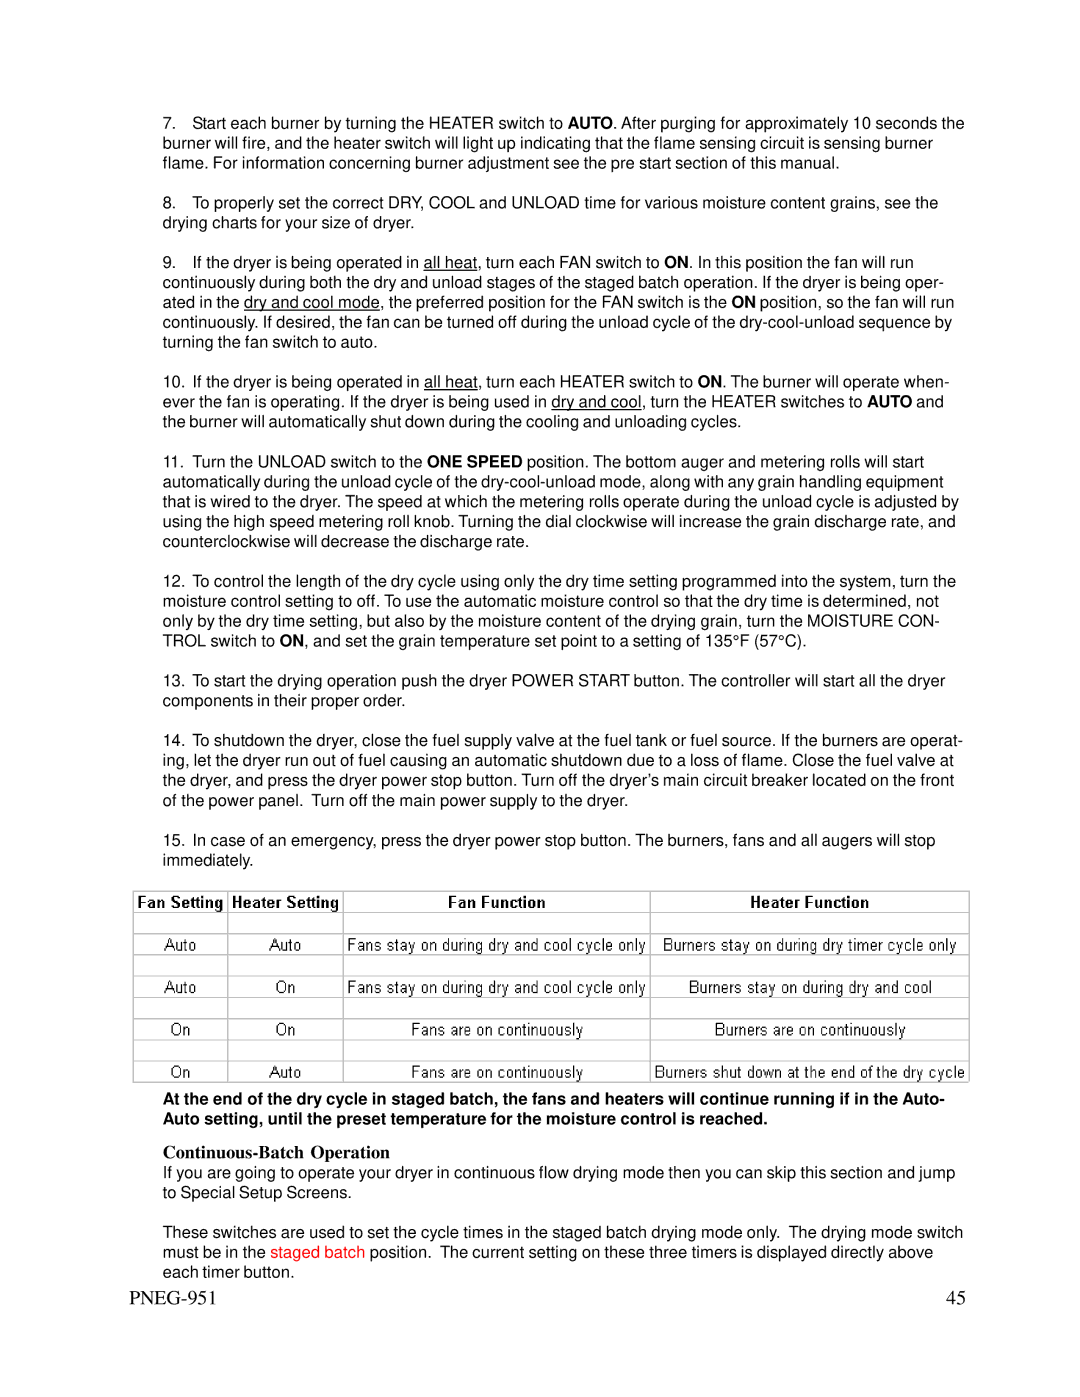
9.If the dryer is being operated in all heat, turn each FAN switch to ON. In this position the fan will run
continuously during both the dry and unload stages of the staged batch operation. If the dryer is being oper- ated in the dry and cool mode, the preferred position for the FAN switch is the ON position, so the fan will run continuously. If desired, the fan can be turned off during the unload cycle of the
10.If the dryer is being operated in all heat, turn each HEATER switch to ON. The burner will operate when- ever the fan is operating. If the dryer is being used in dry and cool, turn the HEATER switches to AUTO and the burner will automatically shut down during the cooling and unloading cycles.
11.Turn the UNLOAD switch to the ONE SPEED position. The bottom auger and metering rolls will start automatically during the unload cycle of the
12.To control the length of the dry cycle using only the dry time setting programmed into the system, turn the moisture control setting to off. To use the automatic moisture control so that the dry time is determined, not only by the dry time setting, but also by the moisture content of the drying grain, turn the MOISTURE CON- TROL switch to ON, and set the grain temperature set point to a setting of 135°F (57°C).
13.To start the drying operation push the dryer POWER START button. The controller will start all the dryer components in their proper order.
14.To shutdown the dryer, close the fuel supply valve at the fuel tank or fuel source. If the burners are operat- ing, let the dryer run out of fuel causing an automatic shutdown due to a loss of flame. Close the fuel valve at the dryer, and press the dryer power stop button. Turn off the dryer’s main circuit breaker located on the front of the power panel. Turn off the main power supply to the dryer.
15.In case of an emergency, press the dryer power stop button. The burners, fans and all augers will stop immediately.
At the end of the dry cycle in staged batch, the fans and heaters will continue running if in the Auto- Auto setting, until the preset temperature for the moisture control is reached.
Continuous-Batch Operation
If you are going to operate your dryer in continuous flow drying mode then you can skip this section and jump to Special Setup Screens.
These switches are used to set the cycle times in the staged batch drying mode only. The drying mode switch must be in the staged batch position. The current setting on these three timers is displayed directly above each timer button.
| 45 |