Manual V1/English for camera firmware version 9.1.0 or later
N T E N T S
Congratulations
What’s in the box
Illustration shows the H2 with a Hasselblad CFH digital back
Flash unit hot-shoe
Quick Start
H2-Kit only / H2- Separate items
film loading
finally
That’s it
Familiarize yourself with the H2
Function Control Display
AF button
Autofocus setting, single Single setting Shot mode
20s
160 ISO/ASA
Average Frames
Examples
‘aperture priority’ mode
+0.7 EV
Second
Empty
By pressing Drive button on grip
Direction depends on user setting
By pressing AF button on grip
Shutter release button
Flash / Control Lock button / Exit
AF button / on / SEL
Drive button / Save / Enter
AE-L button
Film wind-off button
User button
UP button
EV correction adjustment button
Eyesight correction adjustment wheel
EXP button
Camera Body
Integral ergonomic grip Pixel based LCD user interface
Carrying strap
Rechargeable battery grip
Batteries 5, 6, 7
Battery charger
Charging the battery
Attaching the battery to the camera
Rechargeable battery grip general
Rechargeable battery grip precautions
Viewfinder screen
Accessory connection
PC-connector
Viewfinder
Eyepiece adjustment
Parts & Components
Attaching and removing the viewfinder
Rubber eye cup
Lenses
Parts and components
Infrared focus settings
Depth-of-field calculation
Stop down /depth-of-field
Focus aid
CF Adapter
Film Magazines
LCD panel
LCD illumination button
Change up button
Change down button
Darkslide indicator
Magazine settings lock
Darkslide key
Film tab holder
Battery
Battery replacement
Operation
Attaching and removing the magazine
Film speed setting / Barcode
Magazine settings
Film length/number of frames
Data imprint setting
Frame counter setting
Low-battery symbol
Example
Film loading
Beeper
Film wind off
Unloading a film
Digital Photography
Ixpress CFH
Instant user interface
Three modes of operation and storage
Direct shooting to Adobe DNG
FlexColor and workflow
Colour refinement new colour handling concept
Ixpress CF
Ixpress C digital backs and 3rd party digital backs
Light Metering
Exposure Control
Light metering and exposure control
Metering method
Press Save Drive button to retain the setting
Exposure method
Selecting metering method
Reach M Manual 2b
Ting. Note that the appearance of a +/- symbol on the grip
Automatic Exposure A, S, P, Pv
AE- L button
Metered area reads ‘Zone 8’ Metered area beyond film range
Ter speed setting as confirmation of the setting
With the camera in active mode
Exposure compensation
Quick adjust wheel Profiles
General Functions
Manual focus
Power
Standby
Manual focus mode
Autofocus override in Manual mode
3Autofocus
Single Shot
Manual override in autofocus mode
Autofocus mode
Continuous
Single
Drive
Multi exposure with film magazine only
Profiles
Pre-set profiles feature the following
Making a profile
Using profiles
Changing a profile name
Advanced Features
Self timer options Bracketing options
General overview Camera menu
Self timer Bracketing Interval timer Settings
There are four main functions
Mirror Up/ Delay sequence =
Self timer setting
Mirror goes down / Mirror remains up
Bracketing
Vation
Bracketing setting
Button on the Bracketing screen, then Off AF button
Interval setting
Interval
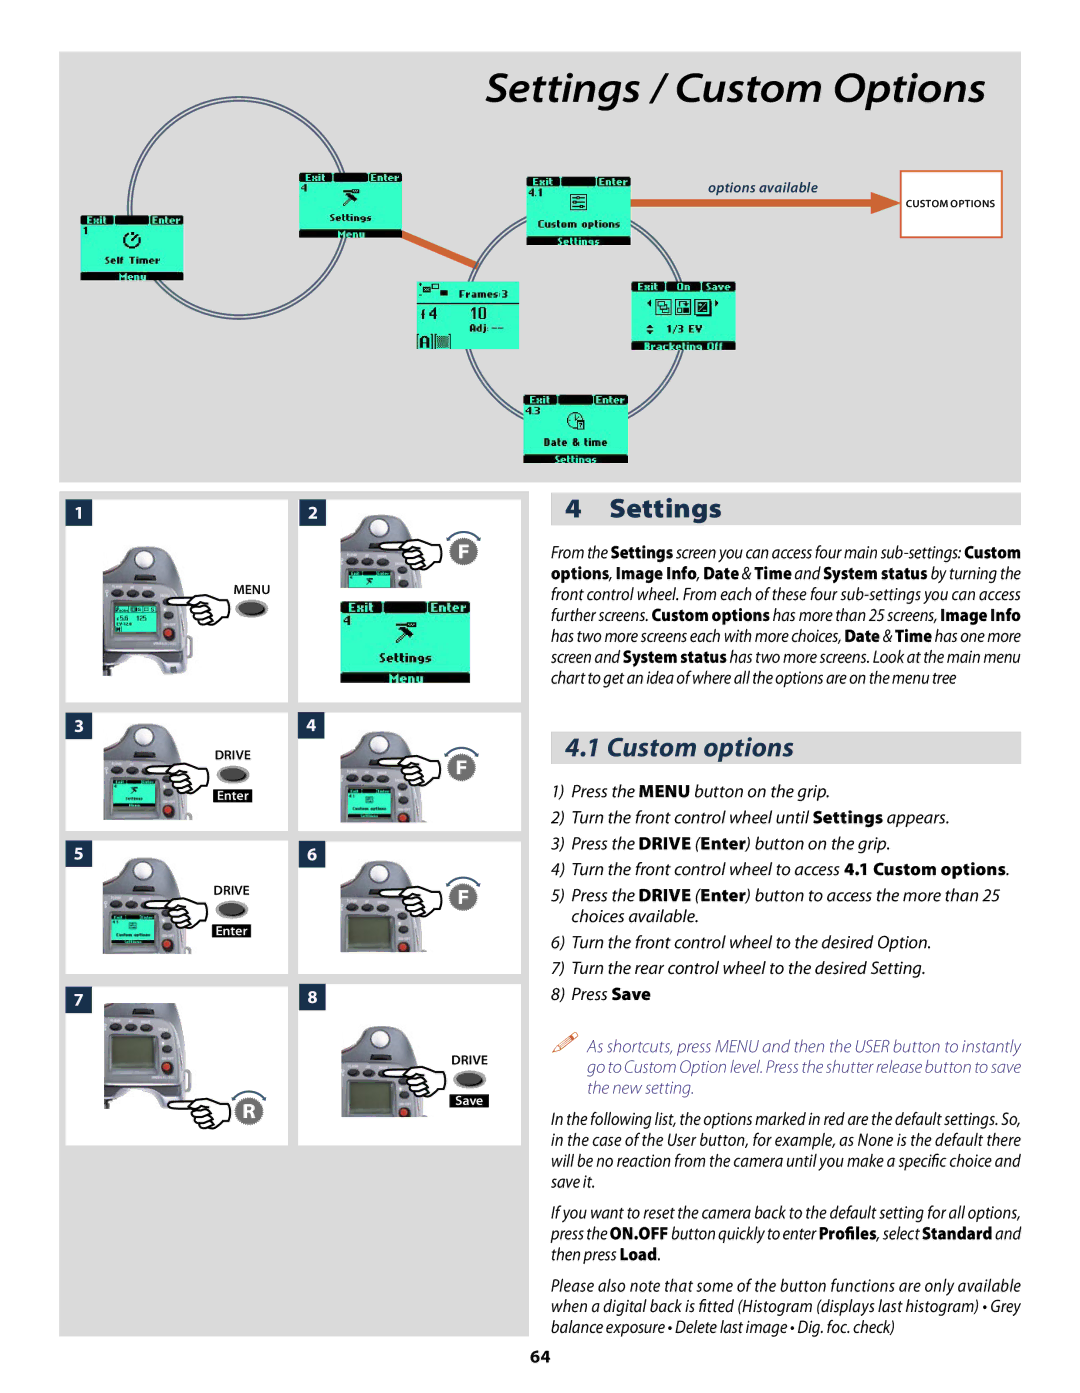
Settings / Custom Options
Custom options
5s 10s 15s 30s
3 Step
Bracketing AF drive lens in MF or AF
Clockwise Counter clockwise
On Off
Half press Always Off
Camera Ext flash Off
Direct Half press
Exp reset Saved
Yes enables the display No disables the display
Customizable button function list
Image Info film magazines only
Imprint type setting
Imprint type
Text
Text setting / Profile name changing
So, to write and store the characters, proceed as follows
Changing text an example
Date & Time
Date & Time
System Status
System Status
Flash
To access the controls
General
Integral flash
Colour temperature full flash 000 5,600º K
1EV 50%
Flash measure of separate flash unit
Separate flash unit connection and use
To use flash measure
Optional Accessories
Proshade
Battery Grip Rechargeable 3043348
Focusing screen HS-grid 3043310
Focusing screen HS-standard 3043305
HMi
Appendix
Glossary of Terms
Quick save
Roll film
Standard exposure
Main screen
True exposure
True exposure
Light metering method sensitivity distribution
Automatic exposure P & Pv Mode
≈ 2%
Technical specifications
Camera Type
Interval timer
External dimensions
Body
Problems, Equipment Care, Service & Guarantee
Copyright Victor Hasselblad AB & Hasselblad A/S
Sweden Denmark