B. Covers Removal For Servicing

Control Compartment Access Door

Lift the lower door up and out to access the gas controls.

Trim Door and Glass Door

Lift the front trim door up and out away from the appliance side surrounds. Replace the door when servicing is complete.

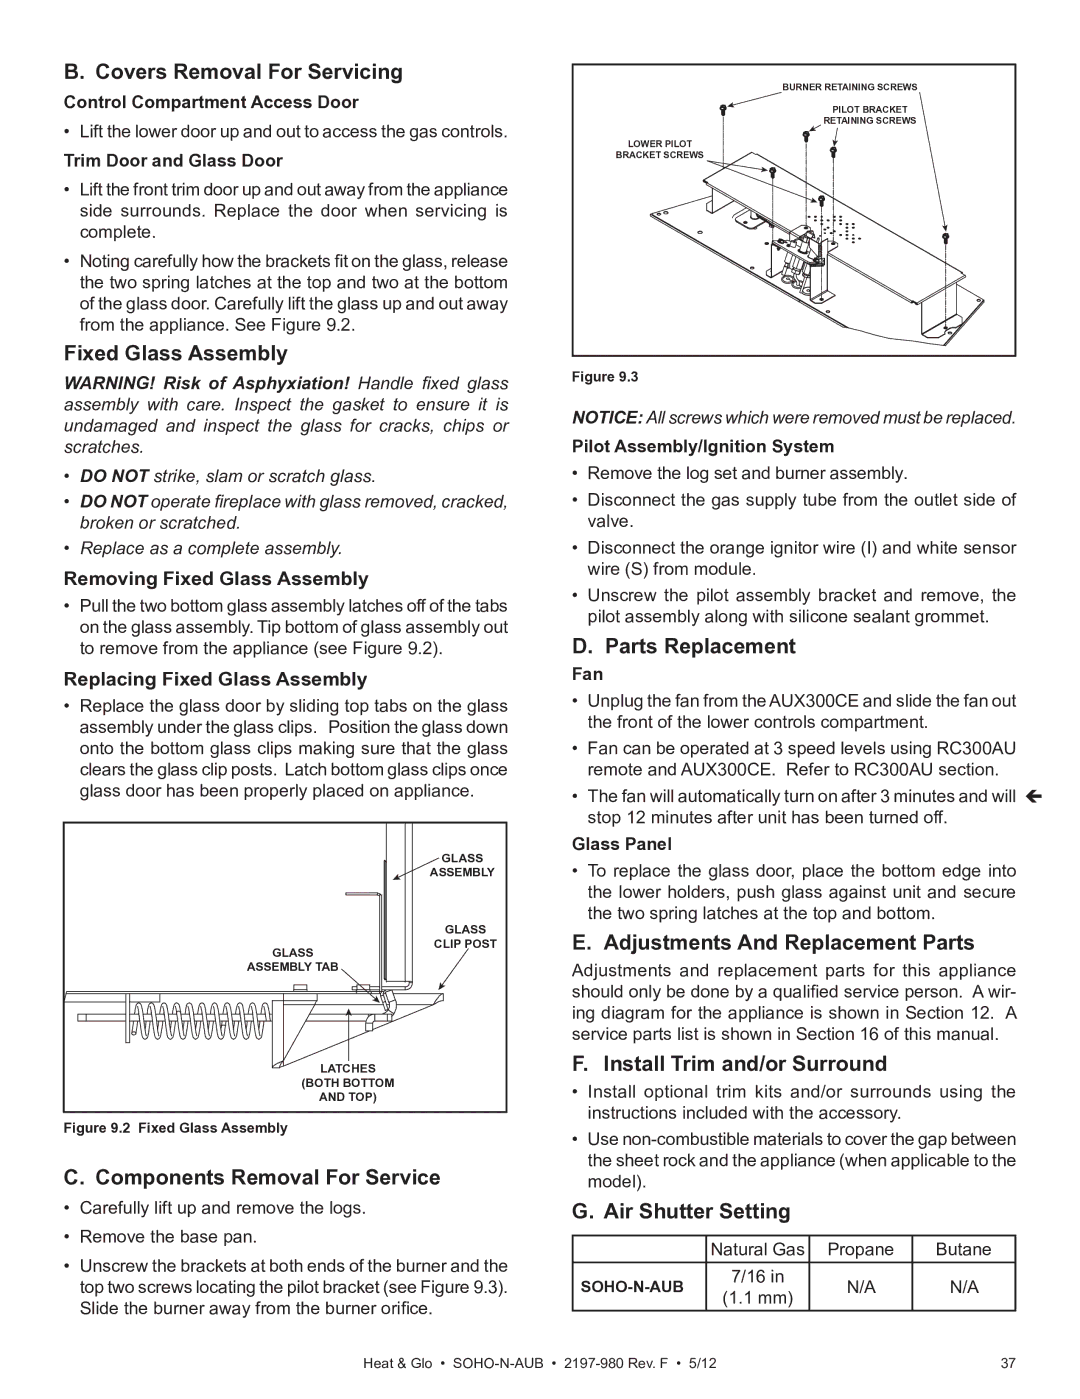
Noting carefully how the brackets fit on the glass, release the two spring latches at the top and two at the bottom of the glass door. Carefully lift the glass up and out away from the appliance. See Figure 9.2.

Fixed Glass Assembly

WARNING! Risk of Asphyxiation! Handle fixed glass assembly with care. Inspect the gasket to ensure it is undamaged and inspect the glass for cracks, chips or scratches.

DO NOT strike, slam or scratch glass.

DO NOT operate fireplace with glass removed, cracked, broken or scratched.

Replace as a complete assembly.

Removing Fixed Glass Assembly

Pull the two bottom glass assembly latches off of the tabs on the glass assembly. Tip bottom of glass assembly out to remove from the appliance (see Figure 9.2).

Replacing Fixed Glass Assembly

Replace the glass door by sliding top tabs on the glass assembly under the glass clips. Position the glass down onto the bottom glass clips making sure that the glass clears the glass clip posts. Latch bottom glass clips once glass door has been properly placed on appliance.


GLASS


ASSEMBLY


GLASS

GLASS

CLIP POST


ASSEMBLY TAB


LATCHES


(BOTH BOTTOM


AND TOP)


Figure 9.2 Fixed Glass Assembly

C. Components Removal For Service

Carefully lift up and remove the logs.

Remove the base pan.

Unscrew the brackets at both ends of the burner and the top two screws locating the pilot bracket (see Figure 9.3). Slide the burner away from the burner orifice.

BURNER RETAINING SCREWS

PILOT BRACKET

RETAINING SCREWS

LOWER PILOT

BRACKET SCREWS

Figure 9.3

NOTICE: All screws which were removed must be replaced.

Pilot Assembly/Ignition System

Remove the log set and burner assembly.

Disconnect the gas supply tube from the outlet side of valve.

Disconnect the orange ignitor wire (I) and white sensor wire (S) from module.

Unscrew the pilot assembly bracket and remove, the pilot assembly along with silicone sealant grommet.

D. Parts Replacement

Fan

• Unplug the fan from the AUX300CE and slide the fan out


the front of the lower controls compartment.


Fan can be operated at 3 speed levels using RC300AU


remote and AUX300CE. Refer to RC300AU section.


The fan will automatically turn on after 3 minutes and will


stop 12 minutes after unit has been turned off.


Glass Panel

To replace the glass door, place the bottom edge into the lower holders, push glass against unit and secure the two spring latches at the top and bottom.

E. Adjustments And Replacement Parts

Adjustments and replacement parts for this appliance should only be done by a qualified service person. A wir- ing diagram for the appliance is shown in Section 12. A service parts list is shown in Section 16 of this manual.

F. Install Trim and/or Surround

Install optional trim kits and/or surrounds using the instructions included with the accessory.

Use non-combustible materials to cover the gap between the sheet rock and the appliance (when applicable to the model).

G. Air Shutter Setting


Natural Gas

Propane

Butane

SOHO-N-AUB

7/16 in

N/A

N/A

(1.1 mm)


Heat & Glo • SOHO-N-AUB2197-980 Rev. F • 5/12

37

Page 37
Image 37
Heat & Glo LifeStyle 2197-980 owner manual Covers Removal For Servicing, Components Removal For Service, Parts Replacement

2197-980 specifications

The Heat & Glo LifeStyle 2197-980 is a cutting-edge contemporary gas fireplace designed to seamlessly integrate into modern living spaces while providing warmth and aesthetic appeal. This model represents a perfect blend of innovative technology and stylish design, making it an excellent choice for homeowners seeking both functionality and elegance.

One of the standout features of the LifeStyle 2197-980 is its impressive heat output. With an efficiency rating that's designed to maximize warmth while minimizing energy consumption, this fireplace efficiently distributes heat throughout the room, providing a comfortable environment even during the coldest months. The unit is equipped with an advanced heating system that ensures rapid warmth without compromising on style.

Another notable characteristic is the customizable flame presentation. The LifeStyle 2197-980 offers a stunning array of flame colors and intensity settings, allowing users to create the perfect ambiance for any occasion. This fireplace utilizes the latest in LED technology to produce realistic flames that can be adjusted to fit the desired aesthetic, whether you prefer a soft glow for an intimate gathering or a robust flame for a cozy family night.

The design of the LifeStyle 2197-980 emphasizes versatility and ease of installation. It can be incorporated into various wall styles, making it an adaptable choice for different home layouts. The unit is designed for direct vent installation, which not only enhances safety but also ensures that indoor air quality remains pristine. The glass front and minimalist frame add a sophisticated touch, enhancing the overall décor of the space.

Safety is a paramount consideration in the LifeStyle 2197-980, equipped with features such as an automatic shut-off system that activates under certain conditions to prevent overheating. The fireplace also comes with a remote control, allowing users to adjust settings conveniently from anywhere in the room.

In summary, the Heat & Glo LifeStyle 2197-980 embodies modern fireplace technology with its efficient heating, customizable flames, versatile installation options, and safety features. It is an ideal choice for those who value design, comfort, and efficiency in a home heating solution, making it an investment that enhances any living space. Whether for cozy nights in or social gatherings, this fireplace stands out as a centerpiece that combines form and function beautifully.