Step 4. Setting the configuration jumper
The | illustration |
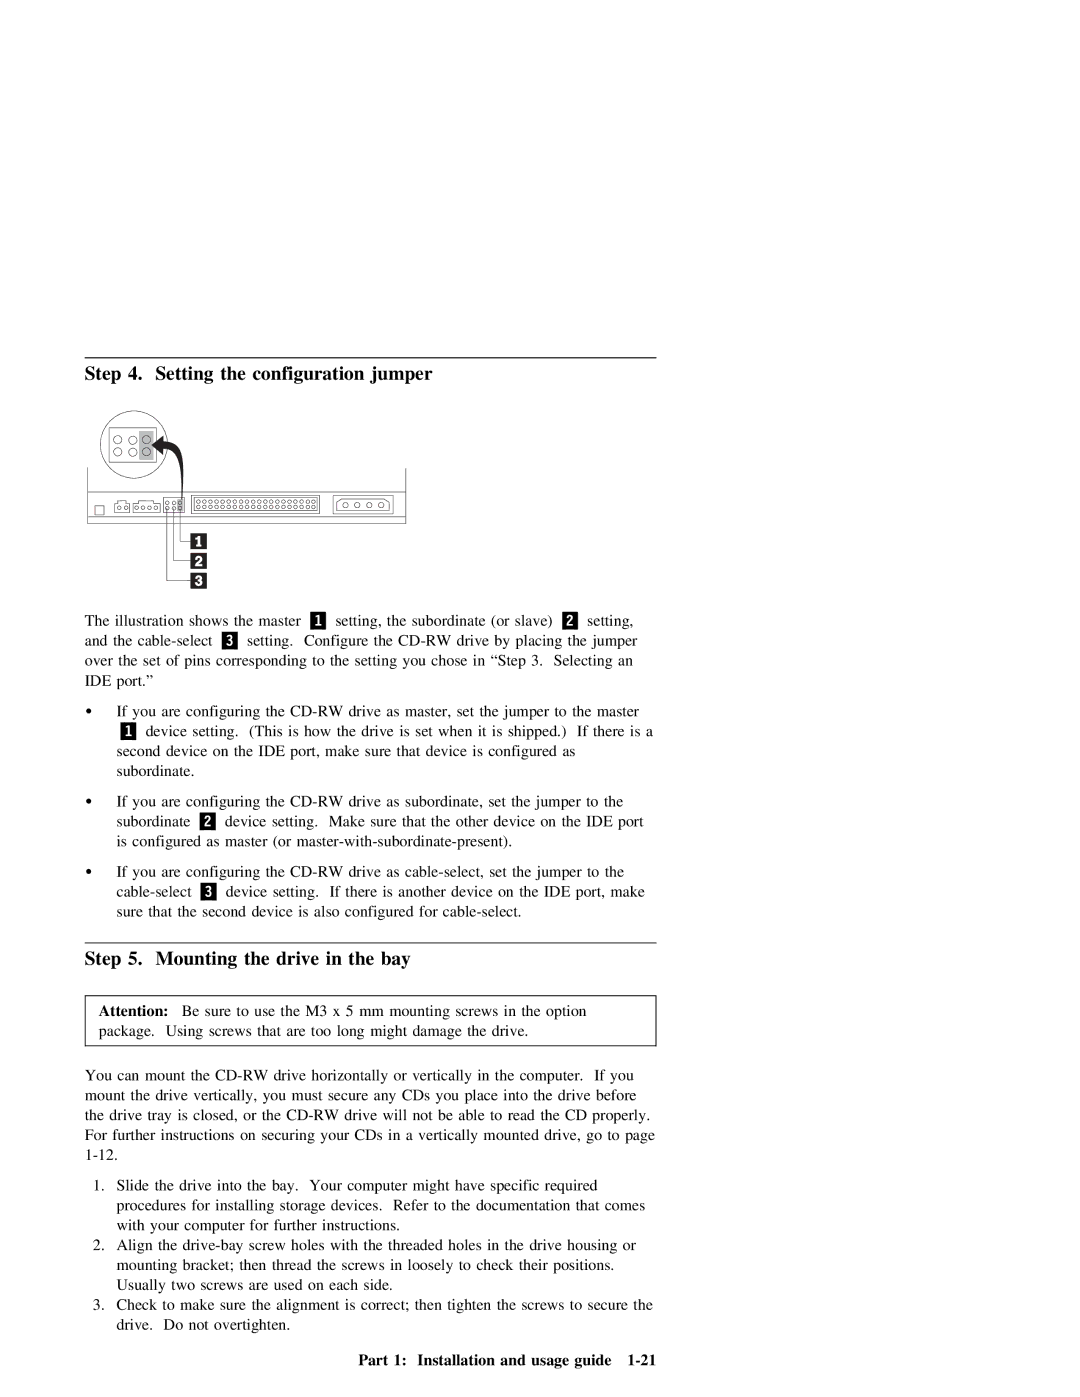
| shows | the | master | .1/ | setting, | the | subordinate | (or | slave).2/ | setting, |
|
| ||||||||||||||||||
and | the | .3/ | setting. | Configure |
| the | the | jumper |
|
|
|
| ||||||||||||||||||||
over | the | set |
| of | pins | corresponding | to | the | setting |
| you | chose | in | “Step | 3. | Selecting |
| an | ||||||||||||||
IDE | port.” |
|
|
|
|
|
|
|
|
|
|
|
|
|
|
|
|
|
|
|
|
|
|
|
|
|
|
|
|
|
| |
Ÿ | If | you | are | configuring the |
| as |
| master, | set | the | jumper to | the | master | |||||||||||||||||||
| .1/ |
| device | setting. | (This |
| is | how | the | drive | is |
| set | when | it | is | shipped.) |
| If there is a | |||||||||||||
| second device on the IDE port, | make |
| sure | that | device |
| is | configured | as |
|
|
|
|
|
| ||||||||||||||||
| subordinate. |
|
|
|
|
|
|
|
|
|
|
|
|
|
|
|
|
|
|
|
|
|
|
|
|
|
|
|
| |||
Ÿ | If | you | are | configuring | the |
| as |
| subordinate, |
| set | the | jumper | to | the |
|
|
| ||||||||||||||
| subordinate |
| .2/ | device | setting. | Make | sure | that |
| the |
| other | device | on | the | IDE |
| port | ||||||||||||||
| is | configured | as master (or |
|
|
|
|
|
|
|
|
|
| |||||||||||||||||||
Ÿ | If | you | are | configuring | the |
| as |
|
| set | the | jumper | to |
| the |
|
|
| ||||||||||||||
|
| .3/ | device | setting. | If |
| there | is |
| another |
|
| device | on | the | IDE |
| port, | make | |||||||||||||
| sure | that |
| the | second | device |
| is | also | configured | for |
|
|
|
|
|
|
|
|
| ||||||||||||
|
|
|
|
|
|
|
|
|
|
|
|
|
|
|
|
|
|
|
|
|
|
|
|
|
| |||||||
Step | 5. | Mounting | the | drive |
| in | the |
| bay |
|
|
|
|
|
|
|
|
|
|
|
|
|
|
|
| |||||||
|
|
|
|
|
|
|
|
|
|
|
|
|
|
|
|
|
|
|
|
|
| |||||||||||
Attention: |
| Be | sure | to |
| use | the | M3 | x | 5 | mm | mounting |
| screws | in | the | option |
|
|
|
| |||||||||||
package. | Using |
| screws | that | are | too | long |
| might | damage | the |
| drive. |
|
|
|
|
|
|
|
|
| ||||||||||
|
|
|
|
|
|
|
|
|
|
|
|
|
|
|
|
|
|
| ||||||||||||||
You | can | mount | the | drive horizontally | or | vertically | in |
|
| the | computer. | If | you |
|
|
|
| |||||||||||||||
mount | the |
| drive | vertically, |
| you | must | secure |
| any CDs |
| you |
| place | into | the | drive | before |
|
| ||||||||||||
the | drive |
| tray | is closed, | or | the |
| drive | will |
| not |
| be | able | to | read | the | CD |
| properly. | ||||||||||||
For | further | instructions | on | securing |
| your | CDs |
| in | a | vertically | mounted | drive, | go |
| to | page | |||||||||||||||
|
|
|
|
|
|
|
|
|
|
|
|
|
|
|
|
|
|
|
|
|
|
|
|
|
|
|
|
|
|
| ||
1. Slide | the | drive | into |
| the | bay. | Your | computer | might | have | specific | required |
|
|
|
|
| |||||||||||||||
| procedures | for | installing | storage | devices. | Refer | to | the |
| documentation | that | comes |
|
|
|
| ||||||||||||||||
| with |
| your |
| computer | for |
| further |
| instructions. |
|
|
|
|
|
|
|
|
|
|
|
|
|
|
|
|
| |||||
2. | Align | the |
| the | threaded | holes | in | the | drive | housing | or |
|
| |||||||||||||||||||
| mounting | bracket; | then | thread | the | screws | in | loosely | to | check | their | positions. |
|
|
| |||||||||||||||||
| Usually | two | screws | are | used | on | each | side. |
|
|
|
|
|
|
|
|
|
|
|
|
|
|
|
| ||||||||
3. | Check | to | make | sure the | alignment | is |
| correct; | then | tighten | the | screws | to | secure |
| the | ||||||||||||||||
| drive. | Do |
| not | overtighten. |
|
|
|
|
|
|
|
|
|
|
|
|
|
|
|
|
|
|
|
|
|
|
| ||||
|
|
|
|
|
|
|
|
|
|
|
|
| Part | 1: | Installation | and | usage | guide |
|
|
| |||||||||||