BACK | PROCEDURE 3 |
8.Remove the existing back canes from the recliner brackets.
WARNING
The back canes MUST be fastened securely to the seat frame BEFORE using the wheelchair.
9.Position the new back canes on the recliner brack- ets and tighten securely with the socket bolts, coved washers, washers and locknuts.
10.Position the actuator housings on the new back canes and tighten securely with the socket bolts, washers and locknuts.
11.Secure the recliner cables to the new back canes with tie wraps.
12.Insert the folding handle into the new back canes.
13.Position the recliner handles on the new back canes.
14.Securely tighten the recliner handles and folding handle to the new back canes with the phillips bolts and locknuts.
15.Install the new back upholstery onto the back canes. Refer to REPLACING BACK UPHOLSTERY in this section of the manual.
16.Install the headrest extension into the new back canes.
REPLACING THE LOCKING MECHANISM IN THE BACK CANE (FIGURE 14)
CAUTION
The locking mechanism in the back canes is spring loaded. Slowly remove the back canes from the wheelchair to prevent the springs from being lost.
NOTE: The following procedure is for
B A C K
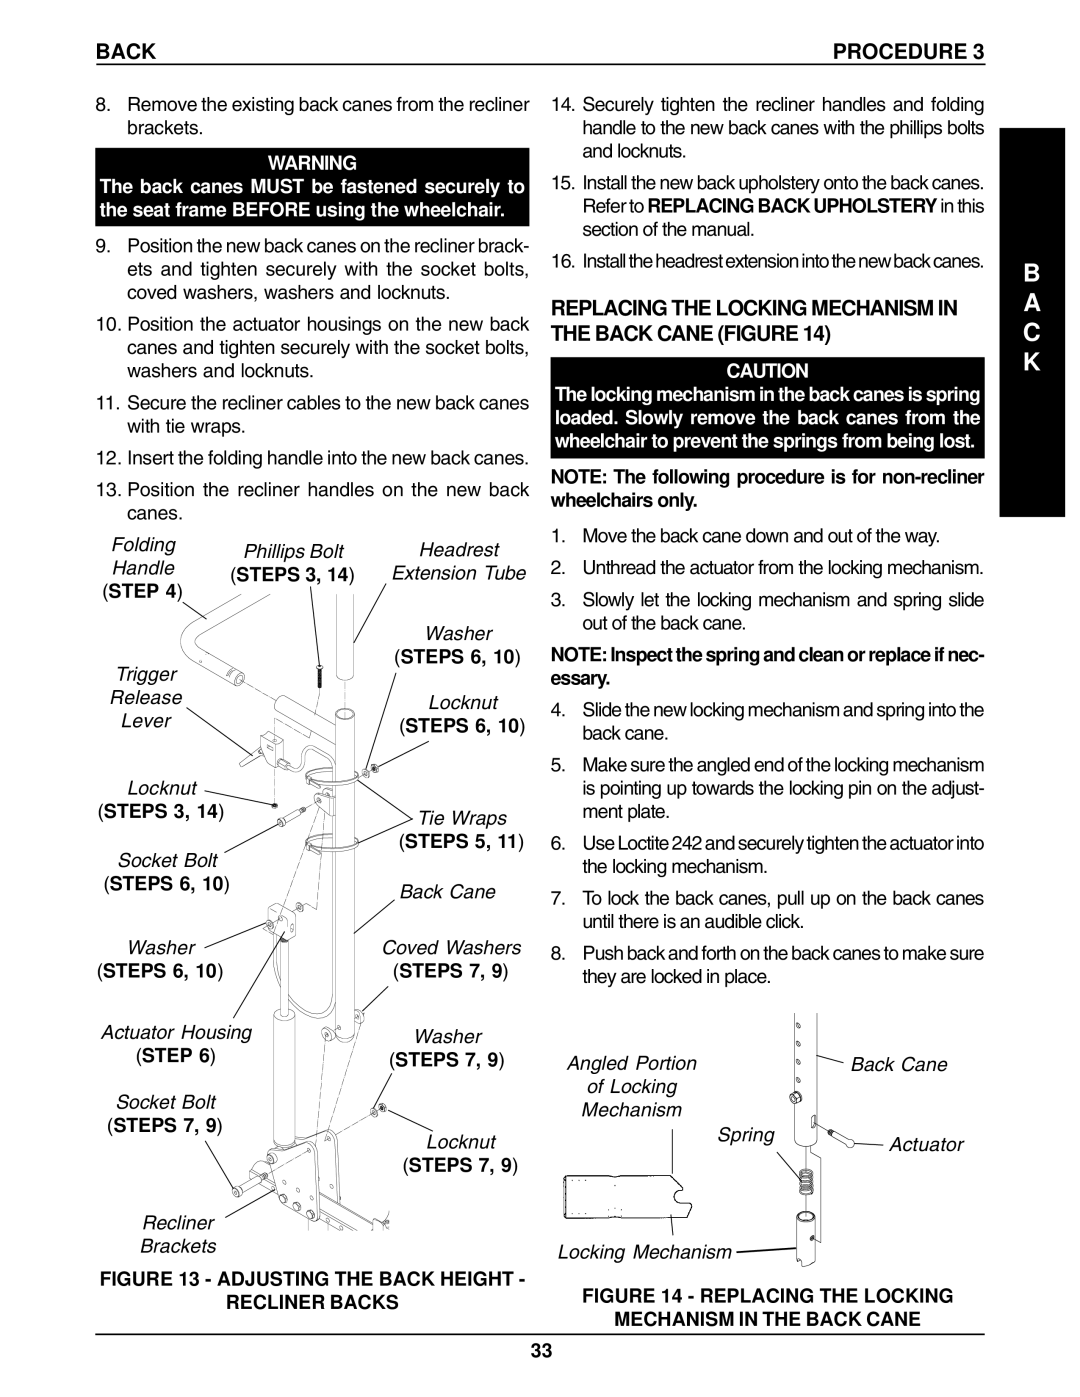
Folding | Phillips Bolt | |
Handle | ||
(STEPS 3, 14) | ||
(STEP 4) | ||
|
Trigger
Release
Lever
Locknut
(STEPS 3, 14)
Socket Bolt
(STEPS 6, 10)
Washer
(STEPS 6, 10)
Actuator Housing
(STEP 6)
Socket Bolt
(STEPS 7, 9)
Recliner
Brackets
Headrest
Extension Tube
Washer
(STEPS 6, 10)
Locknut
(STEPS 6, 10)
Tie Wraps
(STEPS 5, 11)
Back Cane
Coved Washers
(STEPS 7, 9)
Washer
(STEPS 7, 9)
Locknut
(STEPS 7, 9)
1.Move the back cane down and out of the way.
2.Unthread the actuator from the locking mechanism.
3.Slowly let the locking mechanism and spring slide out of the back cane.
NOTE: Inspect the spring and clean or replace if nec- essary.
4.Slide the new locking mechanism and spring into the back cane.
5.Make sure the angled end of the locking mechanism is pointing up towards the locking pin on the adjust- ment plate.
6.Use Loctite 242 and securely tighten the actuator into the locking mechanism.
7.To lock the back canes, pull up on the back canes until there is an audible click.
8.Push back and forth on the back canes to make sure they are locked in place.
Angled Portion |
| Back Cane |
of Locking |
|
|
Mechanism |
|
|
| Spring | Actuator |
|
|
Locking Mechanism ![]()
FIGURE 13 - ADJUSTING THE BACK HEIGHT -
RECLINER BACKS
FIGURE 14 - REPLACING THE LOCKING
MECHANISM IN THE BACK CANE
33