NAMES AND FUNCTIONS OF PARTS
Rear panel (continued)
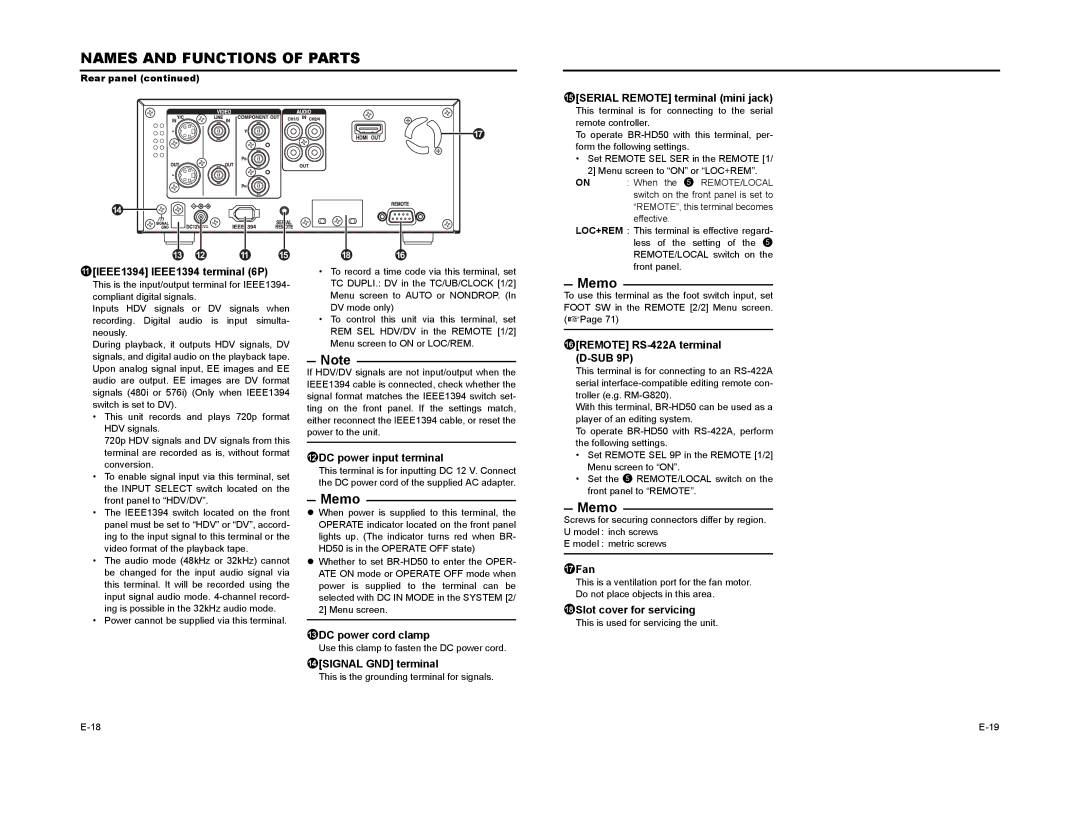
e[SERIAL REMOTE] terminal (mini jack)
d
c b a e
a[IEEE1394] IEEE1394 terminal (6P)
This is the input/output terminal for IEEE1394- compliant digital signals.
Inputs HDV signals or DV signals when recording. Digital audio is input simulta- neously.
During playback, it outputs HDV signals, DV signals, and digital audio on the playback tape. Upon analog signal input, EE images and EE audio are output. EE images are DV format signals (480i or 576i) (Only when IEEE1394 switch is set to DV).
•This unit records and plays 720p format HDV signals.
720p HDV signals and DV signals from this terminal are recorded as is, without format conversion.
•To enable signal input via this terminal, set the INPUT SELECT switch located on the front panel to “HDV/DV”.
•The IEEE1394 switch located on the front panel must be set to “HDV” or “DV”, accord- ing to the input signal to this terminal or the video format of the playback tape.
•The audio mode (48kHz or 32kHz) cannot be changed for the input audio signal via this terminal. It will be recorded using the input signal audio mode.
•Power cannot be supplied via this terminal.
g
hf
•To record a time code via this terminal, set TC DUPLI.: DV in the TC/UB/CLOCK [1/2] Menu screen to AUTO or NONDROP. (In DV mode only)
•To control this unit via this terminal, set REM SEL HDV/DV in the REMOTE [1/2] Menu screen to ON or LOC/REM.
Note
If HDV/DV signals are not input/output when the IEEE1394 cable is connected, check whether the signal format matches the IEEE1394 switch set- ting on the front panel. If the settings match, either reconnect the IEEE1394 cable, or reset the power to the unit.
bDC power input terminal
This terminal is for inputting DC 12 V. Connect the DC power cord of the supplied AC adapter.
Memo
zWhen power is supplied to this terminal, the OPERATE indicator located on the front panel lights up. (The indicator turns red when BR- HD50 is in the OPERATE OFF state)
zWhether to set
This terminal is for connecting to the serial remote controller.
To operate
• Set REMOTE SEL SER in the REMOTE [1/ 2] Menu screen to “ON” or “LOC+REM”.
ON : When the 5 REMOTE/LOCAL switch on the front panel is set to “REMOTE”, this terminal becomes effective.
LOC+REM : This terminal is effective regard- less of the setting of the 5 REMOTE/LOCAL switch on the front panel.
Memo
To use this terminal as the foot switch input, set FOOT SW in the REMOTE [2/2] Menu screen. (XPage 71)
f[REMOTE] RS-422A terminal (D-SUB 9P)
This terminal is for connecting to an
With this terminal,
To operate
•Set REMOTE SEL 9P in the REMOTE [1/2] Menu screen to “ON”.
•Set the 5 REMOTE/LOCAL switch on the front panel to “REMOTE”.
Memo
Screws for securing connectors differ by region. U model : inch screws
E model : metric screws
gFan
This is a ventilation port for the fan motor. Do not place objects in this area.
hSlot cover for servicing
This is used for servicing the unit.
cDC power cord clamp
Use this clamp to fasten the DC power cord.
d[SIGNAL GND] terminal
This is the grounding terminal for signals.
