MENU SCREENS
Setting the menus
The functions of
MENU button |
|
|
| R button |
|
|
SET button
Q button
P button S button
To display the Menu screen at the next level, bring the cursor to NEXT PAGE and press the SET or S button.
To return to the previous Menu screen, do one of the following actions.
•Press the S button. Or
•Select PAGE BACK and press the SET or S button.
4.To return to the normal screen, do one of the following actions.
•Press the MENU button. Or
•Select EXIT in the TOP Menu screen and press the SET or S button.
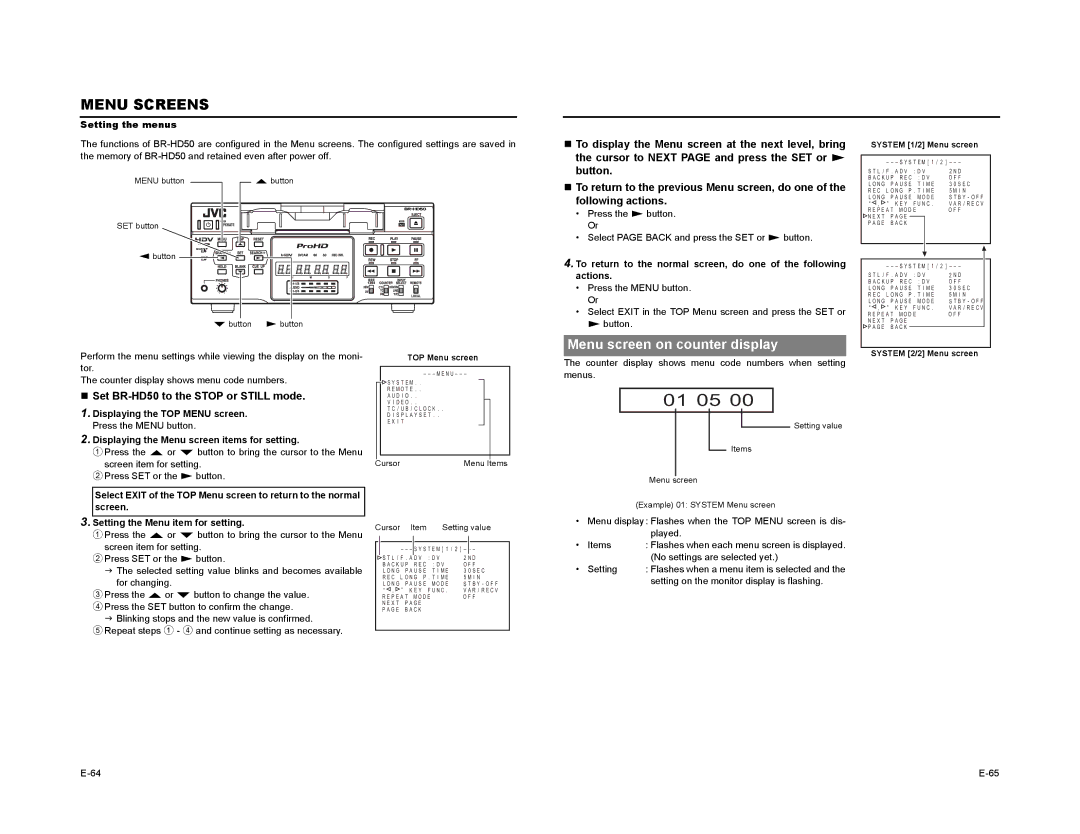
Menu screen on counter display
SYSTEM [1/2] Menu screen
| – – – S Y S T E M [ 1 / 2 ] – – – | |||||
S T L / F . A D V : D V | 2 N D | |||||
B A C K U P R E C : D V | O F F | |||||
L O N G P A U S E T I M E | 3 0 S E C | |||||
R E C L O N G P . T I M E | 5 M I N | |||||
L O N G P A U S E M O D E | S T B Y - O F F | |||||
“ , ” K E Y F U N C . | V A R / R E C V | |||||
R E P E A T M O D E | O F F | |||||
N E X T | P A G E |
|
|
|
| |
P A G E | B A C K |
|
|
| ||
|
|
|
|
|
| |
|
|
|
|
|
| |
|
|
|
|
|
|
|
|
|
|
|
|
|
|
| – – – S Y S T E M [ 1 / 2 ] – – – |
| ||||
S T L / F . A D V : D V | 2 N D |
| ||||
B A C K U P R E C : D V | O F F |
| ||||
L O N G P A U S E T I M E | 3 0 S E C |
| ||||
R E C L O N G P . T I M E | 5 M I N |
| ||||
L O N G P A U S E M O D E | S T B Y - O F F |
| ||||
“ , ” K E Y F U N C . | V A R / R E C V |
| ||||
R E P E A T M O D E | O F F |
| ||||
N E X T | P A G E |
|
| |||
P A G E | B A C K |
|
|
| ||
|
|
| ||||
|
|
|
|
|
|
|
Perform the menu settings while viewing the display on the moni- tor.
The counter display shows menu code numbers.
Set BR-HD50 to the STOP or STILL mode.
1.Displaying the TOP MENU screen. Press the MENU button.
2.Displaying the Menu screen items for setting.
1Press the R or P button to bring the cursor to the Menu screen item for setting.
2Press SET or the S button.
Select EXIT of the TOP Menu screen to return to the normal screen.
3.Setting the Menu item for setting.
1Press the R or P button to bring the cursor to the Menu screen item for setting.
2Press SET or the S button.
J The selected setting value blinks and becomes available for changing.
3Press the R or P button to change the value.
4Press the SET button to confirm the change.
J Blinking stops and the new value is confirmed.
5Repeat steps 1 - 4 and continue setting as necessary.
TOP Menu screen
– – – M E N U – – –
![]() S Y S T E M . . R E M O T E . . A U D I O . .
S Y S T E M . . R E M O T E . . A U D I O . .
V I D E O . .
T C / U B / C L O C K . .
D I S P L A Y S E T . . E X I T
Cursor | Menu Items |
Cursor | Item | Setting value | ||||
|
|
|
|
| ||
|
|
|
|
|
|
|
|
| – – – | S Y S T E M [ 1 / 2 ] – | – – | ||
| S T L / F . A D V : D V |
| 2 N D | |||
| B A C K U P R E C : D V | O F F | ||||
| L O N G P A U S E T I M E | 3 0 S E C | ||||
| R E C L O N G P . T I M E | 5 M I N | ||||
| L O N G P A U S E M O D E | S T B Y - O F F | ||||
| “ , ” K E Y F U N C . | V A R / R E C V | ||||
| R E P E A T M O D E |
| O F F | |||
| N E X T | P A G E |
|
|
| |
| P A G E | B A C K |
|
|
| |
|
|
|
|
|
|
|
The counter display shows menu code numbers when setting menus.
|
| 01 05 00 |
|
| |||||
|
|
|
|
|
|
|
|
| Setting value |
|
|
|
|
|
|
|
|
| |
|
|
|
|
|
|
|
|
| |
|
|
|
|
|
| Items | |||
|
|
|
|
|
| ||||
|
| Menu |
| screen | |||||
|
|
| |||||||
|
| (Example) 01: SYSTEM Menu screen | |||||||
• | Menu display : Flashes when the TOP MENU screen is dis- | ||||||||
|
| played. | |||||||
• | Items | : Flashes when each menu screen is displayed. | |||||||
|
| (No settings are selected yet.) | |||||||
• | Setting | : Flashes when a menu item is selected and the | |||||||
|
| setting on the monitor display is flashing. | |||||||