TIME CODE
Playing back the time code
| COUNTER switch |
1. Select the time code data to display. | Monitor (Status display) |
EDIT
Using a non-linear editing system
Tape contents of
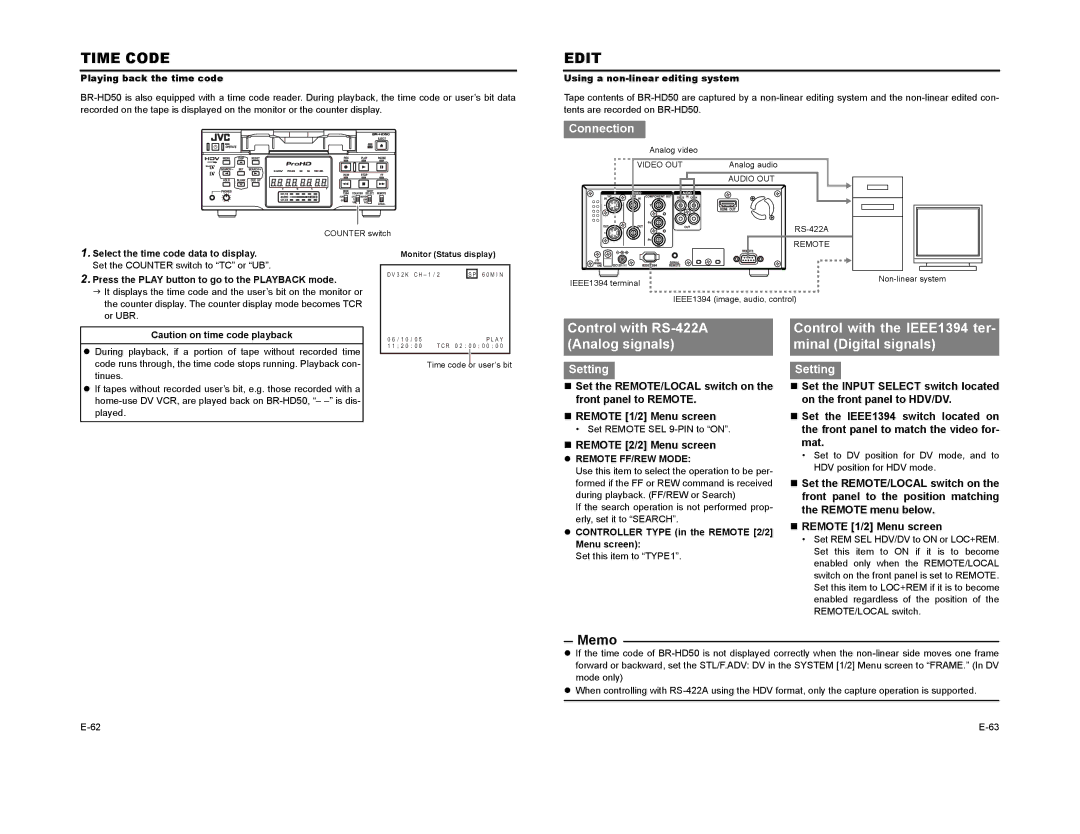
Connection |
|
Analog video |
|
VIDEO OUT | Analog audio |
| AUDIO OUT |
| |
| REMOTE |
Set the COUNTER switch to “TC” or “UB”.
2.Press the PLAY button to go to the PLAYBACK mode.
J It displays the time code and the user’s bit on the monitor or the counter display. The counter display mode becomes TCR or UBR.
D V 3 2 K C H – 1 / 2 | S P | 6 0 M I N | ||
|
|
|
|
|
| W A R N I N G 7 0 0 1 |
| ||
| D R UM MO T O R F A I L U R E |
| ||
| R E C I N H I B I T |
|
|
|
|
|
|
|
|
IEEE1394 terminal | |
| |
| IEEE1394 (image, audio, control) |
Caution on time code playback
zDuring playback, if a portion of tape without recorded time code runs through, the time code stops running. Playback con- tinues.
zIf tapes without recorded user’s bit, e.g. those recorded with a
0 6 / 1 0 / 0 5 | P L A Y |
1 1 : 2 0 : 0 0 | T C R 0 2 : 0 0 : 0 0 : 0 0 |
Time code or user’s bit
Control with RS-422A (Analog signals)
Setting
Set the REMOTE/LOCAL switch on the front panel to REMOTE.
REMOTE [1/2] Menu screen
• Set REMOTE SEL
REMOTE [2/2] Menu screen
zREMOTE FF/REW MODE:
Use this item to select the operation to be per- formed if the FF or REW command is received during playback. (FF/REW or Search)
If the search operation is not performed prop- erly, set it to “SEARCH”.
zCONTROLLER TYPE (in the REMOTE [2/2] Menu screen):
Set this item to “TYPE1”.
Control with the IEEE1394 ter- minal (Digital signals)
Setting
Set the INPUT SELECT switch located on the front panel to HDV/DV.
Set the IEEE1394 switch located on the front panel to match the video for- mat.
•Set to DV position for DV mode, and to HDV position for HDV mode.
Set the REMOTE/LOCAL switch on the front panel to the position matching the REMOTE menu below.
REMOTE [1/2] Menu screen
•Set REM SEL HDV/DV to ON or LOC+REM. Set this item to ON if it is to become enabled only when the REMOTE/LOCAL switch on the front panel is set to REMOTE. Set this item to LOC+REM if it is to become enabled regardless of the position of the REMOTE/LOCAL switch.
Memo
zIf the time code of
zWhen controlling with