MENU SCREENS
Description of the Menu screens (continued)
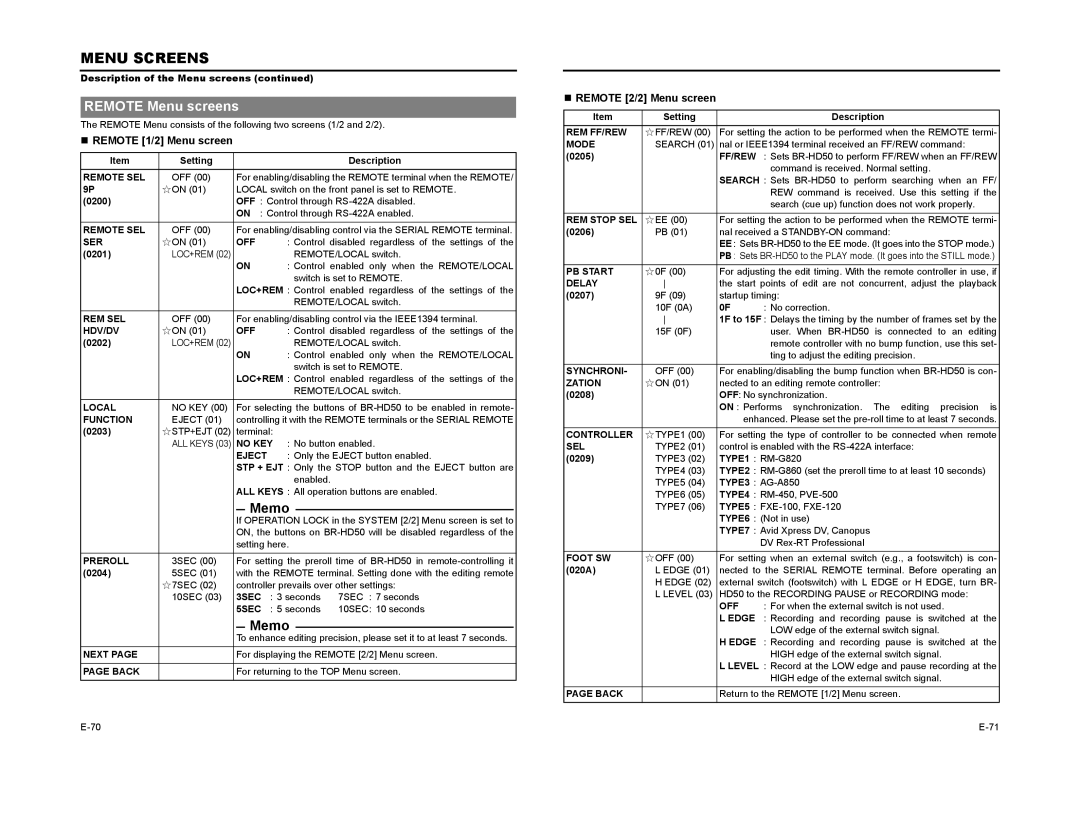
REMOTE Menu screens
The REMOTE Menu consists of the following two screens (1/2 and 2/2).
REMOTE [1/2] Menu screen
Item | Setting |
|
|
|
|
| Description | |
REMOTE SEL | OFF (00) |
| For enabling/disabling the REMOTE terminal when the REMOTE/ | |||||
9P | EON (01) |
| LOCAL switch on the front panel is set to REMOTE. | |||||
(0200) |
|
| OFF : Control through | |||||
|
|
| ON : Control through | |||||
REMOTE SEL | OFF (00) |
| For enabling/disabling control via the SERIAL REMOTE terminal. | |||||
SER | EON (01) |
| OFF | : Control disabled regardless of the settings of the | ||||
(0201) | LOC+REM (02) |
|
|
| REMOTE/LOCAL switch. | |||
|
|
| ON | : Control enabled only when the REMOTE/LOCAL | ||||
|
|
|
|
| switch is set to REMOTE. | |||
|
|
| LOC+REM : Control | enabled regardless of the settings of the | ||||
|
|
|
|
| REMOTE/LOCAL switch. | |||
|
|
|
| |||||
REM SEL | OFF (00) |
| For enabling/disabling control via the IEEE1394 terminal. | |||||
HDV/DV | EON (01) |
| OFF | : Control disabled regardless of the settings of the | ||||
(0202) | LOC+REM (02) |
|
|
| REMOTE/LOCAL switch. | |||
|
|
| ON | : Control enabled only when the REMOTE/LOCAL | ||||
|
|
|
|
| switch is set to REMOTE. | |||
|
|
| LOC+REM : Control | enabled regardless of the settings of the | ||||
|
|
|
|
| REMOTE/LOCAL switch. | |||
|
|
|
| |||||
LOCAL | NO KEY (00) |
| For selecting the buttons of | |||||
FUNCTION | EJECT (01) |
| controlling it with the REMOTE terminals or the SERIAL REMOTE | |||||
(0203) | ESTP+EJT (02) |
| terminal: |
|
| |||
| ALL KEYS (03) |
| NO KEY : No button enabled. | |||||
|
|
| EJECT | : Only the EJECT button enabled. | ||||
|
|
| STP + EJT : Only the STOP button and the EJECT button are | |||||
|
|
|
|
| enabled. | |||
|
|
| ALL KEYS : All operation buttons are enabled. | |||||
|
|
|
|
|
|
|
| |
|
|
|
| Memo |
|
|
| |
|
|
| If | LOCK in the SYSTEM [2/2] Menu screen is set to | ||||
|
|
| OPERATION | |||||
|
|
| ON, the buttons on | |||||
|
|
| setting here. |
|
| |||
|
|
|
| |||||
PREROLL | 3SEC (00) |
| For setting the preroll time of | |||||
(0204) | 5SEC (01) |
| with the REMOTE terminal. Setting done with the editing remote | |||||
| E7SEC (02) |
| controller prevails over other settings: | |||||
| 10SEC (03) |
| 3SEC | : 3 seconds | 7SEC : 7 seconds | |||
|
|
| 5SEC | : 5 seconds | 10SEC: 10 seconds | |||
|
|
|
|
|
|
|
| |
|
|
|
| Memo |
|
|
| |
|
|
| To | editing precision, please set it to at least 7 seconds. | ||||
|
|
| enhance | |||||
NEXT PAGE |
|
| For displaying the REMOTE [2/2] Menu screen. | |||||
|
|
|
| |||||
PAGE BACK |
|
| For returning to the TOP Menu screen. | |||||
REMOTE [2/2] Menu screen
Item | Setting |
| Description |
REM FF/REW | EFF/REW (00) | For setting the action to be performed when the REMOTE termi- | |
MODE | SEARCH (01) | nal or IEEE1394 terminal received an FF/REW command: | |
(0205) |
| FF/REW : Sets | |
|
|
| command is received. Normal setting. |
|
| SEARCH : Sets | |
|
|
| REW command is received. Use this setting if the |
|
|
| search (cue up) function does not work properly. |
|
|
| |
REM STOP SEL | EEE (00) | For setting the action to be performed when the REMOTE termi- | |
(0206) | PB (01) | nal received a | |
|
| EE: Sets | |
|
| PB : Sets | |
PB START | E0F (00) | For adjusting the edit timing. With the remote controller in use, if | |
DELAY | the start points of edit are not concurrent, adjust the playback | ||
(0207) | 9F (09) | startup timing: | |
| 10F (0A) | 0F | : No correction. |
| 1F to 15F : Delays the timing by the number of frames set by the | ||
| 15F (0F) |
| user. When |
|
|
| remote controller with no bump function, use this set- |
|
|
| ting to adjust the editing precision. |
|
|
| |
SYNCHRONI- | OFF (00) | For enabling/disabling the bump function when | |
ZATION | EON (01) | nected to an editing remote controller: | |
(0208) |
| OFF: No synchronization. | |
|
| ON : Performs synchronization. The editing precision is | |
|
|
| enhanced. Please set the |
CONTROLLER | ETYPE1 (00) | For setting the type of controller to be connected when remote | |
SEL | TYPE2 (01) | control is enabled with the | |
(0209) | TYPE3 (02) | TYPE1 : | |
| TYPE4 (03) | TYPE2 : | |
| TYPE5 (04) | TYPE3 : | |
| TYPE6 (05) | TYPE4 : | |
| TYPE7 (06) | TYPE5 : | |
|
| TYPE6 : (Not in use) | |
|
| TYPE7 : Avid Xpress DV, Canopus | |
|
|
| DV |
|
|
| |
FOOT SW | EOFF (00) | For setting when an external switch (e.g., a footswitch) is con- | |
(020A) | L EDGE (01) | nected to the SERIAL REMOTE terminal. Before operating an | |
| H EDGE (02) | external switch (footswitch) with L EDGE or H EDGE, turn BR- | |
| L LEVEL (03) | HD50 to the RECORDING PAUSE or RECORDING mode: | |
|
| OFF | : For when the external switch is not used. |
|
| L EDGE : Recording and recording pause is switched at the | |
|
|
| LOW edge of the external switch signal. |
|
| H EDGE : Recording and recording pause is switched at the | |
|
|
| HIGH edge of the external switch signal. |
|
| L LEVEL : Record at the LOW edge and pause recording at the | |
|
|
| HIGH edge of the external switch signal. |
|
|
| |
PAGE BACK |
| Return to the REMOTE [1/2] Menu screen. | |
|
|
|
|