Recording

Continued

IMPORTANT:

It may be unlawful to record or playback copyrighted material without the consent of the copyright owner.

The recording level is automatically set correctly, so it is not affected by the VOLUME, the SUBWOOFER LEVEL, the SOUND MODE, and the DSP Surround controls. Thus, during recording you can adjust the sound you are actually listening to without affecting the recording level.

If recordings you have made have excessive noise or static, the unit may be too close to a TV. Increase the distance between the TV and the unit.

You can use type I tape for recording.

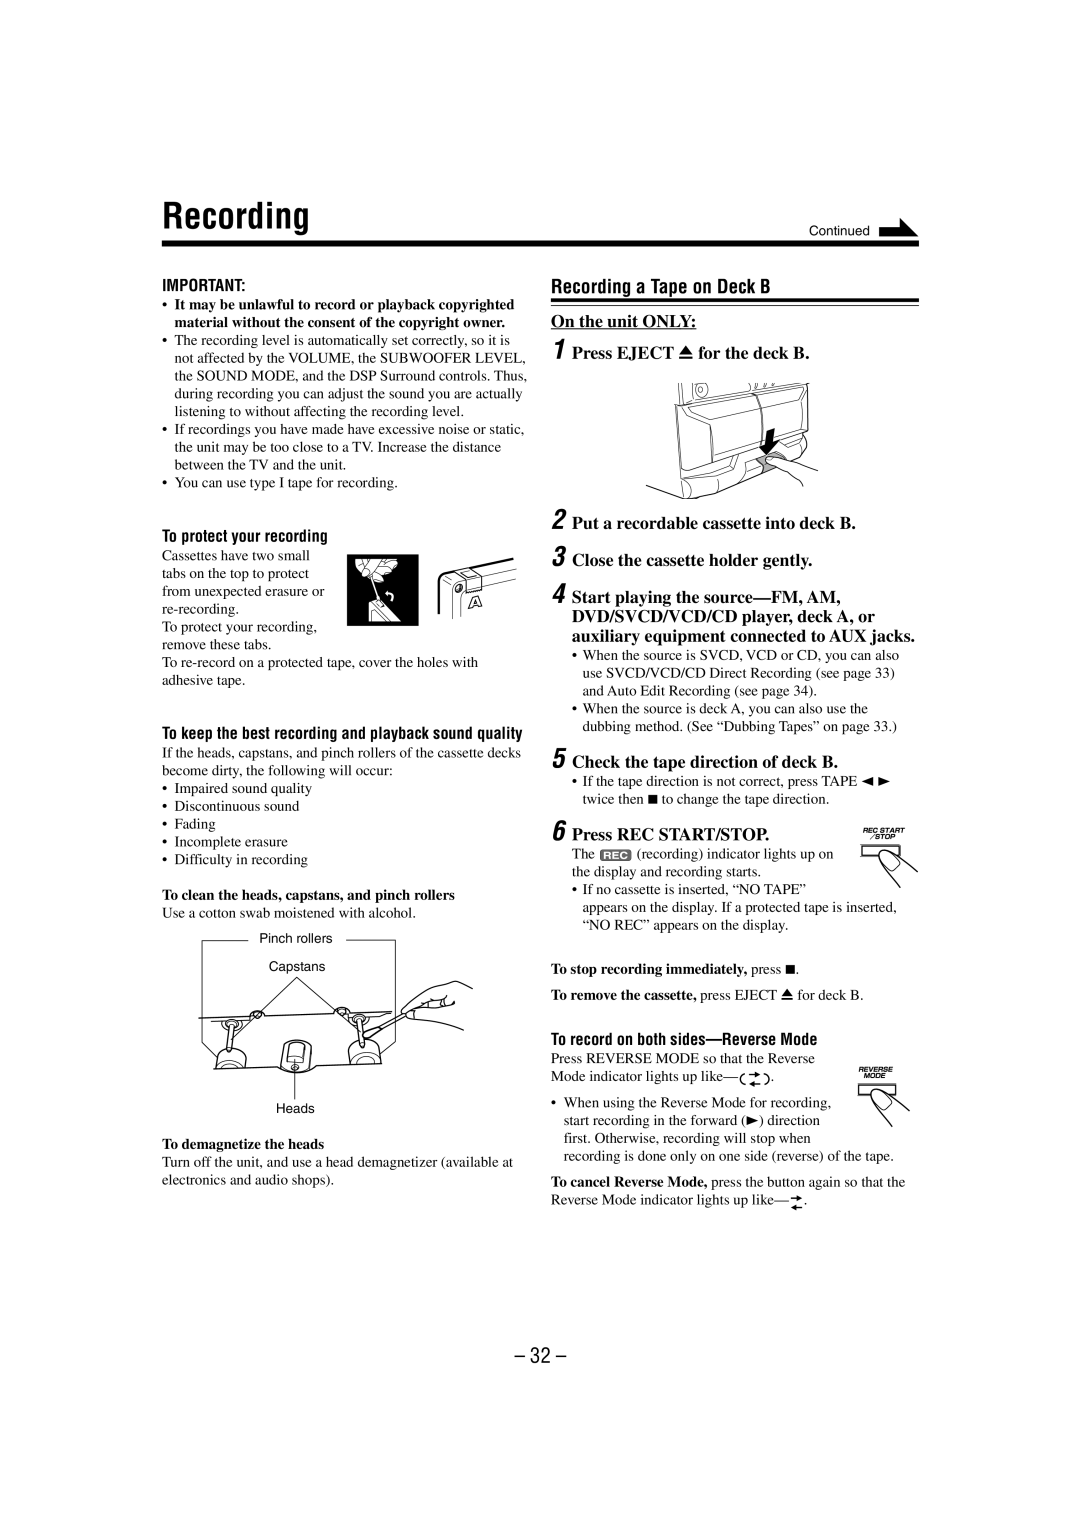
Recording a Tape on Deck B

On the unit ONLY:

1 Press EJECT 0 for the deck B.

To protect your recording

Cassettes have two small

tabs on the top to protect

from unexpected erasure or re-recording.

To protect your recording, remove these tabs.

To re-record on a protected tape, cover the holes with adhesive tape.

To keep the best recording and playback sound quality

If the heads, capstans, and pinch rollers of the cassette decks become dirty, the following will occur:

Impaired sound quality

Discontinuous sound

Fading

Incomplete erasure

Difficulty in recording

To clean the heads, capstans, and pinch rollers

Use a cotton swab moistened with alcohol.

Pinch rollers

Capstans

2 Put a recordable cassette into deck B.

3 Close the cassette holder gently.

4 Start playing the source—FM, AM, DVD/SVCD/VCD/CD player, deck A, or auxiliary equipment connected to AUX jacks.

When the source is SVCD, VCD or CD, you can also use SVCD/VCD/CD Direct Recording (see page 33) and Auto Edit Recording (see page 34).

When the source is deck A, you can also use the dubbing method. (See “Dubbing Tapes” on page 33.)

5 Check the tape direction of deck B.

If the tape direction is not correct, press TAPE 2 3 twice then 7 to change the tape direction.

6 Press REC START/STOP.

The (recording) indicator lights up on the display and recording starts.

If no cassette is inserted, “NO TAPE”

appears on the display. If a protected tape is inserted, “NO REC” appears on the display.

To stop recording immediately, press 7.

To remove the cassette, press EJECT 0 for deck B.

Heads

To demagnetize the heads

Turn off the unit, and use a head demagnetizer (available at electronics and audio shops).

To record on both sides—Reverse Mode

Press REVERSE MODE so that the Reverse

Mode indicator lights up like—.

• When using the Reverse Mode for recording, start recording in the forward (3) direction

first. Otherwise, recording will stop when

recording is done only on one side (reverse) of the tape.

To cancel Reverse Mode, press the button again so that the Reverse Mode indicator lights up like—.

– 32 –

Page 35
Image 35
JVC CA-MXDVA9 manual Recording a Tape on Deck B, On the unit only Press Eject 0 for the deck B, Press REC START/STOP

CA-MXDVA9 specifications

The JVC CA-MXDVA9 and CA-MXDVB10 are compact audio systems that offer an impressive combination of features and technologies designed for music enthusiasts and casual listeners alike. These systems are notable for their sleek design and user-friendly interfaces, making them an excellent addition to any home or office environment.

One of the standout features of the JVC CA-MXDVA9 and CA-MXDVB10 is their multi-format playback capabilities. Both systems support a range of audio formats, including CD, MP3, and WMA, providing flexibility for users to enjoy their favorite music from various sources. Additionally, the systems come equipped with USB ports that allow for direct playback from USB flash drives, enhancing convenience and accessibility.

The CA-MXDVA9 and CA-MXDVB10 also boast advanced sound technologies. The systems utilize JVC’s proprietary digital sound enhancement technology, which elevates audio quality by processing sound in real-time to deliver clearer highs and deeper lows. This ensures that users experience rich, immersive sound whether they're listening to music, watching movies, or playing video games.

Connectivity is another strong point for these audio systems. Both models feature built-in Bluetooth technology, enabling users to stream music wirelessly from their smartphones, tablets, or laptops. This wireless capability ensures an effortless listening experience without the hassle of cables. Additionally, the auxiliary input allows for connecting various devices, making it versatile for different media players.

The design of the JVC CA-MXDVA9 and CA-MXDVB10 is sleek and modern, making them aesthetically pleasing while also being functional. They are compact in size, making them easy to fit into any space without compromising on sound quality. The front-panel display is intuitive, allowing users to navigate through their music library with ease.

Moreover, the systems come with a built-in FM/AM tuner, providing access to local radio stations. The ability to preset favorite stations ensures that users can quickly access their preferred channels.

In conclusion, the JVC CA-MXDVA9 and CA-MXDVB10 are dynamic compact audio systems that cater to a wide array of audio needs. With their multi-format playback, advanced sound processing technologies, and Bluetooth connectivity, they represent an excellent choice for those looking to enhance their audio experience. Their stylish design and practical features make them a valuable addition to any audio setup.