EN 65
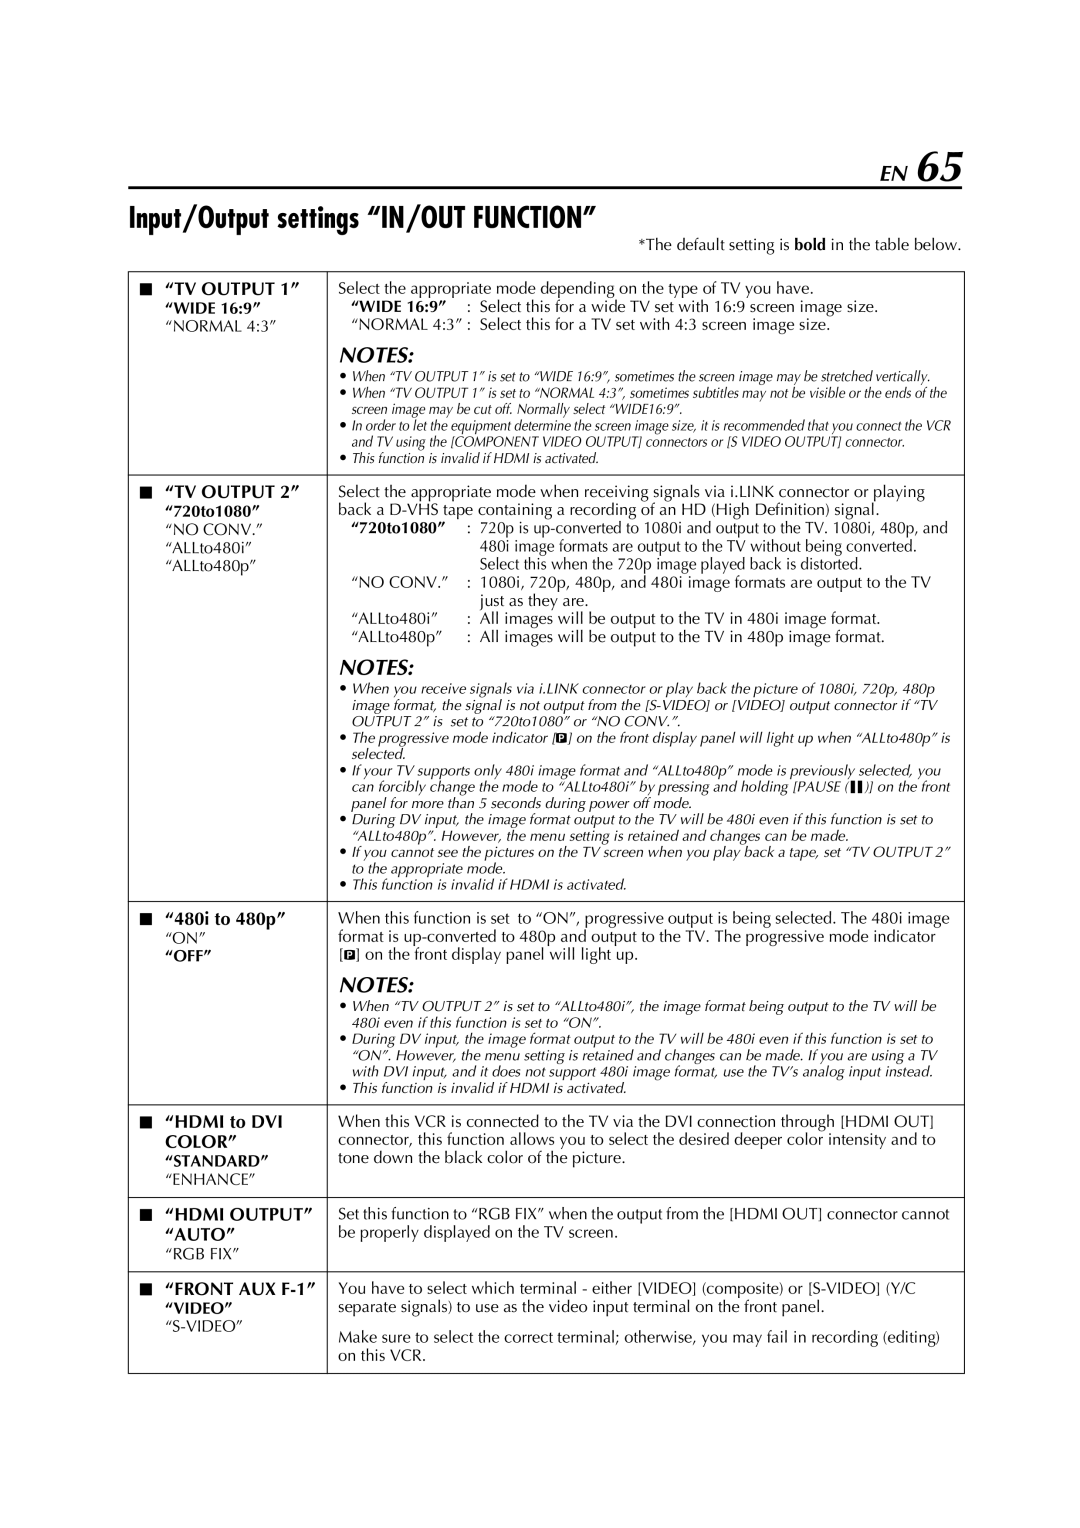
Input/Output settings “IN/OUT FUNCTION”
|
| *The default setting is bold in the table below. |
|
| |
L “TV OUTPUT 1” | Select the appropriate mode depending on the type of TV you have. | |
“WIDE 16:9” | “WIDE 16:9” | : Select this for a wide TV set with 16:9 screen image size. |
“NORMAL 4:3” | “NORMAL 4:3” : Select this for a TV set with 4:3 screen image size. | |
| NOTES: |
|
| • When “TV OUTPUT 1” is set to “WIDE 16:9”, sometimes the screen image may be stretched vertically. | |
| • When “TV OUTPUT 1” is set to “NORMAL 4:3”, sometimes subtitles may not be visible or the ends of the | |
| screen image may be cut off. Normally select “WIDE16:9”. | |
| • In order to let the equipment determine the screen image size, it is recommended that you connect the VCR | |
| and TV using the [COMPONENT VIDEO OUTPUT] connectors or [S VIDEO OUTPUT] connector. | |
| • This function is invalid if HDMI is activated. | |
|
| |
L “TV OUTPUT 2” | Select the appropriate mode when receiving signals via i.LINK connector or playing | |
“720to1080” | back a | |
“NO CONV.” | “720to1080” | : 720p is |
“ALLto480i” |
| 480i image formats are output to the TV without being converted. |
“ALLto480p” |
| Select this when the 720p image played back is distorted. |
| “NO CONV.” : 1080i, 720p, 480p, and 480i image formats are output to the TV | |
|
| just as they are. |
| “ALLto480i” | : All images will be output to the TV in 480i image format. |
| “ALLto480p” | : All images will be output to the TV in 480p image format. |
| NOTES: |
|
| • When you receive signals via i.LINK connector or play back the picture of 1080i, 720p, 480p | |
| image format, the signal is not output from the | |
| OUTPUT 2” is set to “720to1080” or “NO CONV.”. | |
| • The progressive mode indicator [q] on the front display panel will light up when “ALLto480p” is | |
| selected. |
|
| • If your TV supports only 480i image format and “ALLto480p” mode is previously selected, you | |
| can forcibly change the mode to “ALLto480i” by pressing and holding [PAUSE (W)] on the front | |
| panel for more than 5 seconds during power off mode. | |
| • During DV input, the image format output to the TV will be 480i even if this function is set to | |
| “ALLto480p”. However, the menu setting is retained and changes can be made. | |
| • If you cannot see the pictures on the TV screen when you play back a tape, set “TV OUTPUT 2” | |
| to the appropriate mode. | |
| • This function is invalid if HDMI is activated. | |
|
| |
L “480i to 480p” | When this function is set to “ON”, progressive output is being selected. The 480i image | |
“ON” | format is | |
“OFF” | [q] on the front display panel will light up. | |
| NOTES: |
|
| • When “TV OUTPUT 2” is set to “ALLto480i”, the image format being output to the TV will be | |
| 480i even if this function is set to “ON”. | |
| • During DV input, the image format output to the TV will be 480i even if this function is set to | |
| “ON”. However, the menu setting is retained and changes can be made. If you are using a TV | |
| with DVI input, and it does not support 480i image format, use the TV’s analog input instead. | |
| • This function is invalid if HDMI is activated. | |
|
| |
L “HDMI to DVI | When this VCR is connected to the TV via the DVI connection through [HDMI OUT] | |
COLOR” | connector, this function allows you to select the desired deeper color intensity and to | |
“STANDARD” | tone down the black color of the picture. | |
“ENHANCE” |
|
|
|
| |
L “HDMI OUTPUT” | Set this function to “RGB FIX” when the output from the [HDMI OUT] connector cannot | |
“AUTO” | be properly displayed on the TV screen. | |
“RGB FIX” |
|
|
|
| |
L “FRONT AUX | You have to select which terminal - either [VIDEO] (composite) or | |
“VIDEO” | separate signals) to use as the video input terminal on the front panel. | |
| Make sure to select the correct terminal; otherwise, you may fail in recording (editing) | |
| ||
| on this VCR. |
|
|
|
|
