32 Setting Up the Camera Using RM-P2580 (continued)
EN

 MANUAL PAN LIMIT Setup
MENU button |
|
|
|
|
|
|
| ||
| SET button |
|
|
|
| PAN lever | |||
|
| CAMERA button |
| ||||||
|
|
|
|
|
| ||||
|
|
|
|
|
| REMOTE CONTROL UNIT | |||
SETUP | CAMERA |
|
| POSITION |
|
|
|
| |
POWER |
|
|
|
|
|
|
| ||
MENU | SET | ALARM |
|
|
| AUTO | |||
|
| KEY LOCK |
|
|
|
|
|
|
|
| LENS |
| CAMERA/POSITION |
|
| PAN/TILT |
| ||
| SPEED | 1 | 2 | 3 | CAMERA | POSI- |
|
|
|
|
|
|
|
|
| TION |
|
|
|
| IRIS |
| 4 | 5 | 6 | 1 | 2 |
CLOSE | OPEN |
|
|
| OPTION | OPTION | |
NEAR | FOCUS | FAR | 7 | 8 | 9 | AUTO | AUTO |
| AF |
| PAN | PATROL | |||
WIDE | ZOOM | TELE | CLEAR | 0 | ENTER |
|
|
|
|
|
| /HOME |
|
|
|
Numeric ENTER
keys button
CAMERA FUNCTION2
FLIP | OFF |
VAR. P / T SPEED | ON |
EASY AF | OFF |
AF FOR IR | OFF |
TILT LIMIT |
|
M. PAN LIMIT.. | ON |
AUTO RETURN.. |
|
<MENU> RETURN <SET> SUB MENU
CAMERA FUNCTION 2 Screen
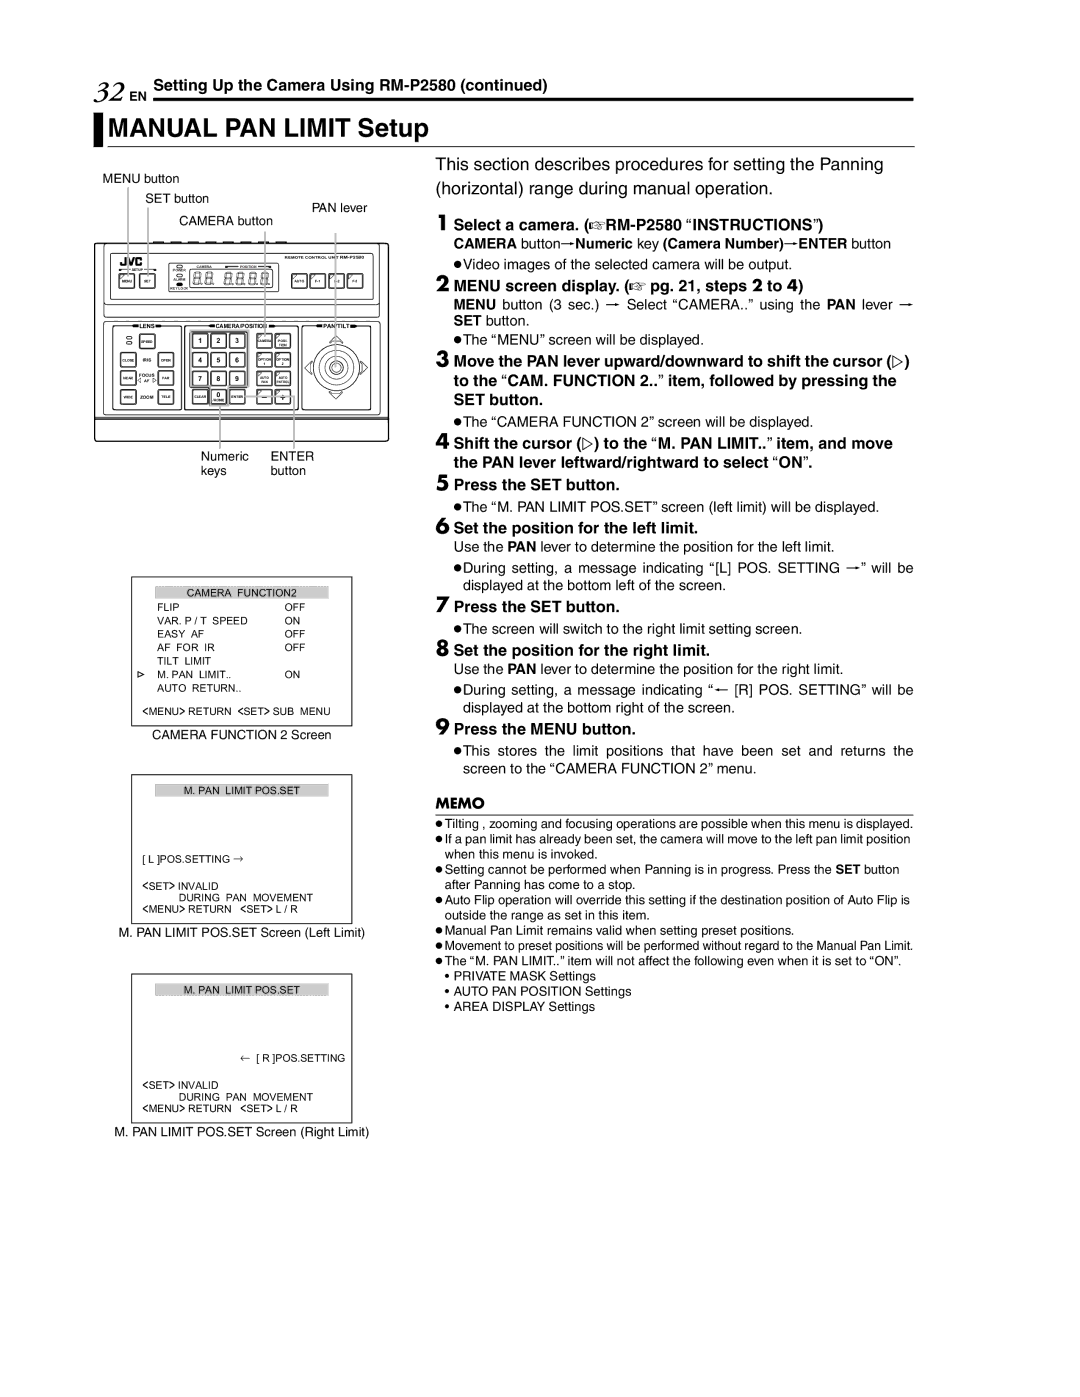
This section describes procedures for setting the Panning (horizontal) range during manual operation.
1Select a camera. (ARM-P2580 AINSTRUCTIONSB)
CAMERA buttonNNumeric key (Camera Number)NENTER button
●Video images of the selected camera will be output.
2 MENU screen display. (A pg. 21, steps 2 to 4)
MENU button (3 sec.) N Select ACAMERA..B using the PAN lever N SET button.
●The AMENUB screen will be displayed.
3 Move the PAN lever upward/downward to shift the cursor (E) to the ACAM. FUNCTION 2..B item, followed by pressing the
SET button.
●The ACAMERA FUNCTION 2B screen will be displayed.
4 Shift the cursor (E) to the AM. PAN LIMIT..B item, and move the PAN lever leftward/rightward to select AONB.
5 Press the SET button.
●The AM. PAN LIMIT POS.SETB screen (left limit) will be displayed.
6 Set the position for the left limit.
Use the PAN lever to determine the position for the left limit.
●During setting, a message indicating A[L] POS. SETTING NB will be displayed at the bottom left of the screen.
7 Press the SET button.
●The screen will switch to the right limit setting screen.
8 Set the position for the right limit.
Use the PAN lever to determine the position for the right limit.
●During setting, a message indicating AO [R] POS. SETTINGB will be displayed at the bottom right of the screen.
9 Press the MENU button.
●This stores the limit positions that have been set and returns the screen to the ACAMERA FUNCTION 2B menu.
M. PAN LIMIT POS.SET
[ L ]POS.SETTING →
<SET> INVALID
DURING PAN MOVEMENT
<MENU> RETURN <SET> L / R
M. PAN LIMIT POS.SET Screen (Left Limit)
M. PAN LIMIT POS.SET
← [ R ]POS.SETTING
<SET> INVALID
DURING PAN MOVEMENT
<MENU> RETURN <SET> L / R
MEMO
●Tilting , zooming and focusing operations are possible when this menu is displayed.
●If a pan limit has already been set, the camera will move to the left pan limit position when this menu is invoked.
●Setting cannot be performed when Panning is in progress. Press the SET button after Panning has come to a stop.
●Auto Flip operation will override this setting if the destination position of Auto Flip is outside the range as set in this item.
●Manual Pan Limit remains valid when setting preset positions.
●Movement to preset positions will be performed without regard to the Manual Pan Limit.
●The AM. PAN LIMIT..B item will not affect the following even when it is set to AONB.
•PRIVATE MASK Settings
•AUTO PAN POSITION Settings
•AREA DISPLAY Settings
M. PAN LIMIT POS.SET Screen (Right Limit)
