Video Cassette Recorder
For Customer Use
Dear Customer
Moisture Condensation
Important Product Safety Instructions
Accessories
Damage Requiring Service
Cleaning
Replacement Parts
Contents
Front View
Index
Rear View
Symbolic Mode Indicators
Front Display Panel
How To Use
Remote
10 EN
ON-SCREEN Display for VHS deck
To recall an indication
Press DISPLAY/OSD
ON-SCREEN Display for DV deck
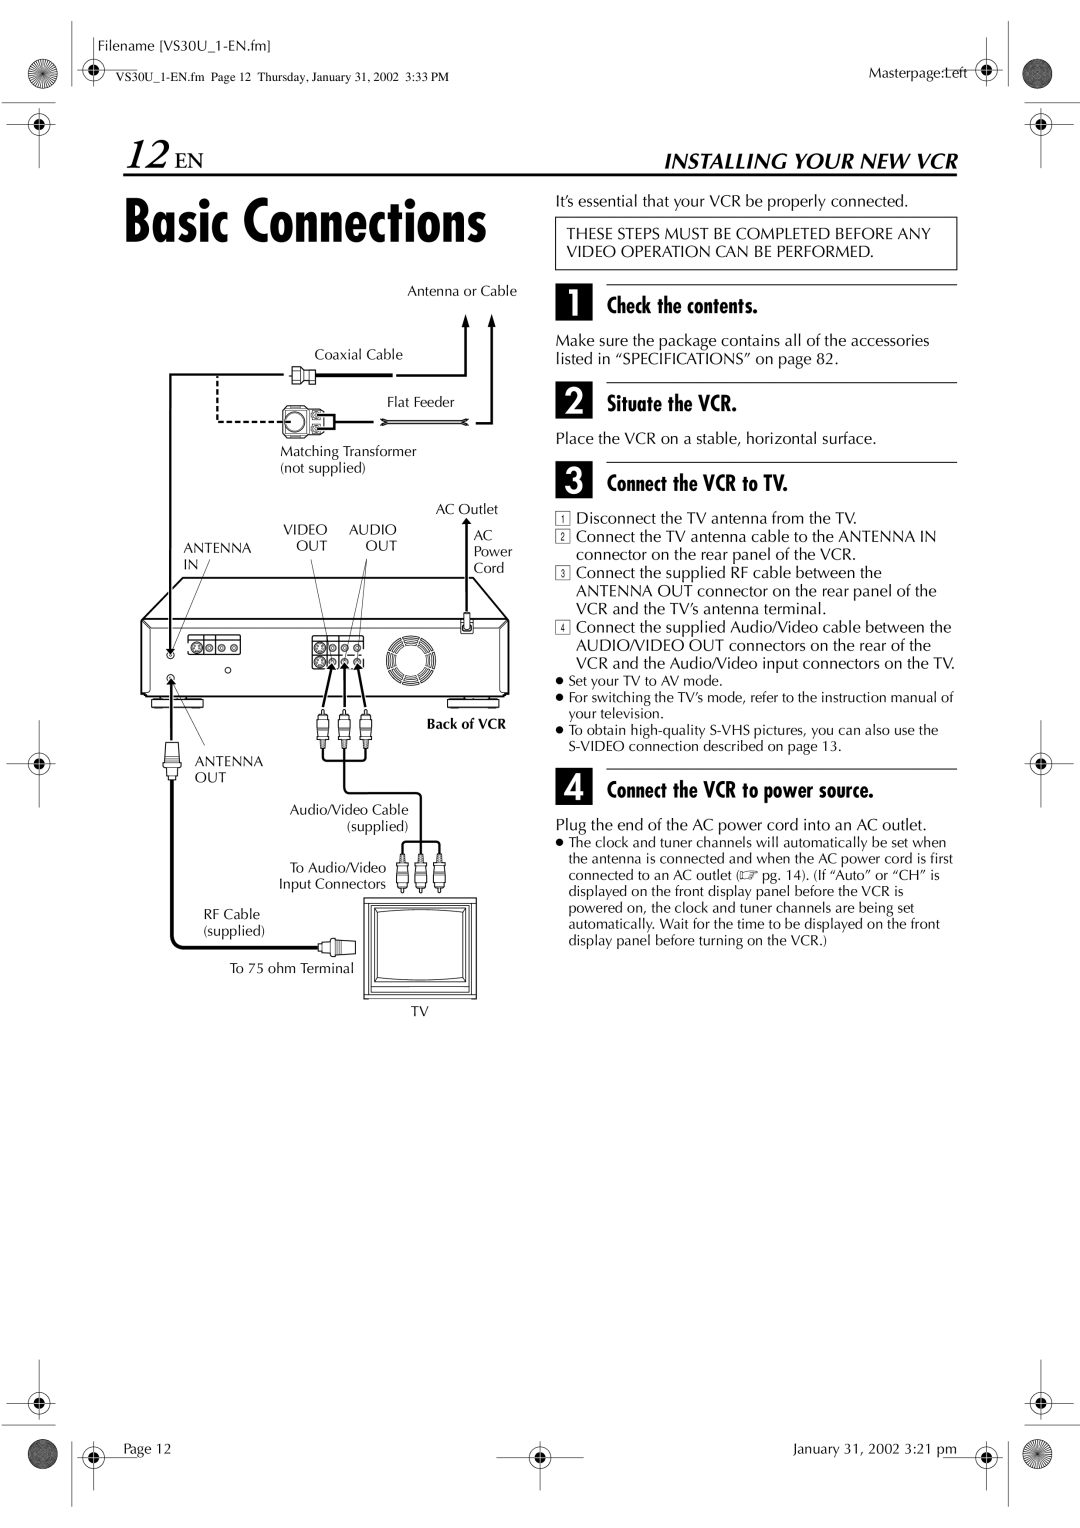
Check the contents
Connect the VCR to power source
12 EN
Situate the VCR
8To connect to a TV with S-VIDEO/AUDIO input connectors
Video Connection
You can obtain high-quality S-VHS pictures
Perform Plug & Play setup
What to do if Plug & Play setting failed
Plug & Play Set
14 EN
Language
Access the Clock Set screen
Clock Set
16 EN
Preparations
Semiauto Clock Set
Manual Clock Set
Access the Tuner Set screen
Tuner Set
18 EN
Auto Channel Set
Access the Manual Channel Set screen
Manual Channel Set
Add or skip the desired channels
To add channels
Installing Controller
20 EN
Setting cable boxs brand and channel
Access the Cable Box Set screen
Access the Main Menu screen on the VCR
Select the cable box’s channel
22 EN
Enter the cable box’s brand
If the cable box’s channel does not change to
If your DBS receiver has audio/video output connectors
How to control the DBS receiver
DBS receiver
Setting DBS receivers brand and channel
Turn on the DBS receiver
Select the DBS receiver’s channel
If you do not use a DBS receiver, press rt until OFF
Controller during timer recording
Scheduled start time of timer recording
Recording
Because it has no remote sensor, you cannot use
Basic Playback
VHS deck
Choose a program
Set the tape speed
Start recording
Pause/Resume recording
28 EN
Still Picture/Frame-By-Frame
Playback On the VCR
Slow Motion On the VCR
Slow Motion On the Remote
Variable Speed Search On the Remote
30 EN
Index Search
Repeat Playback
Next Function Memory
Adjust the tracking manually
Manual Tracking
Soundtrack Selection
Override automatic tracking
Instant Timer Recording ITR
32 EN
VHS deck Record One Program While Watching Another
Reset the counter
Press C.RESET before starting recording or playback
Elapsed Recording Time Indication
Tape Remaining Time
34 EN
Retake
Second Audio Recording
Active Video Calibration
Playback
Recording
DV deck
Select the DV deck
Press DV
DV recording indicator lights on the VCR
38 EN
Picture may appear distorted during variable speed search
VS30U1a-EN.fm Page 39 Thursday, January 31, 2002 335 PM
40 EN
DV deck Record One Program While Watching Another
Time Code
Access the PlusCode No. screen
Access the VCR Plus+ Program screen
Programing
Select the deck
Cable Box or DBS Receiver Users
Guide Channel Number Set
Access the Guide Channel Set screen
44 EN
Guide Channel Number Set
Enter the Guide Channel number
Guide Channel Number
Enter the receiving channel position number
Express Timer
Access the PlusCode screen
Access the Program screen
Enter the program start time
You can program the timer while a regular recording is
Timer Programing
Perform Cable Box Control Setting on page 20 or DBS
Anytime during steps 5 through 10, press Weekly
Enter the program mode
Engage the VCR’s timer mode
24HR Quick Programing
48 EN
VS30U2-EN.fm Page 49 Thursday, January 31, 2002 338 PM
Check, cancel and change programs
To cancel or change a program
50 EN
Select the program to modify
Overlap each other on the VHS deck
START+/- , STOP+/- , DATE+/- , CH+/- , and/or SP/EP
Tape Dubbing
52 EN
Dubbing An Entire Cassette
From DV to VHS
From VHS to DV Dubbing An Entire Cassette
Press DV, then press SP/LP p
54 EN
Locate the start point on the DV deck
Prepare the VHS deck for dubbing
Pause dubbing
From VHS to DV
Locate the start point on the VHS deck
Prepare the DV deck for dubbing
56 EN
Recorder
Player
Set the input mode of recording deck
58 EN
Start the source player
Start the recording deck
Connection to a PC with DV connector
Example When using this VCR as the source player
PC with DV connector
Connection to another VCR
Audio Dubbing
60 EN
VHS Audio Dubbing
DV Audio Dubbing
Engage the Audio Dubbing mode
Make connections Start dubbing
End Audio Dubbing
Press A.DUB
Insert Editing
62 EN
VHS Insert Editing
Source tape Recording tape
Engage the Insert Editing mode
AV Insert Editing VHS deck only
Make connections Start Editing
Prepare the recording cassette
Editing
64 EN
Program Editing Memory
Programs x 8 scenes
Locate the end point
Prepare the source tape
Start Random Assemble Editing
End Random Assemble Editing
Remote A/B Code Switching
66 EN
Change the code for VCR
To control two VCRs with the same Remote
Set the TV brand code
Operate the TV
Before performing the following steps
TV CH +/-,TV VOL+/-, TV Muting, number keys
68 EN
Operate the Cable Box
TV CH +/-,number keys
Press Stop 8, and release POWER. The DBS
Control
Set the DBS receiver brand code
Operate the DBS receiver
Mode Set
Access the Mode Set screen
Select the mode
Select the mode setting
Mode SET
When this function is set to on
VHS Mode SET
72 EN
VHS Mode SET
74 EN
For Example
Correction to the luminance signal to enhance details
Selecting either HI-FI L or HI-FI R
Normally select this. Hi-Fi sound is played back
Sound on the left Hi-Fi channel is played back
DV Mode SET
76 EN
Power
78 EN
Recording
VHS deck
DV deck
Timer Recording
80 EN
Timer Recording
Playback
Recording
82 EN
Cable box Cable Box Control Setting
Changing VCR Plus+ Setting
Express Timer Programming
Timer Warning Display Tuner Set
February 23, 2002 606 pm