6 RECORDING (contd.)
6-2 Program timer recording (contd.)
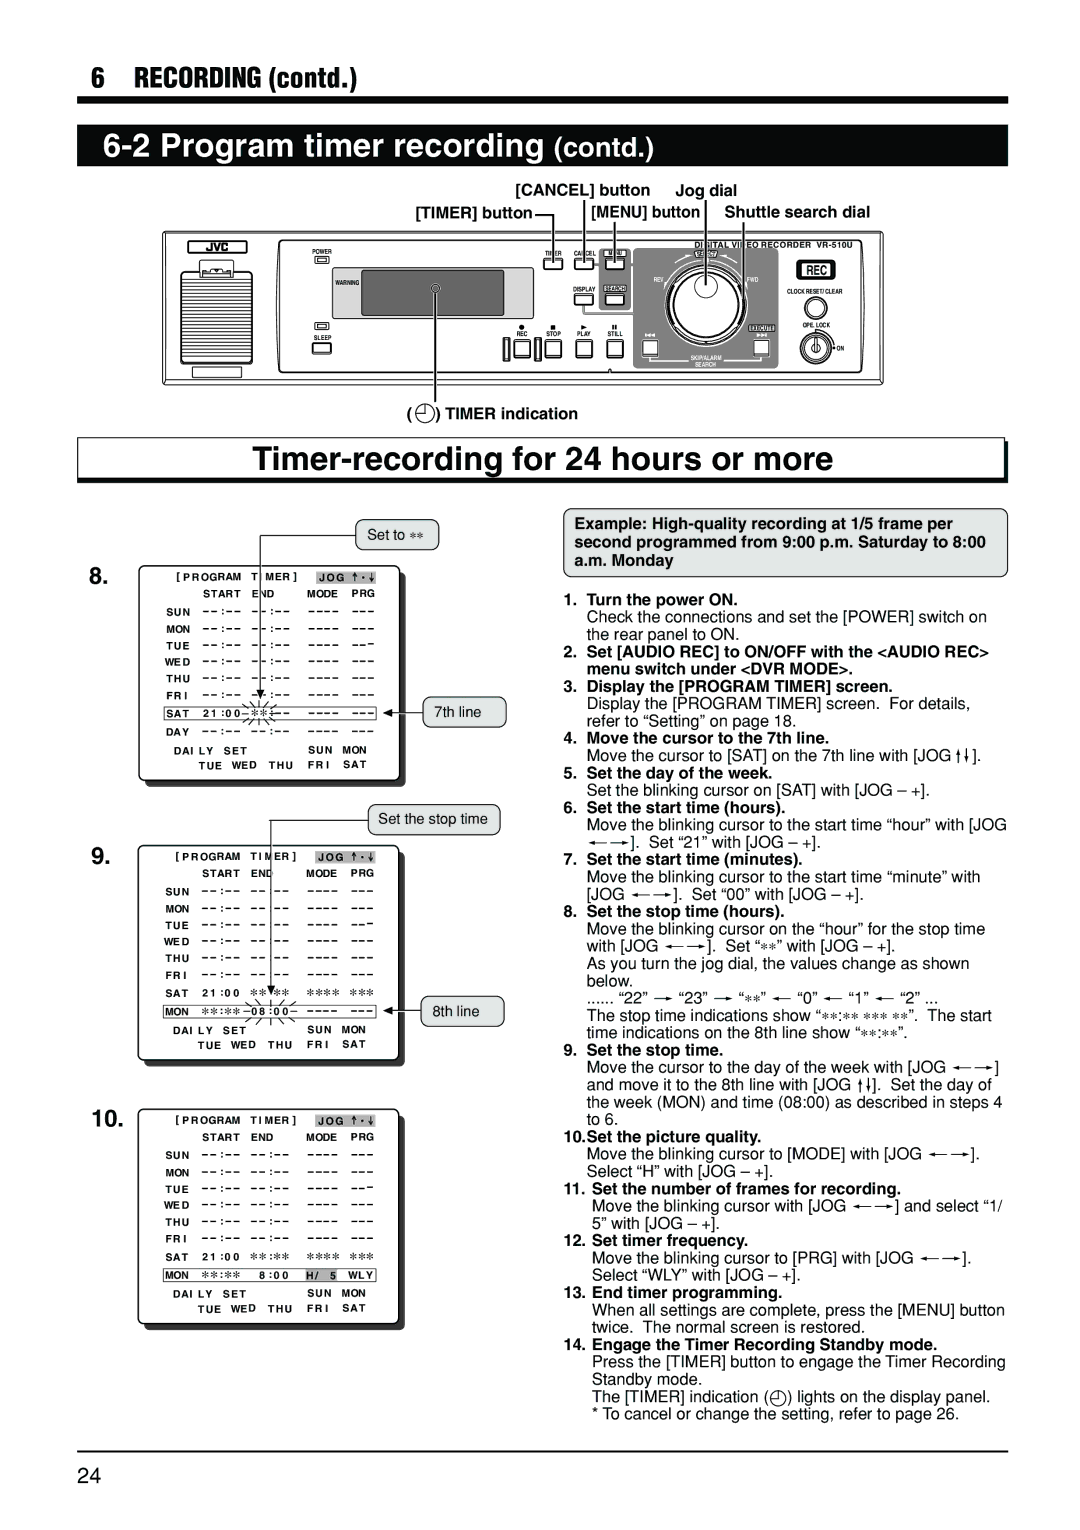
[CANCEL] button Jog dial
[TIMER] button ![]()
[MENU] button Shuttle search dial
DIGITAL VIDEO RECORDER
POWER
TIMER | CANCEL | MENU |
![]() SE
SE
LECT
REC
WARNING | REV | |
DISPLAY SEARCH | ||
|
FWD
CLOCK RESET/ CLEAR
SLEEP
EXECUTE | OPE. LOCK |
REC STOP PLAY STILL
![]() ON
ON
SKIP/ALARM
SEARCH
(  ) TIMER indication
Timer-recording for 24 hours or more
8. | [ P R OGRAM |
|
|
|
|
|
|
|
|
|
|
|
|
|
|
|
|
|
|
|
|
|
|
| Set to ** | ||||||||||||||||||||
T | I M ER ] |
|
|
|
|
|
|
| |||||||||||||||||||||||||||||||||||||
|
|
|
|
|
| ||||||||||||||||||||||||||||||||||||||||
| J O G | ||||||||||||||||||||||||||||||||||||||||||||
|
|
| ST AR T | END | MODE | PRG | |||||||||||||||||||||||||||||||||||||||
|
|
|
| ||||||||||||||||||||||||||||||||||||||||||
| SU N |
|
|
|
|
|
|
|
| : |
|
|
|
|
|
|
|
|
|
|
|
|
|
|
| : |
|
|
|
|
|
|
|
|
|
|
|
|
|
|
|
|
|
|
|
|
|
|
|
|
|
|
|
|
|
|
|
|
|
|
|
|
|
|
|
|
|
|
|
|
|
|
| ||||||||||||||||||
| MON |
|
|
|
|
|
|
|
| : |
|
|
|
|
|
|
|
|
|
|
|
|
|
|
| : |
|
|
|
|
|
|
|
|
|
|
|
|
|
|
|
|
|
|
|
|
|
|
|
|
|
|
|
|
|
|
|
|
|
|
|
|
|
|
|
|
|
|
|
|
|
|
|
|
|
|
|
|
| ||||||||||||
| T U E |
|
|
|
|
|
|
|
| : |
|
|
|
|
|
|
|
|
|
|
|
|
|
|
| : |
|
|
|
|
|
|
|
|
|
|
|
|
|
|
|
|
|
|
|
|
|
|
|
|
|
|
|
|
|
|
|
|
|
|
|
|
|
|
|
|
|
|
|
|
|
|
|
|
|
|
|
|
|
|
|
|
|
|
|
| |||||
| WE D |
|
|
|
|
|
|
|
| : |
|
|
|
|
|
|
|
|
|
|
|
|
|
|
| : |
|
|
|
|
|
|
|
|
|
|
|
|
|
|
|
|
|
|
|
|
|
|
|
|
|
|
|
|
|
|
|
|
|
|
|
|
|
|
|
|
|
|
|
|
|
|
|
|
|
|
|
|
| ||||||||||||
| T H U |
|
|
|
|
|
|
|
| : |
|
|
|
|
|
|
|
|
|
|
|
|
|
|
| : |
|
|
|
|
|
|
|
|
|
|
|
|
|
|
|
|
|
|
|
|
|
|
|
|
|
|
|
|
|
|
|
|
|
|
|
|
|
|
|
|
|
|
|
|
|
|
|
|
|
|
|
|
| ||||||||||||
| F R I |
|
|
|
|
|
|
|
| : |
|
|
|
|
|
|
|
|
|
|
|
|
|
| : |
|
|
|
|
|
|
|
|
|
|
|
|
|
|
|
|
|
| 7th line | |
|
|
|
|
|
|
|
|
|
|
|
|
|
|
|
|
|
|
|
|
|
|
|
|
|
|
|
|
|
|
| |||||||||||||||
|
|
|
|
|
|
|
|
|
|
|
|
|
|
|
|
|
|
|
|
|
|
|
| ||||||||||||||||||||||
| SA T | 2 1 :0 0 |
| ** : |
|
|
|
|
|
|
|
|
|
|
|
|
|
|
|
|
|
| |||||||||||||||||||||||
| DA Y |
|
|
|
| : |
|
|
|
|
|
|
|
|
|
|
| : |
|
|
|
|
|
|
|
|
|
|
|
|
|
|
|
|
|
|
| ||||||||
|
|
|
|
|
|
|
|
|
|
|
|
|
|
|
|
|
| SU N | MON | ||||||||||||||||||||||||||
| DAI L Y S E T |
|
|
|
|
|
|
|
|
|
|
|
|
|
|
|
| ||||||||||||||||||||||||||||
|
| T U E WE D T H U F R I SA T | |||||||||||||||||||||||||||||||||||||||||||
Example:
1.Turn the power ON.
Check the connections and set the [POWER] switch on the rear panel to ON.
2.Set [AUDIO REC] to ON/OFF with the <AUDIO REC> menu switch under <DVR MODE>.
3.Display the [PROGRAM TIMER] screen.
Display the [PROGRAM TIMER] screen. For details, refer to “Setting” on page 18.
4.Move the cursor to the 7th line.
Move the cursor to [SAT] on the 7th line with [JOG f ].
5. | Set the day of the week. |
| Set the blinking cursor on [SAT] with [JOG – +]. |
6. | Set the start time (hours). |
9. | [ P R OGRAM | T I M | ER ] |
|
|
|
| ||||||||||||||||||||||||
|
| J O G |
| ||||||||||||||||||||||||||||
|
| ST AR T | END |
|
|
|
|
| MODE | PRG |
| ||||||||||||||||||||
|
|
|
|
| |||||||||||||||||||||||||||
| SU N |
|
|
|
| : |
|
|
|
|
|
|
|
| : |
|
|
|
|
|
|
|
|
|
|
|
|
|
|
| |
|
|
|
|
|
|
|
|
|
|
|
|
|
|
|
|
|
|
|
| ||||||||||||
| MON |
|
|
|
| : |
|
|
|
|
|
|
|
| : |
|
|
|
|
|
|
|
|
|
|
|
|
|
|
| |
|
|
|
|
|
|
|
|
|
|
|
|
|
|
|
|
|
|
|
|
|
|
|
| ||||||||
| T U E |
|
|
|
| : |
|
|
|
|
|
|
|
| : |
|
|
|
|
|
|
|
|
|
|
|
|
|
|
| |
|
|
|
|
|
|
|
|
|
|
|
|
|
|
|
|
|
|
|
|
|
|
|
|
|
|
|
| ||||
| WE D |
|
|
|
| : |
|
|
|
|
|
|
|
| : |
|
|
|
|
|
|
|
|
|
|
|
|
|
|
| |
|
|
|
|
|
|
|
|
|
|
|
|
|
|
|
|
|
|
|
|
|
|
|
| ||||||||
| T H U |
|
|
|
| : |
|
|
|
|
|
|
|
| : |
|
|
|
|
|
|
|
|
|
|
|
|
|
|
| |
|
|
|
|
|
|
|
|
|
|
|
|
|
|
|
|
|
|
|
|
|
|
|
| ||||||||
| F R I |
|
|
|
| : |
|
|
|
|
|
|
|
| : |
|
|
|
|
|
|
|
|
|
|
|
|
|
|
| |
|
|
|
|
|
|
|
|
|
|
|
|
|
|
|
|
|
|
|
|
|
|
|
| ||||||||
| SA T | 2 1 :0 0 |
| ** :** | **** *** |
| |||||||||||||||||||||||||
| MON | ** :** | 0 8 : 0 0 |
|
|
|
|
|
|
|
|
|
|
|
| ||||||||||||||||
| DAI L Y S E T |
|
|
|
|
|
|
|
|
|
|
| SU N | MON |
| ||||||||||||||||
|
| T U E WE D T H U F R I SA T |
| ||||||||||||||||||||||||||||
Set the stop time
8th line
Move the blinking cursor to the start time “hour” with [JOG |
p[]. Set “21” with [JOG – +]. |
7. Set the start time (minutes). |
Move the blinking cursor to the start time “minute” with |
[JOG p[]. Set “00” with [JOG – +]. |
8. Set the stop time (hours). |
Move the blinking cursor on the “hour” for the stop time |
with [JOG p[]. Set “**” with [JOG – +]. |
As you turn the jog dial, the values change as shown |
below. |
...... “22” [ “23” [ “**” p “0” p “1” p “2” ... |
The stop time indications show “**:** *** **”. The start |
time indications on the 8th line show “**:**”. |
9. Set the stop time. |
Move the cursor to the day of the week with [JOG p[] |
and move it to the 8th line with [JOG | f]. Set the day of |
10. | [ P R OGRAM | T I M ER ] |
|
|
|
| ||||||||||||||||||||||||
|
| J O G |
| |||||||||||||||||||||||||||
|
|
| ST AR T | END | MODE | PRG |
| |||||||||||||||||||||||
| SU N |
|
|
|
| : |
|
|
|
|
|
|
|
| : |
|
|
|
|
|
|
|
|
|
|
|
|
|
|
|
|
|
|
|
|
|
|
|
|
|
|
|
|
|
|
|
|
|
|
| |||||||||||
| MON |
|
|
|
| : |
|
|
|
|
|
|
|
| : |
|
|
|
|
|
|
|
|
|
|
|
|
|
|
|
|
|
|
|
|
|
|
|
|
|
|
|
|
|
|
|
|
|
|
|
|
|
|
| |||||||
| T U E |
|
|
|
| : |
|
|
|
|
|
|
|
| : |
|
|
|
|
|
|
|
|
|
|
|
|
|
|
|
|
|
|
|
|
|
|
|
|
|
|
|
|
|
|
|
|
|
|
|
|
|
|
|
|
|
|
| |||
| WE D |
|
|
|
| : |
|
|
|
|
|
|
|
| : |
|
|
|
|
|
|
|
|
|
|
|
|
|
|
|
|
|
|
|
|
|
|
|
|
|
|
|
|
|
|
|
|
|
|
|
|
|
|
| |||||||
| T H U |
|
|
|
| : |
|
|
|
|
|
|
|
| : |
|
|
|
|
|
|
|
|
|
|
|
|
|
|
|
|
|
|
|
|
|
|
|
|
|
|
|
|
|
|
|
|
|
|
|
|
|
|
| |||||||
| F R I |
|
|
|
| : |
|
|
|
|
|
|
|
| : |
|
|
|
|
|
|
|
|
|
|
|
|
|
|
|
|
|
|
|
|
|
|
|
|
|
|
|
|
|
|
|
|
|
|
|
|
|
|
| |||||||
| SA T | 2 1 :0 0 |
| ** :** | **** *** |
| ||||||||||||||||||||||||
| MON | ** :** | 8 : 0 0 |
| H / 5 WL Y |
| ||||||||||||||||||||||||
| DAI L Y S E T |
|
|
|
|
|
|
|
|
| SU N | MON |
| |||||||||||||||||
|
| T U E WE D T H U F R I SA T |
| |||||||||||||||||||||||||||
the week (MON) and time (08:00) as described in steps 4 to 6.
10.Set the picture quality.
Move the blinking cursor to [MODE] with [JOG p[]. Select “H” with [JOG – +].
11.Set the number of frames for recording.
Move the blinking cursor with [JOG p[] and select “1/ 5” with [JOG – +].
12.Set timer frequency.
Move the blinking cursor to [PRG] with [JOG p[]. Select “WLY” with [JOG – +].
13.End timer programming.
When all settings are complete, press the [MENU] button twice. The normal screen is restored.
14.Engage the Timer Recording Standby mode.
Press the [TIMER] button to engage the Timer Recording Standby mode.
The [TIMER] indication (![]() ) lights on the display panel. * To cancel or change the setting, refer to page 26.
) lights on the display panel. * To cancel or change the setting, refer to page 26.
24