5
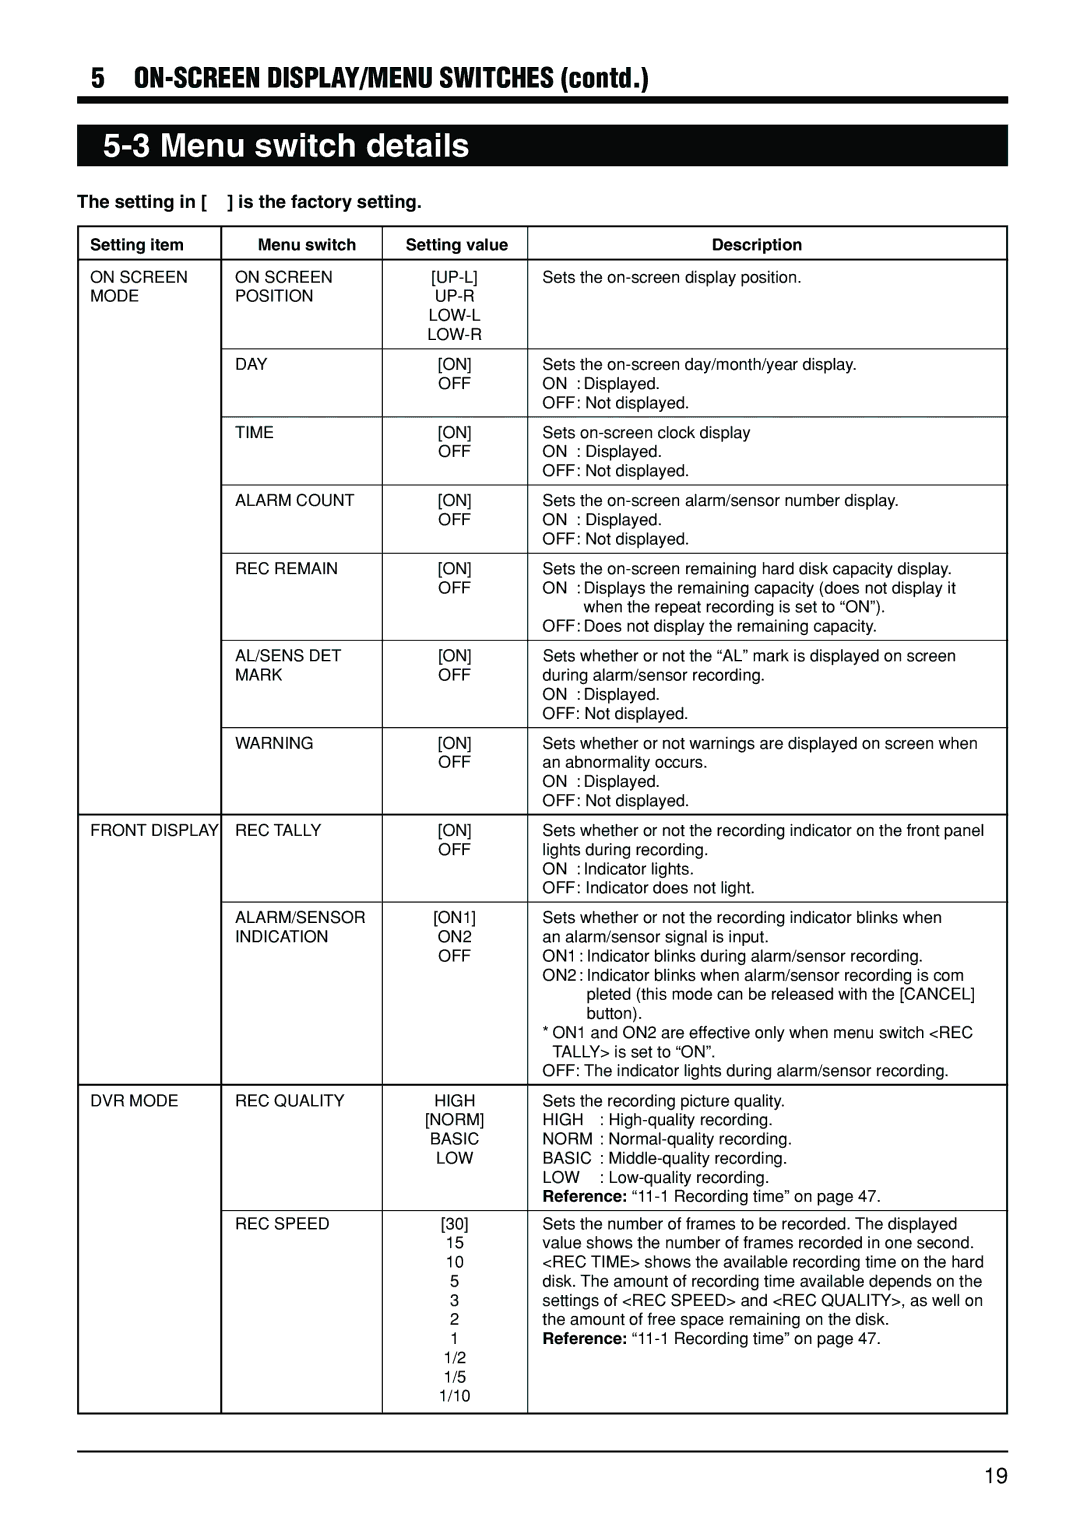
5-3 Menu switch details
The setting in [ ] is the factory setting.
Setting item | Menu switch | Setting value |
| Description |
|
|
|
| |
ON SCREEN | ON SCREEN | Sets the | ||
MODE | POSITION |
|
| |
|
|
|
| |
|
|
|
| |
|
|
|
| |
| DAY | [ON] | Sets the | |
|
| OFF | ON : Displayed. | |
|
|
| OFF: Not displayed. | |
|
|
|
| |
| TIME | [ON] | Sets | |
|
| OFF | ON : Displayed. | |
|
|
| OFF: Not displayed. | |
|
|
|
| |
| ALARM COUNT | [ON] | Sets the | |
|
| OFF | ON : Displayed. | |
|
|
| OFF: Not displayed. | |
|
|
|
| |
| REC REMAIN | [ON] | Sets the | |
|
| OFF | ON : Displays the remaining capacity (does not display it | |
|
|
|
| when the repeat recording is set to “ON”). |
|
|
| OFF: Does not display the remaining capacity. | |
|
|
|
| |
| AL/SENS DET | [ON] | Sets whether or not the “AL” mark is displayed on screen | |
| MARK | OFF | during alarm/sensor recording. | |
|
|
| ON : Displayed. | |
|
|
| OFF: Not displayed. | |
|
|
|
| |
| WARNING | [ON] | Sets whether or not warnings are displayed on screen when | |
|
| OFF | an abnormality occurs. | |
|
|
| ON : Displayed. | |
|
|
| OFF: Not displayed. | |
|
|
|
| |
FRONT DISPLAY | REC TALLY | [ON] | Sets whether or not the recording indicator on the front panel | |
|
| OFF | lights during recording. | |
|
|
| ON : Indicator lights. | |
|
|
| OFF: Indicator does not light. | |
|
|
|
| |
| ALARM/SENSOR | [ON1] | Sets whether or not the recording indicator blinks when | |
| INDICATION | ON2 | an alarm/sensor signal is input. | |
|
| OFF | ON1 : Indicator blinks during alarm/sensor recording. | |
|
|
| ON2 : Indicator blinks when alarm/sensor recording is com | |
|
|
|
| pleted (this mode can be released with the [CANCEL] |
|
|
|
| button). |
|
|
| * ON1 and ON2 are effective only when menu switch <REC | |
|
|
| TALLY> is set to “ON”. | |
|
|
| OFF: The indicator lights during alarm/sensor recording. | |
|
|
|
| |
DVR MODE | REC QUALITY | HIGH | Sets the recording picture quality. | |
|
| [NORM] | HIGH | : |
|
| BASIC | NORM : | |
|
| LOW | BASIC : | |
|
|
| LOW | : |
|
|
| Reference: | |
|
|
|
| |
| REC SPEED | [30] | Sets the number of frames to be recorded. The displayed | |
|
| 15 | value shows the number of frames recorded in one second. | |
|
| 10 | <REC TIME> shows the available recording time on the hard | |
|
| 5 | disk. The amount of recording time available depends on the | |
|
| 3 | settings of <REC SPEED> and <REC QUALITY>, as well on | |
|
| 2 | the amount of free space remaining on the disk. | |
|
| 1 | Reference: | |
|
| 1/2 |
|
|
|
| 1/5 |
|
|
|
| 1/10 |
|
|
|
|
|
|
|
19
