7222 7228 7235
Copyright
Contents
Web Utility
IV Scanner Key Operator Administrators only
III Scanner
Appendix
Configuration of Manuals
About this Manual
Using of this Manual Selecting the Destination
Touch the E-Mail key on the LCD screen
Windows
Summary of Network Functions
Inputting Text
Before Use
Memo
Outline
This chapter summarizes the copier network functions
Network Setting Method
Network/Scanner Function Outline
Connection with the Network
Scanner Functions
Copier
Scan Data Output
Scan to E-Mail
Scan to FTP
Send to a Shared Folder Scan to PC SMB
Before Use
Control Panel Descriptions LCD Screen
Control Panel Descriptions
LCD Screen Operation Methods
Buttons common to all setting screens
LCD Screen
Basic screen
Job List Contents
Job List Screen
Unsuccessful Job List
Changing Job Order
Job Deletion
Unsuccessful Job List Data
Memo
Inputting Text
Normal Input Screen
Inputting Text
Data Input Screen
There are three kinds of Normal Input screen as below
Keyboard Input Screen
There are two kinds of Keyboard screen as below
Inputting Text
II Network Setup Administrators only
Setting from the Control Panel Web Utility
Memo
Setting from the Control Panel
II Network Setup Administrators only
Network Setup List
→ The Help Mode screen is displayed on the LCD screen
Method for Setting Network from Control Panel
→ The Copy basic mode screen is displayed on the LCD screen
Press the Copy button on the control panel
Touch the OK key
Touch the 2.Network key
Select the item to set by touching it
IP Address Settings
→ The display returns to the Network setting screen
→ The TCP/IP Setup screen is displayed
TCP/IP Setup
Touch the 1.TCP/IP Setup key on Network setting screen
Touch OK key
Enable TCP/IP
IP Address
Subnet Mask
Default Gateway
Enable Dhcp
Touch the on or OFF key on the Enable Dhcp Setting
Other DNS Server
Use or to access TCP/IP Setup screen 2/3 from screen 1/3
Preferred DNS Server
Touch the Other DNS server key
RAW Port Number
Allows you to assign a Port Code
DNS Domain Name
TCP/IP Setup Part 3
DNS Host Name
This sets the DNS Host name
NetWare Setup
Touch the 2.NetWare Setup key on Network setting screen
→ The NetWare Setup screen is displayed
NetWare Setup
Print Server Name
Enable NetWare
Ethernet Frame Type
Touch the Edit key on the Ethernet Frame Type screen
Print Server Password
File Server Name
NetWare setup Part 2
This sets the NDS Novell Directory Service Name
NDS Context Name
NDS Tree
This sets the NDS Tree Name
Printer Number
Operating Mode
Using the control panel, enter the Printer Number between 0
Touch the PServer or RPrinter key
Using the control panel, enter the time internal between 1
Disable Bindery
Touch the Detail key on the NetWare Setup screen
Touch the YES or no keys on the Disable Bindery menu
AppleTalk Setup
Touch the 3.AppleTalk Setup key on Network setting screen
→ The AppleTalk Setup screen is displayed
This sets whether or not to enable AppleTalk
Enable AppleTalk
AppleTalk setup
On Enables AppleTalk OFF Disables AppleTalk
Zone Name
This sets the IPP features
IPP Setup
Touch the 4.IPP Setup key on the Network setting screen
→ The IPP Setup screen will be displayed
IPP Setup
Touch either the on or OFF key on the Enable IPP screen
Enable IPP
Access to IPP Setup screen 1/4 from Network setting screen
Accept IPP Job
Message from Operator
Use or to access to IPP Setup screen 2/4 from screen 1/4
Using the control panel, enter a value between 0
Job Size
Operation Support Information
Use or to access to IPP Setup screen 3/4 from screen 2/4
IPP setup Part 3
This sets operation support information
Supported Document Format
Use or to access to IPP Setup screen 4/4 from screen 3/4
Default selection menu
Document Format menu
Printer Related Infomation
Touch Printer Info on the IPP Setup screen
→ The screen will return to IPP Setup screen
→ The Printer Information screen will be displayed
Location
Printer Information
Printer Information Part 1
Printer Model
Printer Driver Installer
More Printer Information
Printer Information Part 2
Printer Manufacturer
Printer Information Part 3
FTP Setup
→ The FTP Setup screen is displayed
Touch either the YES or no key on the Enable Pasv Mode menu
Enable Pasv Mode
Access to FTP Setup screen 1/2 from Network setting screen
Proxy Server
FTP Setup Part 2
Connection Timeout
Use or to access to FTP Setup screen 2/2 from screen 1/2
FTP Client Port Number
Mail Smtp Setup
Touch the 6.E-Mail Smtp Setup key on Network setting screen
→ The E-Mail Smtp Setup screen is displayed
Enable Smtp
Touch either the on or OFF key on the Enable Smtp menu
Smtp Server
To enable binary division
To disable binary division
Binary Division
Using the control panel, enter value between 0 and 100MB
Mail Smtp Setup Part 2
Touch the Edit key on the Connection Timeout menu
Maximum Message Size
→ E-Mail Smtp Setup Detail screen is displayed
Touch the Detail key on E-Mail Smtp Setup screen
Mail Smtp Detail Setup
Smtp Port Number
→ The Screen will return to E-Mail Smtp Setup screen
Enables Smtp confirmation
Disables Smtp confirmation
POP before Smtp
Mail POP Setup
→ E-Mail POP Setup screen will be displayed
Touch either the on or OFF key on the Enable POP screen
Enable POP
Login Name
POP Server
Password
This sets the password used for connecting to the POP server
Polling Interval
Mail POP Setup Part 2
Enables automatic polling
Touch either the YES or no key in the Polling Interval menu
→ E-Mail POP Setup Detail screen is displayed
Touch the Detail key on E-Mail POP Setup screen
Mail POP Detail Setup
POP Port Number
POP Connection Timeout
→ The screen will return to E-Mail POP Setup screen
Mail Extended Config
→ E-Mail Extended Config screen will be displayed
Touch the YES or no keys on the DSN Request menu
DSN Request
This sets the extended E-mail functions
Requests DSN
MDN Response
Response Timeout for MDN/DSN
MDN Request
Touch the YES or no keys on the MDN Request menu
→ Device Setup screen is displayed
Device Setup
Touch the 9.Device Setup key on the Network setting screen
This sets device information
Network Speed
Access to Device Setup screen from Network setting screen
MAC Address
Touch the Edit key on the Network Speed menu
Use or to access Device Setup screen 2/2 from screen 1/2
Parallel Receiving Ieee
Network Receiving
→ The screen will return to the Network setting screen
Touch the 10.List print key on the Network setting screen
This prints out the Network setting list
List Print
Pcsmb Setup
Touch the 11.PCSMB Setup key on the Network Setting screen
Touch either the on or OFF key on the Pcsmb Setup screen
Ldap Setup
Touch the 12.LDAP Setup key on the Network Setting screen
→ The Ldap Setup screen will be displayed
Ldap Setup
Touch either the on or OFF key on the Enable Ldap menu
Enable Ldap
Search Timeout
Maximum Hit Number
Connect Chk
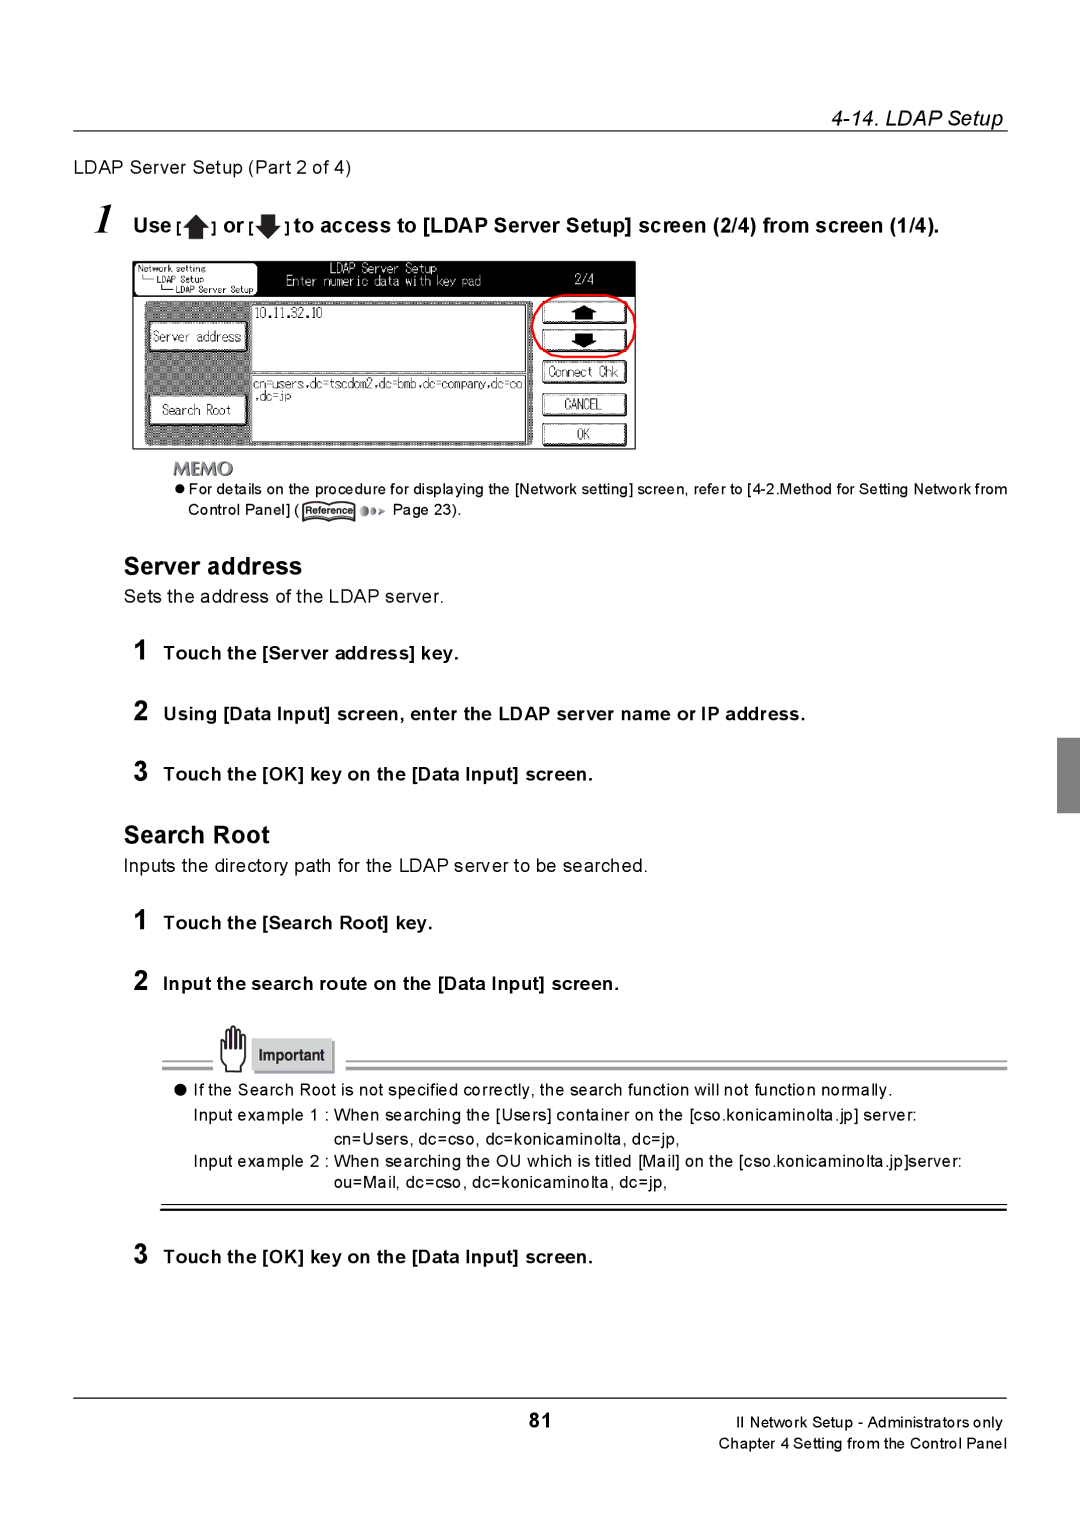
Search Root
Ldap Server Setup Part 2
Server address
Sets the address of the Ldap server
Enable SSL
Touch either the on or OFF key in the Enable SSL menu
Port No
Touch the Edit key on the Authentication Type menu
Authentication Type
User authentication
Kerberos authentication
Sets the Password for accessing the Ldap server
Ldap Server Setup Part 4of
Sets the User Name to access the Ldap server
User Name
Domain name
Perform default settings for detailed search items
Attribute
→The search attribute selection screen is displayed
Condition
Touch Condition for Item 1 Item 4 on the touch panel
→The condition selection screen is displayed
Memo
Web Utility
Accessing Web Utility
This section explains how to access the Web Utility
Protocol Information
To access the Network Status page, follow these steps
Network Information
Network Information
TCP/IP Configuration
To access the TCP/IP Configuration page, follow these steps
Procedures for altering the respective fields below
Changing IP Settings
Should you wish to enable TCP/IP, follow these steps
Enabling TCP/IP
Changing Dhcp Settings
Changing DNS Settings
NetWare Configuration
To access the NetWare Configuration page, follow these steps
Changing NetWare Settings
To alter any of the NetWare settings, follow these steps
Enabling NetWare
NetWare Configuration
NetWare Configuration
AppleTalk Configuration
Enabling AppleTalk
100
Changing AppleTalk Settings
101
IPP Configuration
To access the IPP Configuration page, follow these steps
102
Open the IPP Configuration Click the Enable IPP check box
Should you wish to enable IPP, follow these steps
Enabling IPP
Changing IPP Configuration Settings
104
„ Document Format Supported
FTP Configuration
To access the FTP Configuration page, follow these steps
Changing FTP Setting
106
Mail Send Smtp Configuration
Enabling E-mail Send Smtp
Changing E-mail Send Smtp Setting
To enable E-mail Send SMTP, follow these steps
Open the E-mail Send Smtp Click the Enble Smtp box
109
Mail Receive POP Configuration
110
Changing E-mail Receive POP Setting
111
Mail Extended Configuration
Input the password and click the Apply button
112
Pcsmb Configuration
To access the Pcsmb Configuration page, follow these steps
113
Ldap Configuration
To access the Ldap Configuration page, follow these steps
114
Input the password and click the Check Ldap Setting button
115
Mail Notification Configuration
116
117
Device Configuration
To access the Device Configuration page, follow these steps
118
Changing Device Setting
119
Reset
To access the Reset page, follow these steps
120
To reset the Network function, follow these steps
Resetting the Network Function
Restoring the Factory Defaults
Wait two minutes, then reconnect
122
125
Using the Scanner Functions
When There is Trouble with Scanner
181
124
This chapter explains how to use the scanner functions
III Scanner
125
126
Selecting the Destination
Touch the SCAN/SERVER button on the control panel
„ Scan to FTP
127
Touch the E-Mail key on Scanner mode basic screen
Inputting the destination manually
Touch the File name key
Input the file name for the scan data
→ The display returns to the Scanner mode basic screen
128
Touch the Enter address key
129
For more information, refer to Subject and Body
130
→ The registration is displayed in the selected group
131
Select the group registered from A- No. etc
Select the destination from the destination list
Selecting from the Ldap server
132
Set the file name for scanned data. Touch the File name key
133
→ Go to Step
134
→ The popup menu for setting condition is displayed
→ The popup menu for setting condition is closed
Touch Condition key
135
→ The Ldap search simple screen is displayed
Touch the Search key
136
→ The E-Mail Register screen is displayed
Touch Subject/Msg. Body
Subject and Body
137
Touch the Subject key
138
Touch the Body key
Touch the character keys to input the body of the E-mail
139
Touch the From key
Touch the FTP key on Scanner mode basic screen
140
141
→ The FTP registration/edit screen is displayed
→ The display returns to the FTP registration/edit screen
If necessary, touch Pasv mode or Proxy key for settings
142
Touch the Port No. key
Input the User ID with 0 9 or using the Control panel
143
144
→ FTP is displayed inverted
Input the filename for the scan data
145
→ The Pcsmb select screen is displayed
Touch the Pcsmb key on Scanner mode basic screen
146
Set the file name of scanned data. Touch the File name key
Touch the Host Name key
147
→ The Pcsmb Input screen is displayed
Input the name of PC to which data is to be sent
Input the location of the shared folder
Touch the Password key
148
Touch the User Name key
149
150
Registering Destinations
Mail
Mail registration/edit screen
152
Touch the E-Mail Address key
Touch the Name key
153
Use the character keys to input the address
Use the character keys to input the registration name
154
Touch the Entry key
Touch the Back key
Use the , and , keys and select the address
Mail list screen
155
→ The selected address is displayed inverted
Use the and keys to select the subject
Mail subject list screen
156
Touch the Edit or Erase key
Use the and keys to select the body
Mail message body list screen
157
Use the character keys to input the body
FTP registration/edit screen
158
159
Input the port number with the 0 9 key
Touch the A- No. etc key to set the registration group
FTP list screen
160
Use the and , key and select the FTP profile name
Enter Name for the destination
Pcsmb registration/edit
161
→ The display returns to the Pcsmb registration/edit screen
162
Input the location of a shared folder
Pcsmb address list screen
163
Use the and keys to select the Pcsmb profile name
Setting Scanner Functions
Scanning Mode Usage
164
Scanning Documents
Text/Photo Enhance Mode
Touch the Original Mode key
Scan Density
Scan Mode
File Format Scan Quality
166
Touch the Setting key in the Size menu
Scan Size
167
Original Direction
Lens Mode
Touch the Setting key in the Original Direction menu
168
Set the document on the copier Radf or the platen glass
When scanning in memory mode, touch the Store key
When scanning in real mode, proceed to Step
169
Press the Start button on the control panel
170
171
Application Function Settings
Touch the Application key
→ The Select Application Function screen is displayed
→ The Dual page mode screen is displayed
172
→ The Select type of original screen is displayed
Reading in documents of different sizes Mixed Original
173
Touch the Mixed Original key Touch the OK key
Reading in folded documents Folded Orignal
174
Touch the Folded Original key Touch the OK key
175
Reading in by selecting binding position Flip Side2
Reading in with black and white reversed Reverse Image
→ Reverse Image is selected
Not scanning outside the document Non Image Area Erase
176
→ Non Image Area Erase is set
Erasing document frames and folds Frame/Fold Erasure
177
Touch the Frame Erasure key
When the check is complete, touch the Back key
Checking settings
Touch the Setting conf key
178
179
→ The display returns to the Check mode screen
Confirming Address
Touch the Confirm Address key
180
Troubleshooting 182 Network Error List 183
181
Troubleshooting
182
Network Error List
183
Network Error List
184
185
186
IV Scanner Key Operator Administrators only
187
188
IV Scanner Key Operator Administrators only
189
Key Operator Mode
Usage Objectives for Key Operator Mode
Switching the Key Operator Mode
Key Operator Mode
192
Scanner Initial Settings
Touch the 3. Scanner key on the Key operator mode screen
Touch the 1. Initial setting key
Touch the Edit key, then change the setting
Auto reset timer
Select Auto reset timer on Initial setting screen
194
300 dpi
This changes the default value for the scanner resolution
Select Scan Quality in Initial setting screen
400 dpi
Select Scan W/O key count in Initial setting screen
Scan W/O key count
196
Each time you touch the Edit key, the setting is switched
Original direction default
Select Orig. direction default in Initial setting screen
From now on, the copier operates with these settings
Main menu display
198
Search character default
Scanning continues with the same settings
Reset data after job
Select Reset data after job in Initial setting screen
200
File Form default
Select File Form default in Initial setting screen
Select Text/Photo enhance mode in Initial setting screen
202
Select Scan Density in Initial setting screen
This sets the scanning density
This sets the scanning mode
Select Scan mode in Initial setting screen
204
Disable Entry Function
Select Disable Entry Function in Initial setting screen
Touch the Return key
→ The screen will return to the Scanner setting menu screen
Touch the 2. List Print key
206
Appendix 209
207
208
Appendix
209
Product Specifications
Scanner Functions
210
Network Functions
Restrictions
211
10/100Base-T UTP cable specifications
LED Status
212
Konica Minolta Scan Distributor
Setting Konica Minolta Scan Distributor
Touch the 2.Network key on the Key operator mode screen
Touch the key Touch the 13.Scan Distributor Set key 213
214
Index According to Item
215
Index According to Item
216
217
Smtp
Purpose Oriented Index
218
219
220
Recycled paper is used for the inside pages of this manual