Troubleshooting
6.0TROUBLESHOOTING
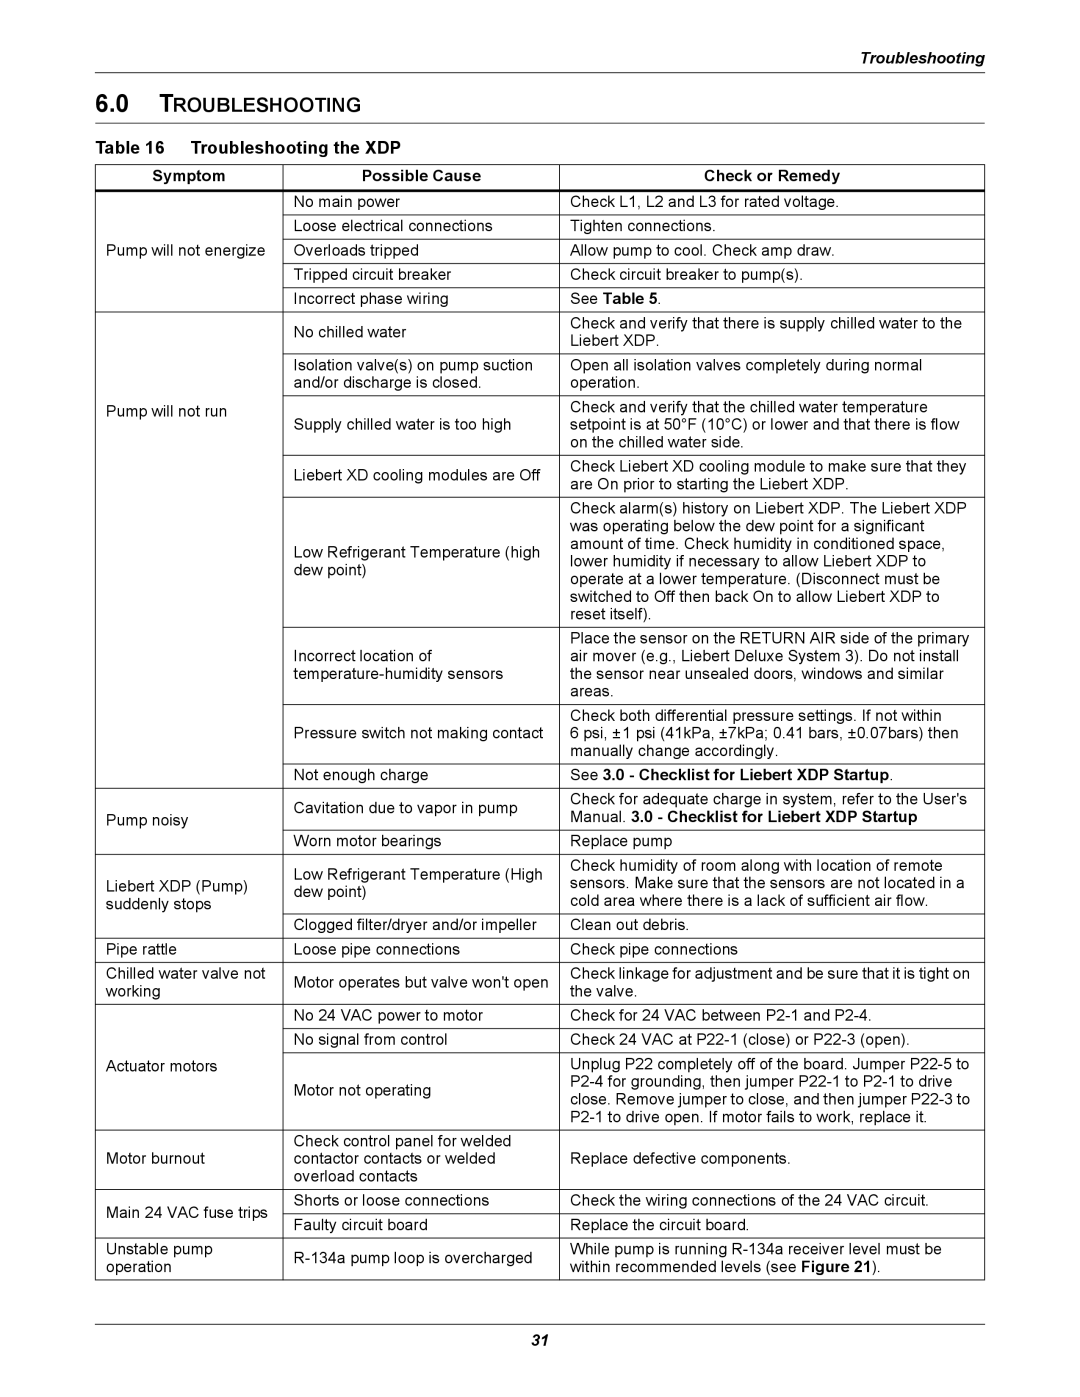
Table 16 Troubleshooting the XDP
Symptom | Possible Cause | Check or Remedy | |
| No main power | Check L1, L2 and L3 for rated voltage. | |
| Loose electrical connections | Tighten connections. | |
Pump will not energize | Overloads tripped | Allow pump to cool. Check amp draw. | |
|
|
| |
| Tripped circuit breaker | Check circuit breaker to pump(s). | |
|
|
| |
| Incorrect phase wiring | See Table 5. | |
| No chilled water | Check and verify that there is supply chilled water to the | |
| Liebert XDP. | ||
|
| ||
| Isolation valve(s) on pump suction | Open all isolation valves completely during normal | |
| and/or discharge is closed. | operation. | |
Pump will not run | Supply chilled water is too high | Check and verify that the chilled water temperature | |
| setpoint is at 50°F (10°C) or lower and that there is flow | ||
|
| on the chilled water side. | |
| Liebert XD cooling modules are Off | Check Liebert XD cooling module to make sure that they | |
| are On prior to starting the Liebert XDP. | ||
|
| ||
|
| Check alarm(s) history on Liebert XDP. The Liebert XDP | |
|
| was operating below the dew point for a significant | |
| Low Refrigerant Temperature (high | amount of time. Check humidity in conditioned space, | |
| lower humidity if necessary to allow Liebert XDP to | ||
| dew point) | ||
| operate at a lower temperature. (Disconnect must be | ||
|
| ||
|
| switched to Off then back On to allow Liebert XDP to | |
|
| reset itself). | |
|
| Place the sensor on the RETURN AIR side of the primary | |
| Incorrect location of | air mover (e.g., Liebert Deluxe System 3). Do not install | |
| the sensor near unsealed doors, windows and similar | ||
|
| areas. | |
|
| Check both differential pressure settings. If not within | |
| Pressure switch not making contact | 6 psi, ±1 psi (41kPa, ±7kPa; 0.41 bars, ±0.07bars) then | |
|
| manually change accordingly. | |
| Not enough charge | See 3.0 - Checklist for Liebert XDP Startup. | |
| Cavitation due to vapor in pump | Check for adequate charge in system, refer to the User's | |
Pump noisy | Manual. 3.0 - Checklist for Liebert XDP Startup | ||
| |||
| Worn motor bearings | Replace pump | |
|
|
| |
| Low Refrigerant Temperature (High | Check humidity of room along with location of remote | |
Liebert XDP (Pump) | sensors. Make sure that the sensors are not located in a | ||
dew point) | |||
suddenly stops | cold area where there is a lack of sufficient air flow. | ||
| |||
| Clogged filter/dryer and/or impeller | Clean out debris. | |
|
|
| |
Pipe rattle | Loose pipe connections | Check pipe connections | |
|
|
| |
Chilled water valve not | Motor operates but valve won't open | Check linkage for adjustment and be sure that it is tight on | |
working | the valve. | ||
| |||
| No 24 VAC power to motor | Check for 24 VAC between | |
|
|
| |
| No signal from control | Check 24 VAC at | |
|
|
| |
Actuator motors |
| Unplug P22 completely off of the board. Jumper | |
| Motor not operating | ||
| close. Remove jumper to close, and then jumper | ||
|
| ||
|
| ||
|
|
| |
| Check control panel for welded |
| |
Motor burnout | contactor contacts or welded | Replace defective components. | |
| overload contacts |
| |
Main 24 VAC fuse trips | Shorts or loose connections | Check the wiring connections of the 24 VAC circuit. | |
|
| ||
Faulty circuit board | Replace the circuit board. | ||
| |||
|
|
| |
Unstable pump | While pump is running | ||
operation | within recommended levels (see Figure 21). | ||
|
31