H2160MW9 a
Channel
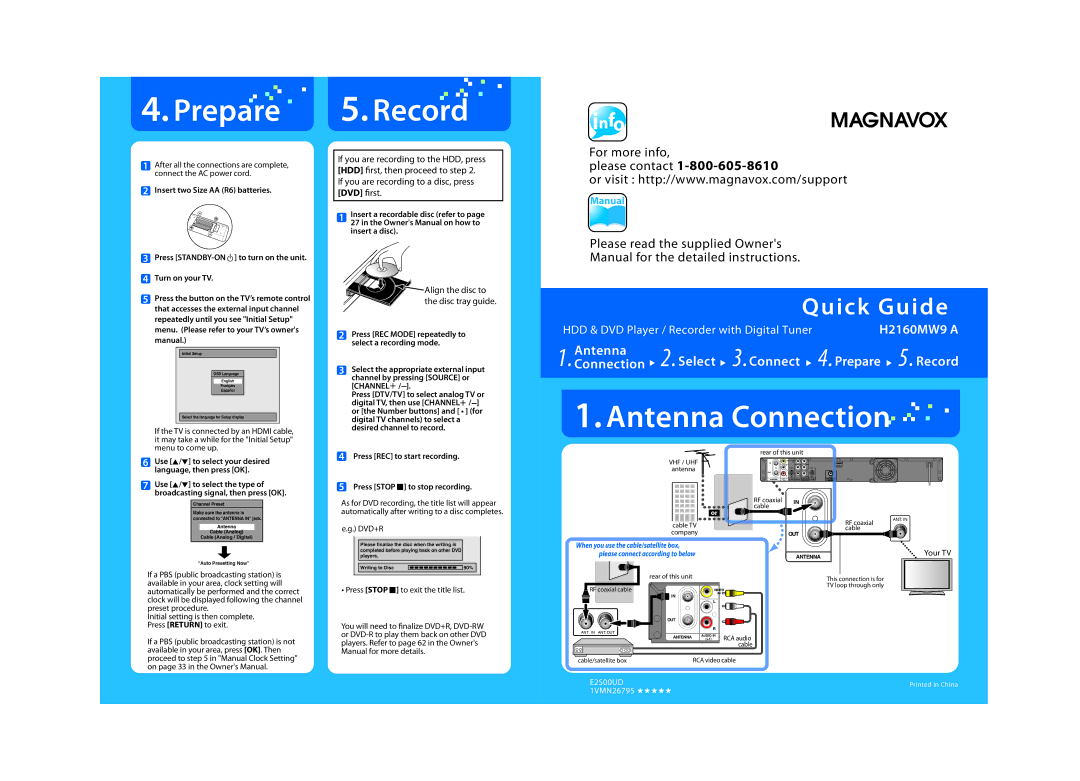
Press REC to start recording Press Stop C to stop recording
Hdmi cable not included
Audio cable
Video cable
Cables used in this connection are as follows
Safety Information
Do not Open
To Avoid the Hazards of Electrical Shock and Fire
Safety Information
Avoid a place with drastic temperature changes
Location and Handling
Cleaning the cabinet
Supplied Accessories
Maintenance Servicing
Cleaning discs
Trademark Information
Dolby Digital Stereo Creator
Contents
Contents
Dubbing
Features
Recording
Playback
Compatibility
Features
Editing
Others
14 13
Functional Overview
Front Panel 23* 4 5 6 7 8* 9
Functional Overview
Rear Panel
Using a Remote Control
Remote Control
Installing the Batteries in the Remote Control
Open the cover Insert batteries
Setup button
Confirm button Analog mode
Digital mode
REC Mode button
Current status of the unit
Front Panel Display
Display Message
Displays the following
Overview
Connection
Antenna Connection Required
Quality
Connecting to a TV Using Audio / Video Jacks
Connection
Connections
Connecting to a TV Using the S-Video Out Jack
Connecting to a TV Using Component Video Out Jacks
Copyright protection system
Connecting to a TV with an Hdmi Compatible Port
Hdmi Mode and Actual Output Signals
With this setup
Connecting to a Cable / Satellite Box
Connections Basic Setup
Connecting to a TV without Audio / Video Jacks
Digital Audio Connection
Actual Output
Finding the Viewing Channel on Your TV
Proceed to in Initial Setting on
Before YOU Start
Turn on your TV
Before YOU Start
Guide to On-Screen Display / Menu
File Name Information
Indicates an operation status Each icon means
Title Name Information
First, track name will be displayed
Main Menu
Disc Edit / HDD Menu / Dubbing / Disc Playback Mode
Align the disc to the disc tray guide
Switching HDD / DVD Mode
How to Insert a Disc
Cable Analog
Initial Setting
Antenna
Cable Analog / Digital
Channel Setting
Auto Channel Scan
Adding / Deleting Channels
Channel Setting
Use K / L to select Manual Channel Preset, then press OK
Use K / L to select Channel, then press OK
Use K / L to select Add or Delete, then press OK
Press Setup to exit
Select the channel number to add or delete
Select the channel number to delete
Press Setup and turn the unit to the standby mode
Setting the Clock
Auto Clock Setting
Use K / L to select Clock, then press OK
Use K / L to select Clock Setting, then press OK
Setting the Clock
Manual Clock Setting
Daylight Saving Time
Channel Selection
Tuner Settings
Switching Analog Mode Digital Mode
Tuner Settings
Selecting TV Audio
SAP secondary audio program
Selecting TV Audio cont’d
Stereo
DTV Closed Caption
Then press OK
Use K / L to select ON, then press
Use K / L to select User Setting, then press OK.CC Style
Closed Caption Style
Font Style
Edge Type
Font Size
Font Opacity
Unrecordable Discs
Information on Recording
Recordable Discs
Maximum recordable numbers of title / chapters
About HDD
Recording Mode
Information on Recording
Make Recording Compatible
Setting for Auto Chapter
Before Recording
Follow the steps to record TV programs
Channel
Desired channel to record
It may take a while to load Disc
This is a simple way to set the recording time in blocks
To set one-touch timer recording OTR
Press REC to start recording
Press Stop C twice to stop
Recording the Contents of the Autostart Recording
Autostart Recording
Recording
Use K / L to enter the date, then
Timer Recording
Press Timer Use K / L to select New Program, then press OK
Press B
Press OK when all items are entered
Timer Recording
Auto recording mode select
Alternate recording DVD only
Press Timer Check the information
To stop the timer recording in progress
How to select a channel number for the timer recording
Hint
Hints for Timer Recording
Priority of Overlapped Settings
Title
Special Recording
Overwriting from the Beginning
Overwriting in the Middle of the Title
Overwrite recording a Existing title B After overwriting
Special Recording
Hints for Overwriting
Overwrite recording a Existing title B Existing title C
Information on Dubbing
Recording Mode for Dubbing
Dubbing
Guide to Dubbing Menu Display
Dubbing
Settings for an External Device
Press Setup and use K / L to
Use K / L to select Video, then press OK
Recording from an External Device
Information on DV Dubbing
Recording audio mode
Indicator of dubbing function
Guide to DV and On-Screen Display
Use Source or Channel / to select L3DV-IN
Press REC Mode repeatedly to
DVC to HDD / DVD Dubbing
Press Display
Use K / L to select Start Rec, then press OK
Dubbing will start
Use K / L to select DVD HDD, then press OK
Selected Title Dubbing
Use K / L to select HDD DVD, then press OK
Use K / L to select Add, then
To delete a title
One-touch Dubbing
Use K / L to select Yes, then press
To move a title
One Title Dubbing HDD to DVD only
Use K / L to select Yes, then press OK
To cancel the disc protection
Protecting a Disc
OFF ON, then press OK. e.g. DVD+RW
Finalizing a Disc
Finalizing is completed
Playing the Discs on Other DVD Players
Auto Finalizing
Unplayable Discs
Information on Playback
Playable Discs and Files
Color Systems
PBC playback control for Video CD
Disc Playback Mode menu will appear
Information on Playback
Hint for HDD / DVD Playback
Direct Playback
Insert a disc refer to page 27 on how to insert a disc
Basic Playback
Press Play B to start playback
Use K / L//s / B to select a desired title, then press OK
Basic Playback
Playback from the Title List
HDD title list
Total time of recorded disc space
Disc name Default No Disc Name Disc type
Making edits compatible/finalize When DVD+RW is inserted
Playback will start
Hints for audio CD tracks and MP3 / Jpeg files
When selecting track/file
When selecting the folder Not available for audio CD
MP3
Pause
Playing Back an Audio CD and a
CD-RW/-R with MP3/JPEG Files cont’d
Kodak Picture CD
Variable Skip / Variable Replay
Special Playback
Resume Playback
Fast Forward / Fast Reverse Playback
Slow Forward / Slow Reverse Playback
Special Playback
Step by Step Playback
Simultaneous Playback and Recording
During playback, press Display to bring up the display menu
Marker Setting
Zoom
Use / B to select to display the marker list
Slide Show
Repeat Playback
Random Playback
To go back to the specific time
Program Playback
5Press Play B
Search
Using H / G
Using Display
Title / Chapter Search
Audio CD
Search
Time Search
To move to the number next to , press B
For DVD-video Audio soundtrack will switch
Switching Subtitles
Switching Audio Soundtrack
Selecting the Format of Audio and Video
Switching Virtual Surround System
Switching Camera Angles
Reducing Block Noise
Information on Editing
HDD mode
DVD mode
Guide to a Title List
Edit Menu
How to Access the Edit Menu
Information on Editing
Putting name on disc
Press Title
Editing
Deleting a Title
Use K / L to select Edit, then
Yes, then press OK Title is now deleted
Editing
Confirmation message will appear
Repeat until you select all the titles you want to delete
Deleting Selected Titles
Use K / L to select Delete Multiple Titles, then press OK
Press Clear
Guide to Edit Title Name
When you finish entering a title name, press OK
Putting Names on Titles
DVD
Chapter Marks Add
For DVD, the data will be written onto the disc momentarily
You cannot delete the chapter mark
Chapter Marks Delete
To delete a chapter mark
Chapter mark number is displayed on the preview screen DVD
Data will be written onto the disc momentarily
Chapter Marks Delete All
To delete all chapter marks
You can divide one title into 2 new titles
Dividing a Title
Use K / L to select Title Dividing, then press OK
Deleting a Scene of a Title
You can delete a specific part of a title
Go back to the title list
With Preview highlighted, press
OK to preview the result
Use K / L to select Delete then press OK
Protecting a Title
With OFF On selected, press
Editing Function
Hiding Chapters
Chapter is now hidden
Setting an Index Picture
New index picture is now set
Putting Name on Disc
You can erase all titles on a disc
Contents of the disc is now deleted
Erasing Disc
Making Edits Compatible
Press Setup Use K / L to select HDD Menu, then press OK
Deleting All Titles in HDD
List of Settings
Contents
List of Settings
TV-PG TV-G TV-Y7
SAP
Use K / L to select Playback, then press OK
Setups
Playback
Use K / L to select a desired item, then press OK
Playback cont’d
Setups
Parental Lock Default OFF DVD only
Yes
Disc Audio
Disc Menu Language Default English DVD only
Audio Language Default Original DVD only
Still Mode Default Auto DVD only Select Auto usually
Subtitle Language Default OFF DVD only
Angle Icon Default on DVD only
Variable Skip / Replay
Display
OSD Language Default English
Screen Saver Default 10 minutes
Refer to 1 to 6 on pages
Chip
FL Dimmer Default Bright
Display cont’d
To set the rating
Use the Number Buttons to enter new access password
Canadian French Rating
For 3 refer to
Video
Refer to 1 to 2 on page 110 and set the selected item
Video cont’d
Progressive Scan Default OFF
TV Aspect Default 43 Letter Box
Hdmi Audio Default on
When you finish with the setting, press Setup to exit
Format Default RGB
RGB Range Default Normal
Reset the setting to default
Reset All
Select Yes again using K / L , then press OK
Your setting in recording will be initialized
OPEN/CLOSE a to take out the disc. The disc canceled during
Troubleshooting
Symptom Remedy
Repairing process MAY not work
Troubleshooting
Playback picture is distorted
Protection signal
Disc is not supported by this unit
Color of the picture is abnormal This is not a malfunction
Symptom
Error message Cause Solution
Language Code
Language Code
Glossary
Recording
Specifications
General
Tuner
Disco Grabable
Español
Discos Reproducibles
Disco no Grabable
122 ES
Modo Hdmi y señales efectivas de salida
Español
Conexión a un Televisor con un Puerto Compatible con Hdmi
Cables suministrados
Se desee grabar
Presione STANDBY-ON y
Para cerrar la bandeja de discos
Presione REC para iniciar la grabación
Añadir, y luego presione OK
Presione Setup en el modo de detención
Utilice K / L para seleccionar
Copiado a un toque
Con el rótulo aupntando hacia arriba. Presione de
Nuevo OPEN/CLOSE a para cerrar la bandeja de discos
Reproducción Directa
Consulte Resume Playback en la página
Memo
1VMN26793
Customer Service
Tel
Base
Lecture Réglage des Édition fonctions Autres
Appuyez sur Stop C pour
Appuyez sur REC pour démarrer l’enregistrement
Interrompre l’enregistrement
Comme pour l’enregistrement sur DVD, la liste
Câble S-vidéo
Prend en charge uniquement la résolution
Audio Câble audio
Câble vidéo
Précautions
Risk of Electric Shock Do not Open
Pour éviter les risques de choc électrique et d’incendie
Emplacement et manipulation
Précautions
Avertissement de condensation de vapeur
Entretien
Accessoires fournis
Vérification du signal IR
Nettoyage du boîtier
Information sur les Marques Commerciales
Est une marque de commerce de Eastman kodak company
Conseils pour l’enregistrement programmé
Sommaire
Réglages DU Tuner Commutation entre les modes analogiques
Protection D’UN Disque
Sommaire
Édition
Copie
Caractéristiques
Enregistrement
Lecture
Édition
Symbole Description
Caractéristiques
Compatibilité
Face avant 23* 4 5 6 7 8* 9
Remarques
Présentation DES Fonctionnalités
Face arrière
Utilisation d’une télécommande
Télécommande
Installation des piles de la télécommande
Ouvrez le couvercle Insérez les piles
Touche Setup
Touche de confirmation Mode analogique
Mode numérique
Touche Timer
Affiche les indications
Affichage de la face avant
Messages de l’affichage
Titre/piste/fichier et marqueur de chapitre
Présentation générale
Connexion
Branchement de l’antenne obligatoire
Ordinaire
Connexion
Arrière de l’appareil
Enregistrement
Hdmi Interface Multimédia à Haute Définition
Mode Hdmi et signaux de sortie réels
Système de protection des droits d’auteur
Avec cette configuration
Connexion
Raccordement à un téléviseur sans prises audio / vidéo
Format audio disque Réglage Dolby Digital
Branchement des signaux audio numériques
Sortie effective
Sortie numérique
Initiaux en
Avant DE Démarrer
Recherche de la chaîne de visionnement sur votre téléviseur
De téléviseurs exemple
Guide du menu / affichage à l’écran
Configuration
Avant DE Démarrer
Le nom de piste est affiché en premier
Information sur le nom du titre
Information sur le nom du fichier
Menu principal
Lecture au hasard
Nom du disque édité
Protection de disque
Lecture programmée
Commutation des modes DD / DVD
Comment insérer un disque
Câble Analogique
Réglages Initiaux
Antenne
Câble Analogique/Numérique
Balayage auto des chaînes
Le menu Réglage général apparaît
Ajout / suppression de chaînes
Appuyez sur Setup et utilisez
Réglage DES Chaînes
Pour sélectionner Réglage général, puis appuyez sur OK
Votre réglage sera activé
Appuyez sur Setup pour quitter
Sélectionnez le numéro de chaîne à supprimer
Réglage auto de l’horloge
Appuyez sur Setup puis placez l’appareil en mode veille
Réglage DE L’HORLOGE
Heure d’été
Réglage DE L’HORLOGE
Réglage manuel de l’horloge
EF MAR NOV
Commutation entre les modes analogiques et numériques
Réglages DU Tuner
Sélection d’un chaîne
TV numérique
Réglages DU Tuner
Sélection du l’audio de TV
Chaque pression sur Audio change la langue
SAP programme audio secondaire
Sélection du l’audio de TV suite
Stéréo
Sous-titres DTV
TV numérique
Style des sous-titres
Taille Police
Type Bord
Couleur Bord
Style Police
Nombre maximum de titres / chapitres enregistrables
Disque enregistrable Disque non enregistrable
LogosCaractéristiques
Informations SUR L’ENREGISTREMENT DE DVD
Mode d’enregistrement
Le DD est un emplacement de stockage temporaire
Description du DD
Enregistrements des sous-titres numériques DTV
Avant L’ENREGISTREMENT
Rendre un enregistrement compatible
Réglage des chapitres automatiques
Consultez Mode d’enregistrement en
Le chargement du disque peut Prendre quelques instants
Titres
Exécution d’un enregistrement express OTR…
Remarque sur l’enregistrement express
Enregistrer le contenu de l’enregistrement automatique
Enregistrement Automatique
Appuyez sur REC pour commencer
Enregistrement automatique commence
Avant l’enregistrement, vérifiez les points suivants
Appuyez sur Timer
Enregistrement Programmé
Guide de l’écran de la programmation en différé
Sur B
Sélection automatique du mode d’enregistrement
Enregistrement Programmé
Appuyez sur OK lorsque toutes les données sont saisies
Pour supprimer le programme différé
Appuyez sur Timer pour quitter
Conseil
Pour corriger le programme différé
Priorité des réglages superposés
Conseils pour l’enregistrement programmé
Remarque pour l’enregistrement sur DVD
Écrasement au milieu du titre
Enregistrement Spécial
Écrasement à partir du début du titre
Titre existant B
Enregistrement Spécial
Conseils pour l’écrasement
Titre existant B Titre existant C
Informations sur la copie
Mode d’enregistrement de la copie
Copie
Remarque sur la copie
Appareil externe
Copie
Réglages pour un appareil externe
Enregistrement d’un appareil externe
Enregistrement
Informations sur la copie de DV
Guide de la DV et de l’affichage à l’écran
Pour sélectionner Entrée DV puis appuyez sur OK
Copie DVC vers DD / DVD
Appuyez sur Display
Utilisez Source ou Channel / pour sélectionner L3 DV-ENTRÉE
Remarque sur le repiquage DV
Utilisez K / L pour sélectionner
Appuyez sur Setup en mode arrêt
Sélectionnez la copie de titre
Puis appuyez sur OK
Copie express…
Mode d’enregistrement de votre
Appuyez sur OK Choix, puis appuyez sur OK
La copie du titre sélectionné démarre
Copie d’un titre DD vers DVD seulement
Préparation de la copie
Le disque est à présent protégé
Protection D’UN Disque
Utilisez K / L pour sélectionner Oui puis appuyez sur OK
Pour annuler la protection du disque
La finalisation est achevée
Finalisation d’un disque
Pour annuler la finalisation
Le menu Edition d’un disque apparaît
Lecture DES Disques SUR D’AUTRES Lecteurs DE DVD
Finalisation auto
Disques non lisibles
Informations SUR LA Lecture
Disques et fichiers lisibles
Systèmes de couleur
Informations SUR LA Lecture
PBC commande de la lecture pour CD vidéo
Le menu Mode lecture disque apparaît
Conseil pour la lecture d’un DD / DVD
Appuyez sur Play B pour démarrer la lecture
Lecture Simple
Lecture directe
Consultez Reprise de la lecture en
Liste des titres du DD
Lecture Simple
Lecture à partir de la liste des titres
Nom du disque Par défaut Pas de nom disque
Remarque sur la liste des titres d’un DVD
Appuyez sur OK
Durée totale de l’espace enregistré sur le disque
Appuyez d’abord sur DVD
Lecture
1Appuyez sur Title
Utilisation du menu titre / disque
Remarques sur les disques Jpeg et Kodak Picture CD
Appuyez sur Stop C pour quitter
Saut variable / relecture variable
Lecture Spéciale
Reprise de la lecture
Lecture rapide en avant / en arrière
Pendant un enregistrement
Lecture Spéciale
Lecture pas à pas
Lecture en avant / en arrière lente
Si le menu d’affichage est déjà ouvert, passez à l’étape
Ex. DVD vidéo
La lecture avec zoom démarre
Diaporama
Répétition de lecture
Lecture aléatoire
5Appuyez sur Play B
Lecture programmée
Lecture de l’enregistrement automatique
Pour retourner à un point dans le temps spécifique
Recherche de piste
Recherche
Recherche de titre / de chapitre
Utilisation de H / G
Pour passer au numéro en regard de , appuyez sur B
Recherche
Recherche chronologique
1Pendant la lecture, appuyez sur Display
Commutation des sous-titres
Commutation de la piste audio
Sélection
Commutation des angles de caméra
Sélection DES Formats Audio ET Vidéo
Commutation du système d’ambiance virtuelle
Réduction du bruit des blocs
Informations SUR L’ÉDITION
Mode DD
Mode DVD
Guide de la liste des titres
Comment accéder au menu d’édition
Informations SUR L’ÉDITION
Menu édition
Suppression d’un titre
Edition puis appuyez sur OK
Édition
Suppression d’un titre
HDD
Utilisez K / L pour sélectioner Oui
Édition
Puis appuyez sur OK
Appuyez sur Clear
Pour enlever le symbole de corbeille du titre
Suppression des titres sélectionnés
Le message de confirmation apparaît
Jeu de
Nommage des titres
Guide de l’édition des noms des titres
Caractères
Lorsque vous arrivez au point désiré, appuyez sur Pause F
Repères de chapitre ajout
Pour ajouter un repère de chapitre
Puis appuyez sur Pause F
Repères de chapitre suppression
Pour supprimer un repère de chapitre
Les données sont écrites temporairement sur le disque
Pour supprimer tous les marqueurs de chapitre
Repères de chapitre suppression totale
Sur Pause F
Division d’un titre
Vous pouvez diviser un titre en 2 nouveaux titres
Suppression d’une scène d’un titre
Vous pouvez supprimer une partie spécifique d’un titre
Sur OK pour visionner le résultat Oui puis appuyez sur OK
Protection d’un titre
Masquage des chapitres
Suivez les étapes de Comment
Définition d’une image d’index
Une nouvelle image d’index est maintenant définie
Les données seront écrites momentanément sur le disque
Nommage d’un disque
Une fenêtre de saisie du nom du titre apparaît
Le nom du disque est maintenant mis à jour
Effacement d’un disque
Le contenu du disque est à présent supprimé
Rendre les éditions compatibles
Appuyez sur Setup
Suppression de tous les titres du DD
Liste DES Réglages
DVD
Liste DES Réglages
RVB
Consultez 1 à 8 aux pages
Réglages
Lecture
Et réglez l’élément sélectionné
Oui
Réglages
Lecture suite
Blocage parental Par défaut HF DVD seulement
Langue du menu disque Par défaut Anglais DVD seulement
Disque audio
Flux
Langue audio Par défaut Original DVD seulement
Arrêt Sur Image Par défaut Auto DVD seulement
Langue sous-titre Par défaut HF DVD seulement
Icône de L’angle Par défaut EF DVD seulement
Saut / Répet. variable
Langue ASE Par défaut English
Affichage
Consultez 1 à 6 aux pages
Economiseur d’écran Par défaut 10 minutes
Cote Mpaa
Affichage suite
Rhéostat FL Par défaut Clair
Cote TV
Classement FR-CA
Activation de l’évaluation
Réglez l’élément sélectionné
Vidéo
Consultez 1 à 2 en page 110 et
Pour 3 consultez la
Aspect TV Par défaut 43 Letter Box
Vidéo suite
Balayage progressif Par défaut HF
Hdmi Audio Par défaut EF
Commande Hdmi Réglé sur HF par défaut
Format Par défaut RVB
Plage RVB Par défaut Normal
Sélectionnez Oui à nouveau avec K / L, puis appuyez sur OK
Sélectionnez Oui avec K / L, puis appuyez sur OK
Utilisez K / L pour sélectionner RAZ puis appuyez sur OK
Réinitialiser les réglages à leurs valeurs par défaut
Dépannage
Symptôme Remède
Dépannage
Généralités
Les proportions de l’image de
Édition
Symptôme
Message d’erreur Cause Solution
Code DE Langue
Langue Code
Glossaire
Syntoniseur
Caractéristiques Techniques
Généralités
Bornes
Mémo
Autres
122 FR
Mémo
1VMN26794
Service à la Clientèle Tel
Imprimé en Chine