SVENSKA

NEDERLANDS

ESPAÑOL

ITALIANO

FRANÇAIS

DEUTSCH

ENGLISH

Set up speakers (Audyssey® Auto Setup)

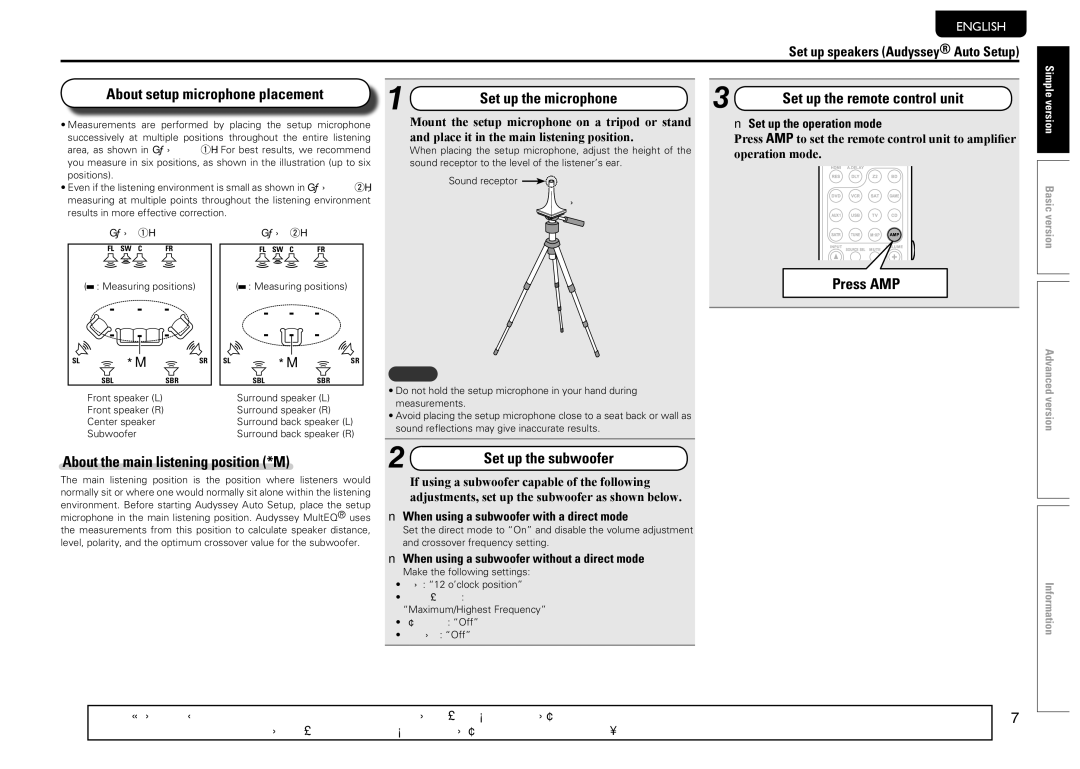
About setup microphone placement

• Measurements are performed by placing the setup microphone

successively at multiple positions throughout the entire listening

area, as shown in GExample qH. For best results, we recommend

you measure in six positions, as shown in the illustration (up to six

positions).

1

Set up the microphone


Mount the setup microphone on a tripod or stand and place it in the main listening position.

When placing the setup microphone, adjust the height of the sound receptor to the level of the listener’s ear.

3

Set up the remote control unit

nn Set up the operation mode

Press AMP to set the remote control unit to amplifier operation mode.

Simple version

• Even if the listening environment is small as shown in GExample wH,

measuring at multiple points throughout the listening environment

results in more effective correction.


GExample qH


GExample wH


FL SW C

FR


FL SW C

FR

(

: Measuring positions)


(

: Measuring positions)

SL

*M

SR

SL


*M

SR


SBL

SBR


SBL

SBR

Sound receptor

NOTE

Setup microphone

Press AMP

Basic version

Advanced

FL

Front speaker (L)

SL

Surround speaker (L)

FR

Front speaker (R)

SR

Surround speaker (R)

C

Center speaker

SBL Surround back speaker (L)

SW Subwoofer

SBR Surround back speaker (R)

About the main listening position (*M)

The main listening position is the position where listeners would normally sit or where one would normally sit alone within the listening environment. Before starting Audyssey Auto Setup, place the setup microphone in the main listening position. Audyssey MultEQ® uses the measurements from this position to calculate speaker distance, level, polarity, and the optimum crossover value for the subwoofer.

Do not hold the setup microphone in your hand during measurements.

Avoid placing the setup microphone close to a seat back or wall as

sound reflections

may give inaccurate results.


2

Set up the subwoofer

If using a subwoofer capable of the following adjustments, set up the subwoofer as shown below.

nn When using a subwoofer with a direct mode

Set the direct mode to “On” and disable the volume adjustment and crossover frequency setting.

nn When using a subwoofer without a direct mode

Make the following settings:

Volume : “12 o’clock position”

Crossover frequency : “Maximum/Highest Frequency”

Low pass filter : “Off”

Standby mode : “Off”

version

Information

The “Simple version” section provides the speaker installation, connection, and setup methods for the 7.1-channel system with surround back

7

speakers. For the installing, connecting, and setup methods of speakers other than the 7.1-channel system (with surround back speakers), see page 30.

Page 11
Image 11
Marantz NR1601 About setup microphone placement, Press AMP, About the main listening position *M, Set up the subwoofer

NR1601 specifications

The Marantz NR1601 is a slimline AV receiver that exemplifies high-quality audio processing in a compact form. Designed for those who prioritize space without sacrificing sound quality, the NR1601 offers a variety of features that cater to modern home entertainment needs.

One of the standout characteristics of the NR1601 is its 5.1-channel surround sound capability, delivering robust and immersive audio experiences. It supports various surround sound formats, including Dolby TrueHD and DTS-HD Master Audio, making it an excellent choice for both movie enthusiasts and music lovers alike. With a power output of 50 watts per channel, the receiver efficiently drives a wide range of speakers, ensuring dynamic sound reproduction.

The NR1601 is equipped with several advanced technologies, including Marantz’s proprietary HDAM (Hyper-Dynamic Amplification Module) technology. This ensures high-quality audio playback by minimizing distortion and delivering excellent transient response. Furthermore, the receiver's built-in Audyssey MultEQ technology automatically calibrates the audio output to suit the specific characteristics of your room, optimizing sound quality irrespective of the environment.

Connectivity is another strong suit of the NR1601. It features multiple HDMI inputs (including HDMI 1.4a support), enabling seamless connectivity to various devices such as Blu-ray players, gaming consoles, and streaming devices. The receiver also supports 3D pass-through and 4K video upscaling, ensuring compatibility with the latest video formats and technologies. With support for audio streaming, the NR1601 offers built-in AirPlay, allowing users to stream music directly from their Apple devices.

The NR1601’s user-friendly interface, combined with a clear on-screen display, makes setup and operation a breeze. Additionally, the receiver's low-profile design allows it to fit easily into any AV cabinet, making it an attractive solution for those with limited space.

In conclusion, the Marantz NR1601 is a feature-rich receiver that combines high-performance audio processing, advanced technologies, and versatile connectivity options. It represents an ideal solution for anyone looking to enhance their home theater experience while maintaining a sleek and elegant design. Its commitment to quality and ease of use sets it apart in the realm of compact audio/video receivers.