SVENSKA

NEDERLANDS

ESPAÑOL

ITALIANO

FRANÇAIS

DEUTSCH

ENGLISH

Manual Setup

Setting items

Setting details


Channel Level

Test Tone Start : Output test tone.

Set the volume of the test

FL / C / FR / SR / SBRz / SBLz / SL / FHL / FHR / SW : Select the

tone to be the same when it

speaker.

is output from each speaker. zz When the “Speaker Config.” – “S.Back” setting (vpage 50) is set to “1sp”, “S.Back” is displayed.

–12.0dB – +12.0dB (0.0dB) : Adjust the volume.

• When o is pressed while the subwoofer volume is set to “–12 dB”, the “Subwoofer” setting switches to “OFF”.

• When “Channel Level” is adjusted, the adjusted values are set for all the surround modes. To adjust the channel level separately for the different

surround modes, use the operation see page 36.

• When you press TEST TONE on the remote control, you can enter this setting item immediately.

NOTE

• Speakers set to “None” in the “Speaker Config.” (vpage 49) settings are not displayed.

• When a headphones jack is inserted in the PHONES jack of this unit, the

“Channel Level” is not displayed.

Setting items

Setting details


Front Speaker Setup

AFront speaker A is used.

Set the front speakers to

BFront speaker B is used.

use for every surround

You can switch speakers by pressing SPKR

mode.

A/B on the remote control.


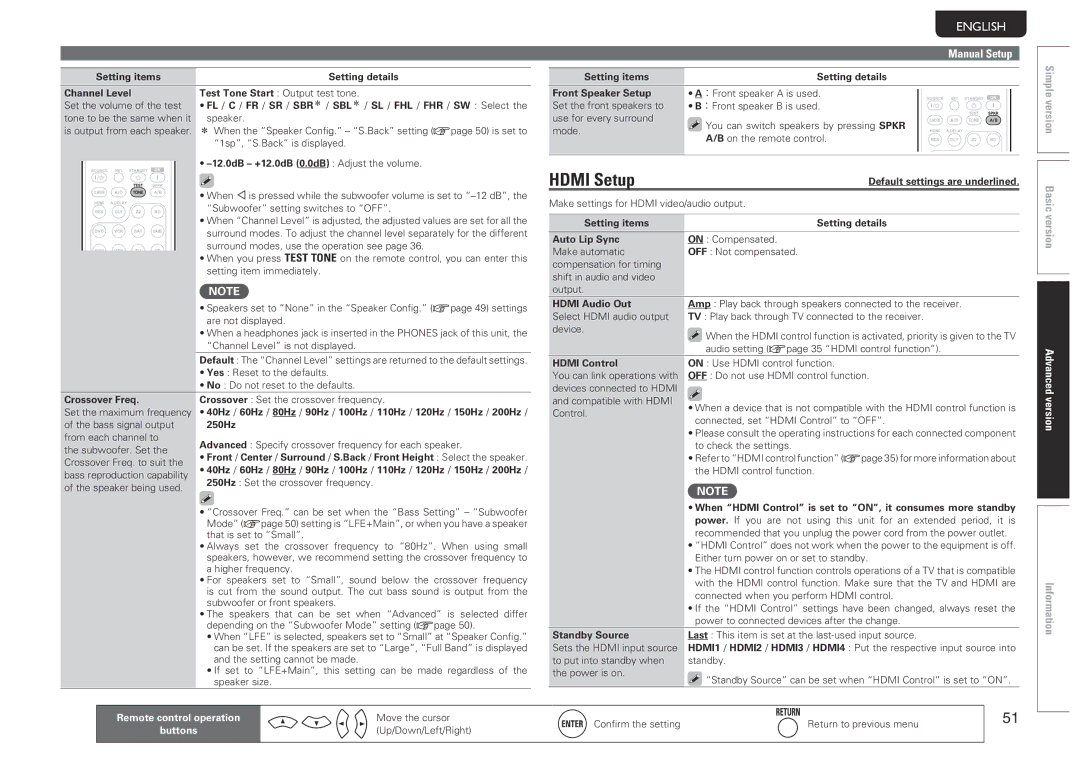
HDMI Setup

Default settings are underlined.

Make settings for HDMI video/audio output.


Setting items

Setting details


Auto Lip Sync

ON : Compensated.

Make automatic

OFF : Not compensated.

compensation for timing


shift in audio and video


output.


HDMI Audio Out

Amp : Play back through speakers connected to the receiver.

Select HDMI audio output

TV : Play back through TV connected to the receiver.

device.

When the HDMI control function is activated, priority is given to the TV


audio setting (vpage 35 “HDMI control function”).

Simple version

Basic version


Default : The “Channel Level” settings are returned to the default settings.


Yes : Reset to the defaults.


No : Do not reset to the defaults.

Crossover Freq.

Crossover : Set the crossover frequency.

Set the maximum frequency

40Hz / 60Hz / 80Hz / 90Hz / 100Hz / 110Hz / 120Hz / 150Hz / 200Hz /

of the bass signal output

250Hz

from each channel to

Advanced : Specify crossover frequency for each speaker.

the subwoofer. Set the

Front / Center / Surround / S.Back / Front Height : Select the speaker.

Crossover Freq. to suit the

40Hz / 60Hz / 80Hz / 90Hz / 100Hz / 110Hz / 120Hz / 150Hz / 200Hz /

bass reproduction capability

250Hz : Set the crossover frequency.


HDMI Control

You can link operations with devices connected to HDMI and compatible with HDMI Control.

ON : Use HDMI control function.

OFF : Do not use HDMI control function.

When a device that is not compatible with the HDMI control function is connected, set “HDMI Control” to “OFF”.

Please consult the operating instructions for each connected component to check the settings.

Refer to “HDMI control function” (vpage 35) for more information about the HDMI control function.

Advanced version

of the speaker being used.

• “Crossover Freq.” can be set when the “Bass Setting” – “Subwoofer

Mode” (vpage 50) setting is “LFE+Main”, or when you have a speaker

that is set to “Small”.

• Always set the crossover frequency to “80Hz”. When using small

speakers, however, we recommend setting the crossover frequency to

a higher frequency.

• For speakers set to “Small”, sound below the crossover frequency

is cut from the sound output. The cut bass sound is output from the

subwoofer or front speakers.

• The speakers that can be set when “Advanced” is selected differ

depending on the “Subwoofer Mode” setting (vpage 50).

• When “LFE” is selected, speakers set to “Small” at “Speaker Config.”

can be set. If the speakers are set to “Large”, “Full Band” is displayed

and the setting cannot be made.

• If set to “LFE+Main”, this setting can be made regardless of the

speaker size.

NOTE

When “HDMI Control” is set to “ON”, it consumes more standby power. If you are not using this unit for an extended period, it is


recommended that you unplug the power cord from the power outlet.


• “HDMI Control” does not work when the power to the equipment is off.


Either turn power on or set to standby.


• The HDMI control function controls operations of a TV that is compatible


with the HDMI control function. Make sure that the TV and HDMI are


connected when you perform HDMI control.


• If the “HDMI Control” settings have been changed, always reset the


power to connected devices after the change.

Standby Source

Last : This item is set at the last-used input source.

Sets the HDMI input source

HDMI1 / HDMI2 / HDMI3 / HDMI4 : Put the respective input source into

to put into standby when

standby.

the power is on.

“Standby Source” can be set when “HDMI Control” is set to “ON”.


Information

Remote control operation

Move the cursor

Confirm the setting

Return to previous menu

51

buttons

(Up/Down/Left/Right)


Page 55
Image 55
Marantz NR1601 manual Hdmi Setup

NR1601 specifications

The Marantz NR1601 is a slimline AV receiver that exemplifies high-quality audio processing in a compact form. Designed for those who prioritize space without sacrificing sound quality, the NR1601 offers a variety of features that cater to modern home entertainment needs.

One of the standout characteristics of the NR1601 is its 5.1-channel surround sound capability, delivering robust and immersive audio experiences. It supports various surround sound formats, including Dolby TrueHD and DTS-HD Master Audio, making it an excellent choice for both movie enthusiasts and music lovers alike. With a power output of 50 watts per channel, the receiver efficiently drives a wide range of speakers, ensuring dynamic sound reproduction.

The NR1601 is equipped with several advanced technologies, including Marantz’s proprietary HDAM (Hyper-Dynamic Amplification Module) technology. This ensures high-quality audio playback by minimizing distortion and delivering excellent transient response. Furthermore, the receiver's built-in Audyssey MultEQ technology automatically calibrates the audio output to suit the specific characteristics of your room, optimizing sound quality irrespective of the environment.

Connectivity is another strong suit of the NR1601. It features multiple HDMI inputs (including HDMI 1.4a support), enabling seamless connectivity to various devices such as Blu-ray players, gaming consoles, and streaming devices. The receiver also supports 3D pass-through and 4K video upscaling, ensuring compatibility with the latest video formats and technologies. With support for audio streaming, the NR1601 offers built-in AirPlay, allowing users to stream music directly from their Apple devices.

The NR1601’s user-friendly interface, combined with a clear on-screen display, makes setup and operation a breeze. Additionally, the receiver's low-profile design allows it to fit easily into any AV cabinet, making it an attractive solution for those with limited space.

In conclusion, the Marantz NR1601 is a feature-rich receiver that combines high-performance audio processing, advanced technologies, and versatile connectivity options. It represents an ideal solution for anyone looking to enhance their home theater experience while maintaining a sleek and elegant design. Its commitment to quality and ease of use sets it apart in the realm of compact audio/video receivers.