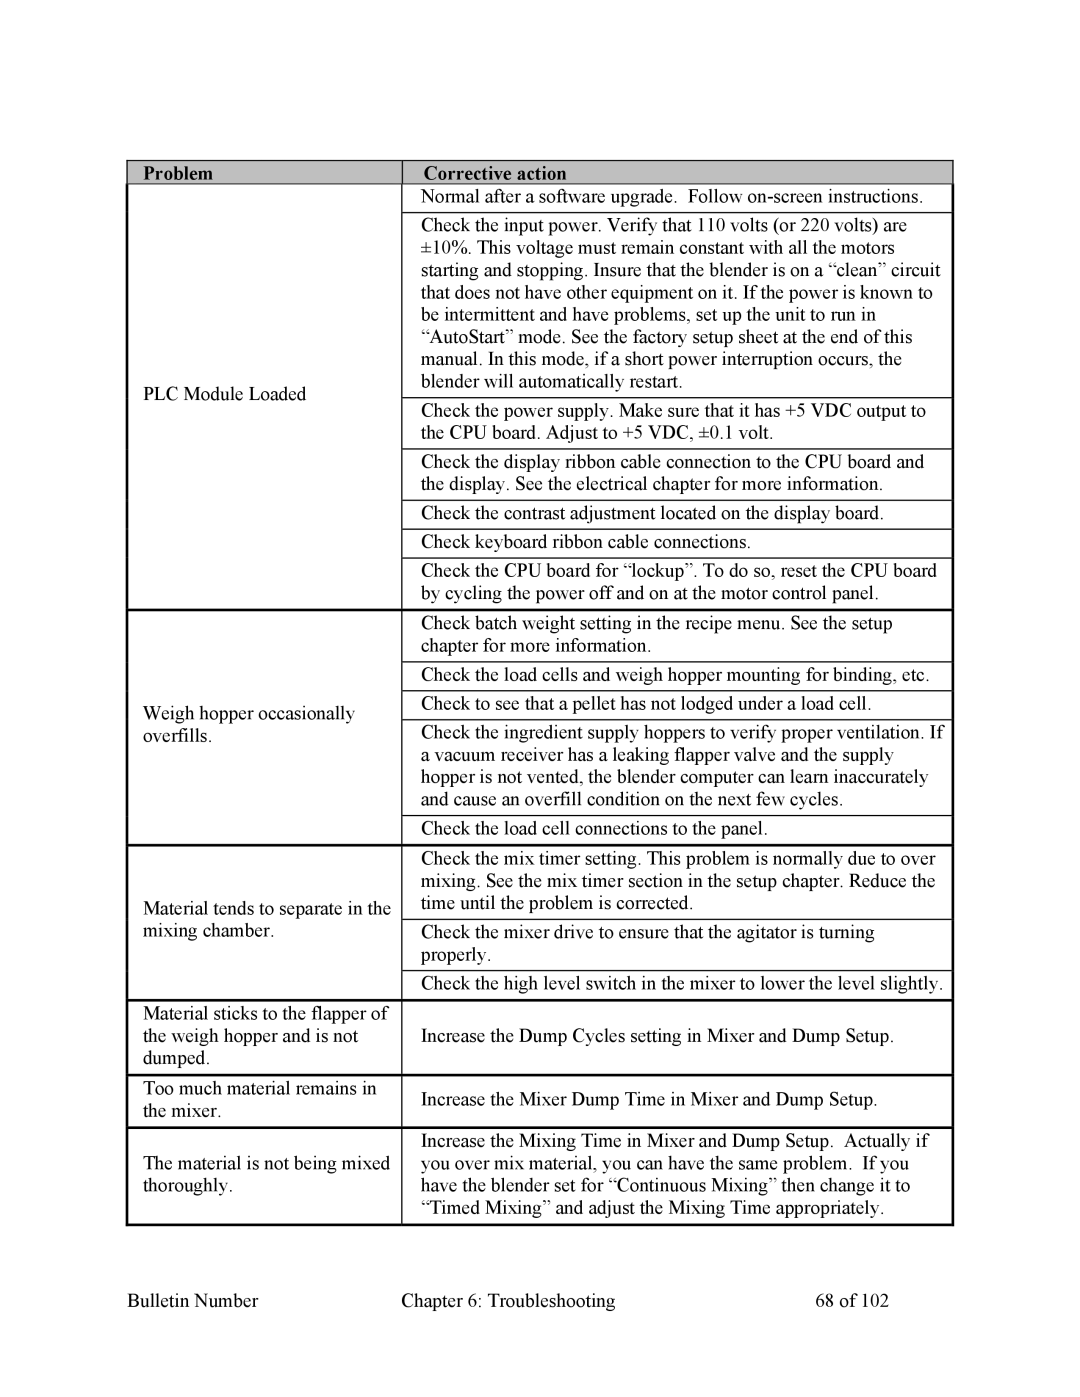
Problem


Corrective action


Normal after a software upgrade. Follow on-screen instructions.


Check the input power. Verify that 110 volts (or 220 volts) are


±10%. This voltage must remain constant with all the motors


starting and stopping. Insure that the blender is on a “clean” circuit


that does not have other equipment on it. If the power is known to


be intermittent and have problems, set up the unit to run in


“AutoStart” mode. See the factory setup sheet at the end of this


manual. In this mode, if a short power interruption occurs, the


PLC Module Loaded


blender will automatically restart.


Check the power supply. Make sure that it has +5 VDC output to


the CPU board. Adjust to +5 VDC, ±0.1 volt.


Check the display ribbon cable connection to the CPU board and


the display. See the electrical chapter for more information.


Check the contrast adjustment located on the display board.


Check keyboard ribbon cable connections.


Check the CPU board for “lockup”. To do so, reset the CPU board


by cycling the power off and on at the motor control panel.


Check batch weight setting in the recipe menu. See the setup


chapter for more information.


Check the load cells and weigh hopper mounting for binding, etc.


Weigh hopper occasionally


Check to see that a pellet has not lodged under a load cell.


overfills.


Check the ingredient supply hoppers to verify proper ventilation. If


a vacuum receiver has a leaking flapper valve and the supply


hopper is not vented, the blender computer can learn inaccurately


and cause an overfill condition on the next few cycles.


Check the load cell connections to the panel.


Check the mix timer setting. This problem is normally due to over


mixing. See the mix timer section in the setup chapter. Reduce the


Material tends to separate in the


time until the problem is corrected.


mixing chamber.


Check the mixer drive to ensure that the agitator is turning


properly.


Check the high level switch in the mixer to lower the level slightly.


Material sticks to the flapper of


the weigh hopper and is not


Increase the Dump Cycles setting in Mixer and Dump Setup.


dumped.


Too much material remains in


Increase the Mixer Dump Time in Mixer and Dump Setup.


the mixer.


Increase the Mixing Time in Mixer and Dump Setup. Actually if


The material is not being mixed


you over mix material, you can have the same problem. If you


thoroughly.


have the blender set for “Continuous Mixing” then change it to


“Timed Mixing” and adjust the Mixing Time appropriately.


Bulletin Number

Chapter 6: Troubleshooting

68 of 102

Page 69
Image 69
Mitsubishi Electronics 882.00207.00 specifications Problem Corrective action

882.00207.00 specifications

Mitsubishi Electronics has always been at the forefront of innovation in the field of electronics, and one of its significant products is the Mitsubishi Electronics 882.00207.00. This device is designed for enhanced performance and reliability, providing a range of features that cater to both industrial and consumer needs.

One of the main features of the Mitsubishi 882.00207.00 is its robust design, which ensures durability in demanding environments. The device is built to withstand harsh conditions, making it ideal for industrial applications where reliability is critical. Its rugged construction means that it can operate efficiently in extreme temperatures, humidity, and other challenging conditions.

In terms of technology, the Mitsubishi 882.00207.00 incorporates advanced electronic components that enhance its functionality. This includes state-of-the-art processing capabilities that allow for quick data processing and seamless operation. The device’s integration of cutting-edge technology ensures that it meets the performance demands of modern applications while providing energy efficiency.

Another notable characteristic is its user-friendly interface. The device is designed with ease of use in mind, allowing operators to interact with it effortlessly. This ensures that even those with minimal technical expertise can operate the device effectively. The clear display and intuitive controls make it accessible for a wide range of users, facilitating smoother operations in various settings.

The Mitsubishi 882.00207.00 is also equipped with multiple connectivity options. This enables it to integrate seamlessly with other devices and systems, facilitating enhanced communication and data transfer. Whether it’s connecting to existing networks or interfacing with new technologies, the device’s versatility ensures it can adapt to evolving technological landscapes.

Additionally, the device is backed by Mitsubishi's commitment to quality and customer support. Users can expect reliable service and assistance, ensuring that they can maximize the potential of their investment.

In conclusion, the Mitsubishi Electronics 882.00207.00 stands out in the electronics market for its durable construction, advanced technology, user-friendly design, and versatile connectivity options. This makes it an invaluable tool for both industrial applications and everyday consumer use, embodying the innovative spirit that Mitsubishi Electronics is known for.