AW-RP400E
$ do not Remove Panel Cover by Unscrewing
Safety precautions
Contents
≥ Handle the ROP carefully
Precautions for use
≥ Use the ROP in an ambient temperature of -10C to +45C
≥ Avoid using the units outdoors ≥ Maintenance
Introduction
Accessories
Installation precautions
Parts and their function
AC 100 inlet AC in AC 3-point inlet
Pedestal Power ON/OFF switch
Bottom panel Prompter connector
Tally lamp accessory
Option connector Option
=Guide pin END/EXT connector ND/EXT
@ SDI in connector SDI
ENG Lens Control connector
L in connector G/L
Connector Y
Connector
SDI connector SDI
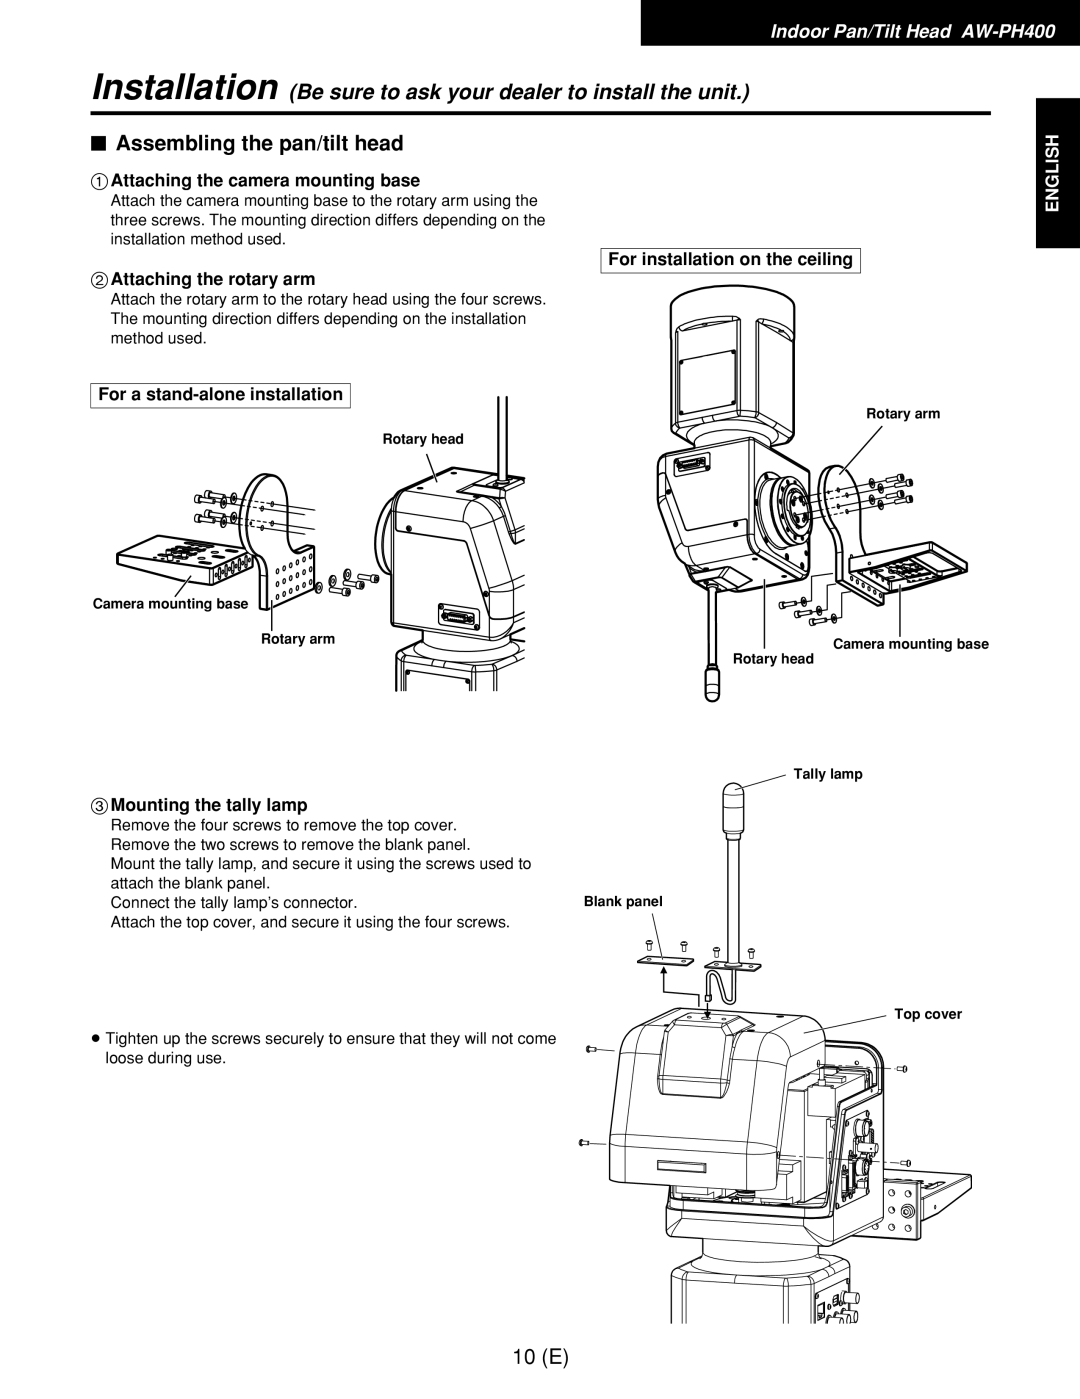
Attaching the camera mounting base
Attaching the rotary arm For installation on the ceiling
For a stand-alone installation
$ Assembling the pan/tilt head
For installation on the ceiling
$ Setting the mounting direction switch
For stand-alone installation
$ Setting the PCB switches
13 E
$ Installing the pan/tilt head
$ Mounting the camera
≥ Camera AW-E750
When mounting the AW-E750 camera
When mounting the AW-E350 or AW-E650 camera
$ Attaching the chain
Replacing the consumable parts
Power consumption 145W
Specifications
Rack-mounting adaptors Mounting screws M4!8 mm
Zoom switch Plug D-SUB 15-pin for tally/INCOM system
$ Front panel
Focus indicator
PAN indicator
Iris indicator
= Zoom indicator
LCD panel
Preset Memory selection buttons 1 to
PAN/TILT lever/ROTATION control switch
Memory button
$ Rear panel
Mext Cont IN/OUT connectors OTALLY/INCOM connector
Camera Control in from RCB P1 to P5 connectors
Camera Control in from RCP connector
Remote connector
Control OUT to PAN/TILT Head P1 to P5 connectors
Moni SEL OUT connector
$ Operation method
Menu settings
Menu item Setting Description Initial value
$ List of menu items and settings
Rotation Switch setting ROTATION/FOCUS/ZOOM/IRIS
Speed with Zoom POS. setting OFF/1/2/3
Preset Speed setting 1 to
Iris Control setting BOTH/RP400/CB400
Control Select Mode setting INTERLOCK/UN-INTERLOCK
Option Switch a to H settings
Memory Length setting 60s/120s/300s/600s
SD Card setting
Monitor Select setting
Buzzer setting OFF/ON
Auto RUN setting Start No., END No., Interval
AW-RP400
$ How to mount the AW-RP400 in a rack
Example of rack mounting
$ How to change the direction of the connector panel
Secure the zoom switch using the four screws
$ How to replace the zoom switch
33 E
Supply voltage DC 10.8V to Power consumption Approx W
35 E
SHORT/LONG selector switch
1Power LED 7DC 12V in socket
Power switch
Cable length setting switches 0 to
Pb in connectors 1 to
MONITOR1, 2 connectors BAC adaptor storage space
Video in connectors 1 to
= Pr/C in connectors 1 to
$ How to mount the AW-RC400 in a rack
Supply voltage
Approx W Indicates safety information
40 E
Pan/tilt head connecting cable Mounting screws M4!8 mm
Camera mounting plate anchoring screws
Pan/tilt head connector
Camera mounting plate
Installation
Performance
Supply voltage Power consumption Approx W
Pan/tilt head connector
Ambient operating temperature 0C to +40C
Connections
46 E
MONITOR1 MONITOR2
Example of system configuration
$ Turning on the power
Operating procedures
$ Providing cable compensation for the cameras
Make these adjustments using the AW-RC400 cable compensator
Setting the recording time and number of memories
$ Genlock adjustments for the respective cameras
$ Video adjustments for the cameras
$ Tracing memory settings
Playing the tracing memory data
Erasing the tracing memory data
$ Setting the preset memory data
Registering the preset memory data
Changing the tracing memory data
Playing the preset memory data
54 E
Abschrauben von Gehäuseteilen
Sicherheitshinweise
$ Öffnen Sie nicht das Gerät durch
Einleitung Zubehör Teile und ihre Funktionen
Inhalt
Sicherheitshinweise Vorsichtsmaßnahmen zum Gebrauch
Auswechseln von Verbrauchsteilen Technische Daten
Vorsicht
Vorsichtsmaßnahmen zum Gebrauch
≥ Behandeln Sie die FSK sorgfältig
Dreharm Kameramontageplatte
Einleitung
Zubehör
Installationshinweise
Teile und ihre Funktionen
Bodenplatte Anschluss Prompter Prompter
Sockel Netzschalter Power ON/OFF
Netzeingang AC in 3-poliger Netzeingang
Kameramontageplatten-Befestigungsschrauben
? Seitenblende
= Führungsstift
Kamerabefestigungsschrauben U1/4 20UNC
Anschluss ND/EXT ND/EXT
Buchse G/L in G/L
Buchse Y Y
Buchse 1394
Buchse SDI SDI
$ Zusammenbauen des Schwenk-/Neigekopfes
$ Einstellen des Montagerichtungsschalters
Für freistehende Installation
Für Deckeninstallation
$ Einstellen der Platinenschalter
$ Ändern der Montageposition der Sockel-Anschlusstafel
Für freistehende Installation Für Deckeninstallation
$ Installieren des Schwenk-/Neigekopfes
$ Montieren der Kamera
≥ Kamera AW-E750
$ Anbringen der Kette
Bei Montage der Kamera AW-E750
Bei Montage der Kamera AW-E350 oder AW-E650
Auswechseln von Verbrauchsteilen
Leistungsaufnahme 145 W
Technische Daten
Stecker D-SUB, 15-polig für Rotlicht/INCOM-System Satz
$ Frontplatte
SD CARD-Steckplatz
Taste Iris AUTO/MANU/LOCK
Schwenkanzeige PAN
Blendenanzeige
LCD-Feld
Wahltasten Preset Memory 1 bis
Taste Memory
Tasten Control Select 1 bis
Anschlüsse Camera Control in from RCB P1 bis P5
$ Rückwand
Anschlüsse EXT Cont IN/OUT
Anschluss TALLY/INCOM
Anschluss Moni SEL OUT
Anschluss Remote
Eingang DC 12V
Anschlüsse Control OUT to PAN/TILT Head P1 bis P5
$ Bedienungsverfahren
Menüeinstellungen
Menüposten Einstellung Beschreibung Anfangswert
$ Liste der Menüposten und Einstellungen
Einstellung Iris Control BOTH/RP400/CB400
Einstellung Preset Speed 1 bis
Einstellung Rotation Switch ROTATION/FOCUS/ZOOM/IRIS
Einstellung Speed with Zoom POS. OFF/1/2/3
Einstellung Memory Length 60s/120s/300s/600s
Einstellungen Option Switch a bis H
Einstellung Control Select Mode INTERLOCK/UN-INTERLOCK
Einstellung SD Card
Einstellung Monitor Select
Einstellung Buzzer OFF/ON
Einstellung Auto RUN Start No., END No., Interval
$ Rackmontageverfahren des AW-RP400
Beispiel für Rackmontage
$ Ändern der Einbauposition der Anschlusstafel
Den Zoomschalter mit den vier Schrauben befestigen
$ Auswechseln des Zoomschalters
33 G
Eingänge/Ausgänge
Eingänge
Ausgänge
Rackmontageadapter Befestigungsschrauben M4!8 mm
Kabellängen-Einstellschalter 0 bis
Schalter Power
Frontplatte Rückwand
1Betriebs-LED 7Eingang DC 12V
Netzgerät-Stauraum
Buchsen MONITOR1
Buchsen Y/VIDEO in 1 bis
Buchsen Pb OUT 1 bis
$ Rackmontageverfahren des AW-RC400
Ca W Ist die Sicherheitsinformation
Versorgungsspannung
40 G
Schwenk-/Neigekopf-Verbindungskabel
Kameramontageplatten-Ankerschrauben
Drehring Kamerabefestigungsschraube U1/4-20UNC
Rolleinheit-Ankerschraubenlöcher
Schwenk-/Neigekopf-Anschluss
43 G
Versorgungsspannung Gleichstrom Leistungsaufnahme Ca W
Anschlüsse
46 G
Beispiel der Systemkonfiguration
$ Einschalten
Bedienungsverfahren
$ Kabelkompensation für die Kameras
Oszilloskop FBAS-Signale
Oszilloskop Komponentensignale
Registrieren der Ablaufspeicherdaten
$ Genlock-Einstellungen für die jeweiligen Kameras
$ Video-Einstellungen für die Kameras
$ Ablaufspeicher-Einstellungen
Wiedergeben der Ablaufspeicherdaten
Registrieren der Vorwahlspeicherdaten
$ Einstellen der Vorwahlspeicherdaten
Ändern der Ablaufspeicherdaten
Löschen der Ablaufspeicherdaten
Wiedergeben der Vorwahlspeicherdaten
54 G
$ Ne pas dévisser le couvercle
Consignes de sécurité
Consignes de sécurité Précautions d’utilisation
Introduction Accessoires Les commandes et leurs fonctions
Remplacement des consommables Fiche technique
Table des matières
≥ Ne pas utiliser les appareils à l’extérieur ≥ Entretien
Précautions d’utilisation
≥ Manipuler le ROP avec précaution
Bras rotatif Socle de montage de caméra
Accessoires
Précautions d’installation
Les commandes et leurs fonctions
Entrée secteur 100 AC in entrée secteur à 3 points
Pied Interrupteur de mise sous/hors tension Power ON/OFF
Lampe de signalisation accessoire
Panneau des connecteurs de La tête rotative Tête rotative
Connecteur ND/EXT ND/EXT
Commutateur de marche/arrêt de signalisation Tally
= Tige de guidage
Vis de montage de caméra U1/4 20UNC
Connecteur G/L in G/L
Connecteur Y Y
Connecteur 1394
Connecteur SDI SDI
$ Montage de la tête panoramique
Fixation du bras rotatif Pour une installation au plafond
Pour une installation autonome
Montage de la lampe de signalisation
$ Réglage du commutateur de sens de montage
Pour une installation autonome
$ Réglage des commutateurs de carte de circuits
13 F
$ Installation de la tête panoramique
$ Montage de la caméra
≥ Caméra AW-E750
$ Fixation de la chaîne
Lors du montage de la caméra AW-E750
Lors du montage de la caméra AW-E350 ou AW-E650
Remplacement des consommables
Fiche technique
19 F
Avant
$ Panneau
Levier de zoom ZOOM/molette de mise au point Focus
Emplacement pour carte SD SD Card
Touche de diaphragme Iris AUTO/MANU/LOCK
Molette de diaphragme Iris
Touche de mémoire Memory
Touches de sélection Preset Memory 1 à
Touches de sélection de commande Control Select 1 à
Voyants de signalisation Tally 1 à
Connecteur TALLY/INCOM
$ Panneau arrière M
Connecteurs EXT Cont IN/OUT
Connecteurs Camera Control in from RCB P1 à P5
Connecteur Moni SEL OUT
Connecteur Remote
Prise DC 12V
Connecteurs Control OUT to PAN/TILT Head P1 à P5
$ Méthode de fonctionnement
Réglage des menus
Rubrique Paramètre Description Valeur initiale
$ Liste des rubriques et des paramètres
Rubrique Iris Control BOTH/RP400/CB400
Rubrique Preset Speed 1 à
Rubrique Rotation Switch ROTATION/FOCUS/ZOOM/IRIS
Rubrique Speed with Zoom POS OFF/1/2/3
Rubrique Memory Length 60s/120s/300s/600s
Rubriques Option Switch a à H
Rubrique Control Select Mode INTERLOCK/UN-INTERLOCK
Rubrique SD Card
Rubrique Monitor Select
Rubrique Buzer OFF/ON
Rubrique Auto RUN Start No., END No., Interval
$ Montage de l’AW-RP400 dans un rack
Exemple de montage en rack
$ Modification du sens de montage du panneau des connecteurs
Fixer le commutateur de zoom à l’aide des quatre vis
$ Remplacement du commutateur de zoom
33 F
Connecteurs d’entrée/sortie
Dimensions L!H!P
Connecteurs d’entrée
Connecteurs de sortie
Adaptateurs de montage en rack Vis de montage M4!8 mm
Commutateurs de réglage de longueur de câble 0 à
Interrupteur d’alimentation Power
Commande de réponse en fréquence
Panneau avant LED d’alimentation
Espace de rangement de l’adaptateur secteur
Connecteurs MONITOR1
Connecteurs Y/VIDEO in 1 à
Connecteurs Pb OUT 1 à
$ Montage de l’AW-RC400 dans un rack
Poids
Dimensions L !H !P
Tension d’alimentation
Fonctions des commutateurs et de réglage
40 F
Câble de raccordement de tête panoramique
Vis d’ancrage de plaque de montage de caméra
2Vis de montage de caméra U1/4-20UNC
Plaque de montage de caméra
Connecteur de tête panoramique
43 F
Température de fonctionnement ambiante 0C à +40C
Tension d’alimentation Consommation Environ 24 W
Connecteur de tête panoramique
Performances
Raccordements
46 F
Exemple de configuration du système
$ Mise sous tension
Procédures de fonctionnement
$ Réglage de la compensation de câble des caméras
Réglage
$ Réglage du genlock des différentes caméras
$ Réglage vidéo des caméras
$ Réglage des mémoires de tracé
Lecture des données de la mémoire de tracé
Enregistrement des données de la mémoire de préréglage
$ Réglage des données de la mémoire de préréglage
Modification des données de la mémoire de tracé
Effacement des données de la mémoire de tracé
53 F
54 F
Per le riparazioni, rivolgersi a personale tecnico
Precauzioni per la sicurezza
Coperchio. All’interno non ci sono parti riparabili
Dall’utente
Precauzioni per la sicurezza Precauzioni per l’uso
Sommario
Avvertimento
Precauzioni per l’uso
≥ Maneggiare il pannello di comando a distanza con cura
≥ Evitare di usare le unità all’esterno ≥ Manutenzione
Introduzione
Accessori
Precauzioni per l’installazione
Parti e loro funzioni
Ingresso c.a AC Ingresso a 3 contatti di corrente alternata
Piedistallo Interruttore Power ON/OFF
Spia tally accessoria
Pannello connettori testa rotante Testa rotante
? Pannello cieco laterale
= Perno guida
Viti di montaggio videocamera U1/4 20UNC
Connettore filtro ND/prolunga ND/EXT
Connettore d’ingresso G/L G/L
Connettore Y Y
Connettore 1394
Connettore SDI SDI
Attaccare la base di montaggio videocamera
Attaccare il braccio rotante Installazione sul soffitto
Installazione indipendente
$ Montaggio della testa di panoramica orizzontale/verticale
$ Regolazione dell’interruttore di direzione montaggio
Installazione indipendente
Installazione sul soffitto
$ Regolazione degli interruttori PCB
Installazione Chiedere al rivenditore di installare l’unità
Installazione indipendente Installazione sul soffitto
$ Montaggio della videocamera
≥ Videocamera AW-E750
$ Attaccare la catena
Montando la videocamera AW-E750
Montando la videocamera AW-E350 o AW-E650
Sostituzione delle parti consumabili
Assorbimento di corrente 145 W circa
Dati tecnici
Spina D-SUB 15 pin per sistema tally/INCOM Gruppo
Anteriore
$ Pannello
Indicatore Focus
Indicatore PAN
Indicatore Iris
= Indicatore Zoom
Pannello LCD
Tasti di selezione Preset Memory da 1 a
Tasto Memory
Tasti Controllo Select da 1 a
Connettore TALLY/INCOM
$ Pannello Posteriore
Connettori EXT Cont IN/OUT
Connettori Camera Control in from RCB da P1 a P5
Connettore Moni SEL OUT
Connettore Remote
Presa DC 12V
Connettori Control OUT to PAN/TILT Head da P1 a P5
$ Metodo operativo
Impostazioni con i menu
Opzione menu Impostazione Descrizione Valore iniziale
$ Elenco delle opzioni e impostazioni dei menu
Impostazione Iris Control BOTH/RP400/CB400
Impostazione Preset Speed da 1 a
Impostazione Rotation Switch ROTATION/FOCUS/ZOOM/IRIS
Impostazione Speed with Zoom POS. OFF/1/2/3
Impostazione Memory Length 60s/120s/300s/600s
Impostazioni Option Switch da a a H
Impostazione Control Select Mode INTERLOCK/UN-INTERLOCK
Impostazione SD Card
Impostazione Monitor Select
Impostazione Buzzer OFF/ON
Impostazione Auto RUN Start No., END No., Interval
$ Modo di montare l’AW-RP400 su un rack
Esempio di montaggio su rack
$ Modo di cambiare la direzione del pannello connettori
$ Modo di sostituire l’interruttore zoom
Sostituzione delle parti consumabili
Connettori d’ingresso/uscita
Assorbimento di corrente 11 W circa
Connettori d’ingresso
Connettori d’uscita
Adattatori di montaggio su rack Viti di montaggio M4!8 mm
Controllo F Response
Interruttore Power
Interruttori di regolazione lunghezza cavo da 0 a
Controllo Y Level
= Connettori Pr/C in da 1 a
Connettori MONITOR1
Spazio di conservazione alimentatore c.a
Connettori Y/VIDEO in da 1 a
Montaggio
$ Modo di montare l’AW-RC400 su un rack
Funzioni interruttori e regolazioni
Dimensioni L !A !P
Alimentazione
Assorbimento di corrente 9 W circa
Compensatore cavo AW-RC400
Unità di rotazione AW-RL400
3Piastra di montaggio videocamera Orizzontale/verticale
1Anello rotante 5Fori viti di ancoraggio unità di rotazione
2Vite di montaggio videocamera U1/4-20UNC
6Connettore testa di panoramica
Installazione
Prestazioni
AlimentazioneC.c. da 24 Assorbimento di corrente 24 W circa
Connettore testa di panoramica orizzontale/verticale
Collegamenti
Controllore di teste Panoramica
Esempio di configurazione del sistema
$ Accensione
Procedure operative
Fare queste regolazioni usando il compensatore cavo AW-RC400
$ Compensazione del cavo delle videocamere
Registrazione dei dati delle memorie di tracciamento
$ Regolazioni del genlock per le rispettive videocamere
$ Regolazioni video per le videocamere
$ Regolazioni delle memorie di tracciamento
Riproduzione dei dati delle memorie di tracciamento
Registrazione dei dati nelle memorie di preselezione
Cancellazione dei dati delle memorie di tracciamento
$ Impostazione dei dati delle memorie di preselezione
Cambiamento dei dati nelle memorie di tracciamento
Riproduzione dei dati delle memorie di preselezione
Italiano
Precauciones de seguridad
Precauciones de seguridad Precauciones para la utilización
Índice
Precaución
Precauciones para la utilización
≥ Maneje el PCR cuidadosamente
M4!8 mm M4!6 mm Llave hexagonal Cable de CA
Introducción
Accesorios
Precauciones para la instalación
Partes y sus funciones
Tornillos de montaje de la base de montaje de la cámara
Pedestal Interruptor Power ON/OFF
Panel de conectores del Cabezal giratorio Panel giratorio
Panel Inferior Conector Prompter
@ Conector SDI in SDI
=Clavija guía EConector ND/EXT ND/EXT
Tornillos de montaje de la cámara U1/4 20UNC
? Panel ciego lateral
Conector G/L in G/L
Conector Y Y
Conector 1394
Conector SDI SDI
$ Montaje del cabezal de panorámica/inclinación
Instalación en el techo
$ Ajuste del conmutador de sentido de montaje
Para instalación independiente
$ Ajuste de los conmutadores PCB
13 S
Instalación independiente Instalación en el techo
$ Instalación del cabezal de panorámica/inclinación
$ Montaje de la cámara
≥ Cámara AW-E750
$ Colocación de la cadena
Cuando monte la cámara AW-E750
Cuando monte la cámara AW-E350 o AW-E650
Cambio de piezas consumibles
Consumo 145 W
Especificaciones
19 S
Delantero
$ Panel
Dial Iris
Botón Iris AUTO/MANU/LOCK
Indicador PAN
Ranura SD Card
Panel LCD
Botones selectores Preset Memory 1 a
Botón Memory
Botones Control Select 1 a
Conectores Camera Control in from RCB P1 a P5
$ Panel trasero M
MConectores EXT Cont IN/OUT OConector TALLY/INCOM
Conector Moni SEL OUT
Conector Remote
Zócalo DC 12V
Conectores Control OUT to PAN/TILT Head P1 a P5
$ Método de funcionamiento
Ajustes de menús
Elemento de menú Ajuste Descripción Valor inicial
$ Lista de ajustes y elementos de menús
Ajuste Iris Control BOTH/RP400/CB400
Ajuste Preset Speed 1 a
Ajuste Rotation Switch ROTATION/FOCUS/ZOOM/IRIS
Ajuste Speed with Zoom POS. OFF/1/2/3
Ajuste Memory Length 60s/120s/300s/600s
Ajustes Option Switch a a H
Ajuste Control Select Mode INTERLOCK/UN-INTERLOCK
Ajuste SD Card
Ajuste Monitor Select
Ajuste Buzzer OFF/ON
Ajuste Auto RUN Start No., END No., Interval
$ Montaje del AW-RP400 en una estantería
Ejemplo de montaje en una estantería
$ Cambio del sentido del panel de conectores
$ Cambio del conmutador del zoom
33 S
Conectores de entrada/salida
Dimensiones An!Al!Prof
Conectores de entrada
Conectores de salida
35 S
Control F Response
Interruptor Power
Conmutadores de ajuste de la longitud del cable 0 a
Control Y Level
? Conectores Y/VIDEO OUT 1 a
Conectores Y/VIDEO in 1 a
= Conectores Pr/C in 1 a
Conectores Pb in 1 a
$ Montaje del AW-RC400 en una estantería
Conmutación y funciones de ajuste
Dimensiones An !Al !Prof
40 S
41 S
Tornillos de anclaje de la placa de montaje de la cámara
Placa de montaje de la cámara
Agujeros para tornillos de anclaje de la unidad de giro
Conector de cabezal de panorámica/inclinación
Instalación
Conector de cabezal de panorámica/inclinación
Alimentación 24 V CC
Conexiones
46 S
Ejemplo de configuración del sistema
$ Conexión de la alimentación
Procedimientos de operación
Monitor de forma de onda señales componentes
$ Compensación de cable para las cámaras
Monitor de forma de onda Señales compuestas
Registro de datos de memorias de trazado
$ Ajustes de vídeo para las cámaras
$ Ajustes de la memoria de trazado
Ajuste del tiempo de grabación y número de memorias
Reproducción de datos de la memoria de trazado
Registro de datos de la memoria de preajustes
$ Ajuste de los datos de la memoria de preajustes
Cambio de los datos de la memoria de trazado
Borrado de los datos de la memoria de trazado
Reproducción de datos de la memoria de preajustes
54 S
Web Site http//www . panasonic . co . jp/global