Basics | 2 | Taking pictures with your | |
| own settings | ||
|
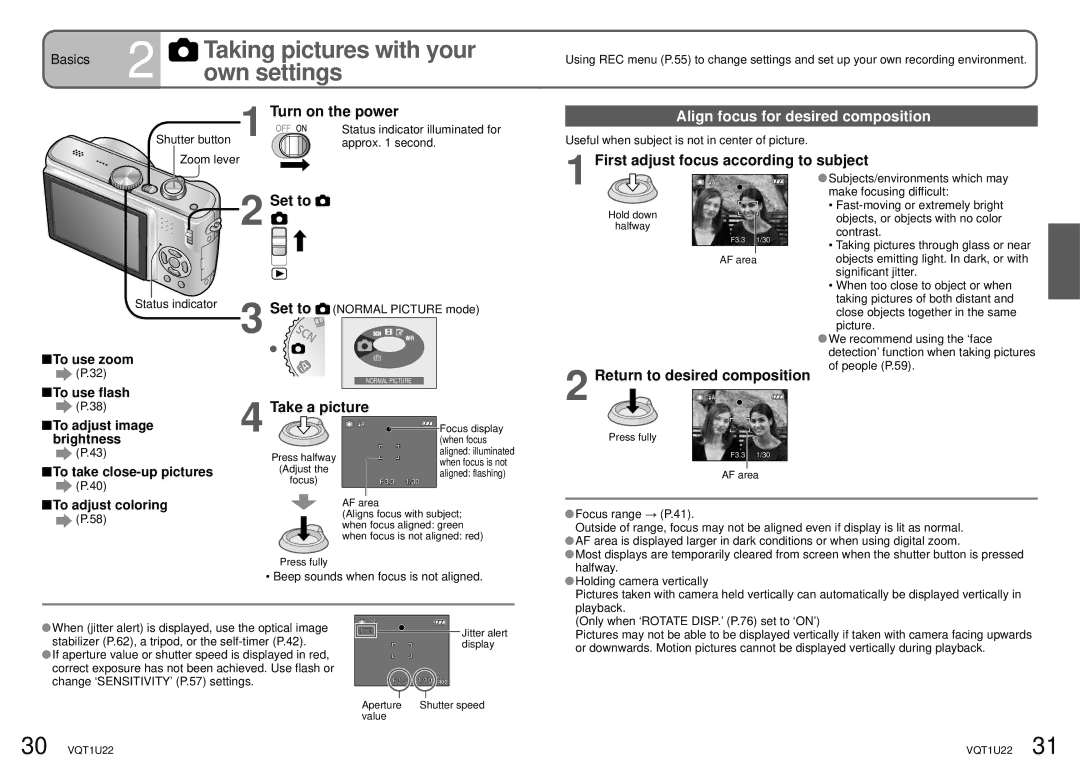
| Shutter button 1 | Turn on the power |
|
| Status indicator illuminated for | |
|
| approx. 1 second. | |
|
| Zoom lever |
|
Using REC menu (P.55) to change settings and set up your own recording environment.
Align focus for desired composition |
Useful when subject is not in center of picture. |
1 First adjust focus according to subject |
| 2 |
Status indicator | 3 |
To use zoom
Set to 
Set to ![]() (NORMAL PICTURE mode)
(NORMAL PICTURE mode)
|
| Subjects/environments which may | |
|
| make focusing difficult: | |
Hold down |
| • | |
| objects, or objects with no color | ||
halfway |
| contrast. | |
F3.3 | 1/30 | ||
• Taking pictures through glass or near | |||
|
| ||
AF area | objects emitting light. In dark, or with | ||
|
| significant jitter. | |
|
| • When too close to object or when | |
|
| taking pictures of both distant and | |
|
| close objects together in the same | |
|
| picture. | |
|
| We recommend using the ‘face | |
|
| detection’ function when taking pictures | |
(P.32)
![]() To use flash
To use flash
(P.38)
To adjust image | 4 |
brightness |
(P.43)
![]() To take
To take
(P.40)
Take a picture |
|
| |
|
| Focus display | |
|
| (when focus | |
Press halfway |
| aligned: illuminated | |
| when focus is not | ||
(Adjust the |
| ||
| aligned: flashing) | ||
focus) | F3.3 | ||
1/30 |
2 Return to desired composition
Press fully
F3.3 1/30
AF area
of people (P.59).
To adjust coloring | AF area | |
(P.58) | (Aligns focus with subject; | |
when focus aligned: green | ||
| ||
| when focus is not aligned: red) |
Press fully
• Beep sounds when focus is not aligned.
 Focus range → (P.41).
Outside of range, focus may not be aligned even if display is lit as normal. ![]() AF area is displayed larger in dark conditions or when using digital zoom.
AF area is displayed larger in dark conditions or when using digital zoom.
![]() Most displays are temporarily cleared from screen when the shutter button is pressed halfway.
Most displays are temporarily cleared from screen when the shutter button is pressed halfway.
![]() Holding camera vertically
Holding camera vertically
Pictures taken with camera held vertically can automatically be displayed vertically in playback.
![]() When (jitter alert) is displayed, use the optical image stabilizer (P.62), a tripod, or the
When (jitter alert) is displayed, use the optical image stabilizer (P.62), a tripod, or the
![]() If aperture value or shutter speed is displayed in red, correct exposure has not been achieved. Use flash or change ‘SENSITIVITY’ (P.57) settings.
If aperture value or shutter speed is displayed in red, correct exposure has not been achieved. Use flash or change ‘SENSITIVITY’ (P.57) settings.
30 VQT1U22
Jitter alert display
F3.3 | 1/10 |
Aperture | Shutter speed |
value |
|
(Only when ‘ROTATE DISP.’ (P.76) set to ‘ON’)
Pictures may not be able to be displayed vertically if taken with camera facing upwards or downwards. Motion pictures cannot be displayed vertically during playback.
VQT1U22 31
