Applications 4 Using PLAYBACK menu
(View)(Continued)
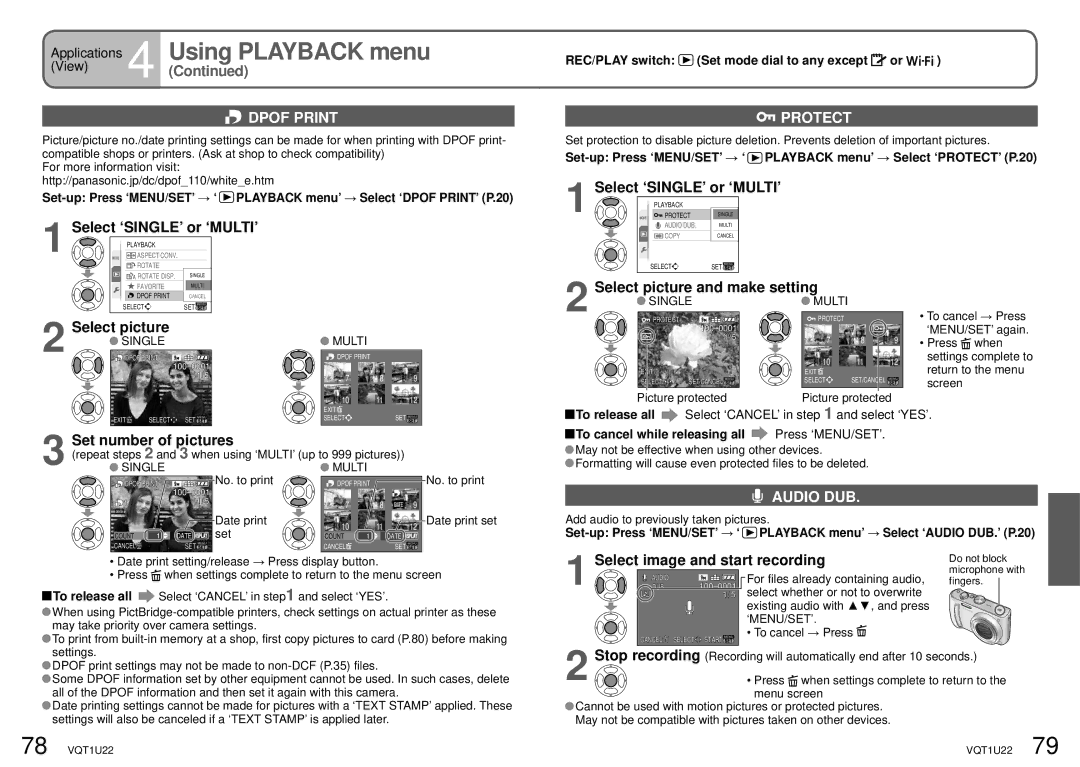
 DPOF PRINT
Picture/picture no./date printing settings can be made for when printing with DPOF print- compatible shops or printers. (Ask at shop to check compatibility)
For more information visit: http://panasonic.jp/dc/dpof_110/white_e.htm
![]() PLAYBACK menu’ → Select ‘DPOF PRINT’ (P.20)
PLAYBACK menu’ → Select ‘DPOF PRINT’ (P.20)
REC/PLAY switch:  (Set mode dial to any except
  or
or 


 )
)
 PROTECT
Set protection to disable picture deletion. Prevents deletion of important pictures.
![]() PLAYBACK menu’ → Select ‘PROTECT’ (P.20)
PLAYBACK menu’ → Select ‘PROTECT’ (P.20)
1 | Select ‘SINGLE’ or ‘MULTI’ |
PLAYBACK | |
SINGLE |
1 | Select ‘SINGLE’ or ‘MULTI’ | |
PLAYBACK |
| |
ASPECT CONV. |
| |
| ROTATE |
|
| ROTATE DISP. | SINGLE |
| FAVORITE | MULTI |
| DPOF PRINT | CANCEL |
| SELECT | SET |
Select picture
2 | SINGLE |
| MULTI |
|
| |
DPOF PRINT | DPOF PRINT |
|
| |||
|
|
| 1/5 | 7 | 8 | 9 |
|
|
|
| 10 | 11 | 12 |
|
|
|
| EXIT |
| SET |
3 | EXIT | SELECT | SET | SELECT |
| |
Set number of pictures |
|
|
| |||
(repeat steps 2 and 3 when using ‘MULTI’ (up to 999 pictures)) | ||||||
SINGLE | No. to print | MULTI |
|
| ||
| DPOF PRINT | DPOF PRINT |
|
| ||
|
|
|
|
| 1 |
| ||
1 |
| 1/5 |
| 7 | 8 | DATE | 9 | |
DATE |
|
| Date print |
|
|
|
| |
|
|
| 10 | 11 |
| 12 | ||
COUNT | 1 | DATE | set | DATE | ||||
COUNT | 1 |
| ||||||
CANCEL |
| SET |
| CANCEL |
| SET |
|
No. to print
Date print set
| PROTECT |
|
|
| |
| AUDIO DUB. | MULTI | |||
| COPY |
| CANCEL | ||
SELECT | SET |
|
| ||
| |||||
Select picture and make setting
2 | SINGLE | MULTI |
|
| • To cancel → Press | |
PROTECT |
| PROTECT |
|
| ||
|
|
|
|
| ‘MENU/SET’ again. | |
|
| 1/5 | 7 | 8 | 9 | • Press when |
|
|
| ||||
|
|
| 10 | 11 | 12 | settings complete to |
|
|
| return to the menu | |||
| EXIT |
| EXIT |
|
| |
| SELECT | SET/CANCEL | SELECT | SET/CANCEL |
| screen |
|
|
|
| |||
| Picture protected | Picture protected |
| |||
To release all | Select ‘CANCEL’ in step 1 and select ‘YES’. | |||||
To cancel while releasing all | Press ‘MENU/SET’. |
|
| |||
![]() May not be effective when using other devices.
May not be effective when using other devices.
![]() Formatting will cause even protected files to be deleted.
Formatting will cause even protected files to be deleted.
AUDIO DUB.
Add audio to previously taken pictures.
![]() PLAYBACK menu’ → Select ‘AUDIO DUB.’ (P.20)
PLAYBACK menu’ → Select ‘AUDIO DUB.’ (P.20)
•Date print setting/release → Press display button.
•Press ![]() when settings complete to return to the menu screen
when settings complete to return to the menu screen
![]() To release all
To release all ![]() Select ‘CANCEL’ in step1 and select ‘YES’.
Select ‘CANCEL’ in step1 and select ‘YES’.
![]() When using
When using
![]() To print from
To print from
![]() DPOF print settings may not be made to
DPOF print settings may not be made to
![]() Some DPOF information set by other equipment cannot be used. In such cases, delete all of the DPOF information and then set it again with this camera.
Some DPOF information set by other equipment cannot be used. In such cases, delete all of the DPOF information and then set it again with this camera.
![]() Date printing settings cannot be made for pictures with a ‘TEXT STAMP’ applied. These settings will also be canceled if a ‘TEXT STAMP’ is applied later.
Date printing settings cannot be made for pictures with a ‘TEXT STAMP’ applied. These settings will also be canceled if a ‘TEXT STAMP’ is applied later.
1 | Select image and start recording | Do not block | |
AUDIO | For files already containing audio, | microphone with | |
fingers. | |||
| 1/5 select whether or not to overwrite |
| |
|
| existing audio with ▲▼, and press |
|
|
| ‘MENU/SET’. |
|
| CANCEL SELECT | • To cancel → Press |
|
2 | START |
| |
Stop recording (Recording will automatically end after 10 seconds.) | |||
| • Press when settings complete to return to the | ||
menu screen
![]() Cannot be used with motion pictures or protected pictures.
Cannot be used with motion pictures or protected pictures.
May not be compatible with pictures taken on other devices.
78 VQT1U22 | VQT1U22 79 |