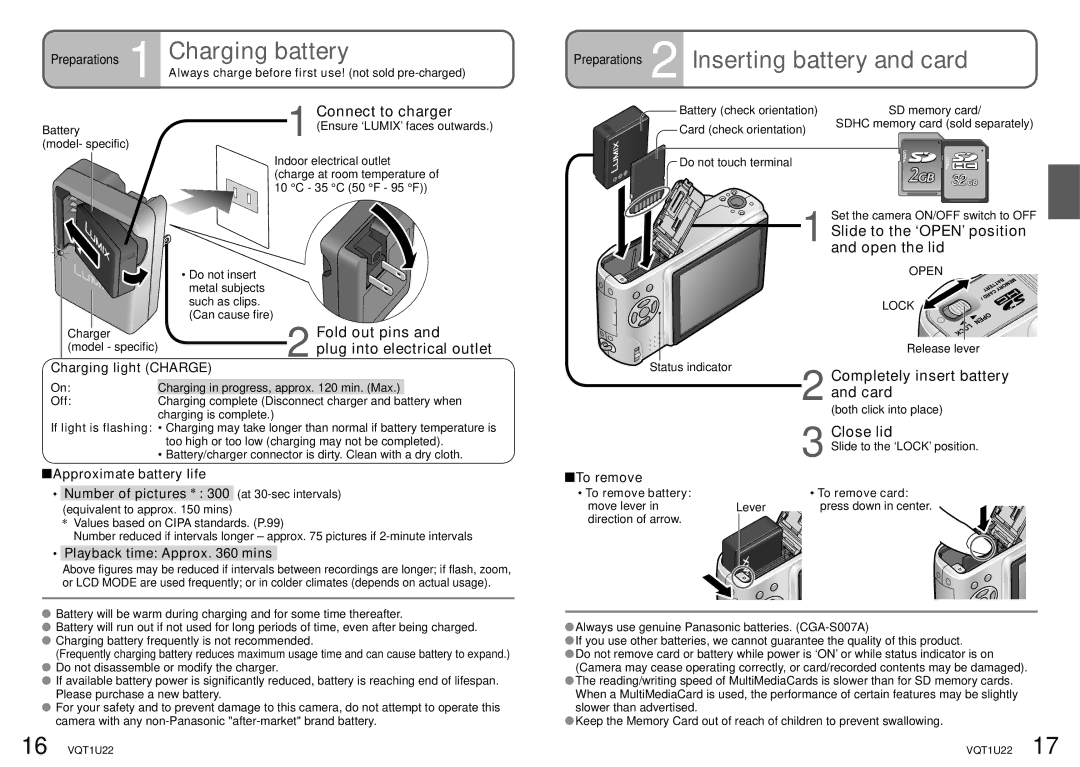
Preparations | 1 | Charging battery | |
|
| Always charge before first use! (not sold | |
|
| 1 | Connect to charger |
Battery |
| (Ensure ‘LUMIX’ faces outwards.) | |
(model- specific) |
| ||
|
| Indoor electrical outlet | |
|
| (charge at room temperature of | |
|
| 10 °C - 35 °C (50 °F - 95 °F)) | |
Preparations 2 Inserting battery and card
Battery (check orientation) | SD memory card/ |
Card (check orientation) | SDHC memory card (sold separately) |
| |
Do not touch terminal |
|
| 32 |
| Set the camera ON/OFF switch to OFF |
| Slide to the ‘OPEN’ position |
1 and open the lid | |
Charger (model - specific)
•Do not insert metal subjects such as clips. (Can cause fire)
2
Fold out pins and
plug into electrical outlet
OPEN |
LOCK |
Release lever |
Charging light (CHARGE)
On: | Charging in progress, approx. 120 min. (Max.) |
|
Off: | Charging complete (Disconnect charger and battery when | |
| charging is complete.) | |
If light is flashing: • Charging may take longer than normal if battery temperature is too high or too low (charging may not be completed).
•Battery/charger connector is dirty. Clean with a dry cloth.
![]() Approximate battery life
Approximate battery life
•Number of pictures ![]() : 300 (at
: 300 (at
(equivalent to approx. 150 mins)
![]() Values based on CIPA standards. (P.99)
Values based on CIPA standards. (P.99)
Number reduced if intervals longer – approx. 75 pictures if
•Playback time: Approx. 360 mins
Above figures may be reduced if intervals between recordings are longer; if flash, zoom, or LCD MODE are used frequently; or in colder climates (depends on actual usage).
![]() Battery will be warm during charging and for some time thereafter.
Battery will be warm during charging and for some time thereafter.
![]() Battery will run out if not used for long periods of time, even after being charged.
Battery will run out if not used for long periods of time, even after being charged.
![]() Charging battery frequently is not recommended.
Charging battery frequently is not recommended.
(Frequently charging battery reduces maximum usage time and can cause battery to expand.) ![]() Do not disassemble or modify the charger.
Do not disassemble or modify the charger.
![]() If available battery power is significantly reduced, battery is reaching end of lifespan. Please purchase a new battery.
If available battery power is significantly reduced, battery is reaching end of lifespan. Please purchase a new battery.
![]() For your safety and to prevent damage to this camera, do not attempt to operate this camera with any
For your safety and to prevent damage to this camera, do not attempt to operate this camera with any
Status indicator |
| Completely insert battery |
|
| |
|
| and card |
|
| 2 (both click into place) |
|
| Close lid |
To remove |
| 3 Slide to the ‘LOCK’ position. |
|
| |
• To remove battery: |
| • To remove card: |
move lever in | Lever | press down in center. |
direction of arrow.
![]() Always use genuine Panasonic batteries.
Always use genuine Panasonic batteries.
![]() If you use other batteries, we cannot guarantee the quality of this product.
If you use other batteries, we cannot guarantee the quality of this product.
![]() Do not remove card or battery while power is ‘ON’ or while status indicator is on (Camera may cease operating correctly, or card/recorded contents may be damaged).
Do not remove card or battery while power is ‘ON’ or while status indicator is on (Camera may cease operating correctly, or card/recorded contents may be damaged).
![]() The reading/writing speed of MultiMediaCards is slower than for SD memory cards. When a MultiMediaCard is used, the performance of certain features may be slightly slower than advertised.
The reading/writing speed of MultiMediaCards is slower than for SD memory cards. When a MultiMediaCard is used, the performance of certain features may be slightly slower than advertised.
![]() Keep the Memory Card out of reach of children to prevent swallowing.
Keep the Memory Card out of reach of children to prevent swallowing.
16 VQT1U22 | VQT1U22 17 |