Pelco manual Configure the CM9700MDD-EVS Settings, Configuring CM9700MDD-EVS Settings

Models: CM9700MDD-EVS

1 54
Download 54 pages 19.83 Kb
Page 28
Image 28

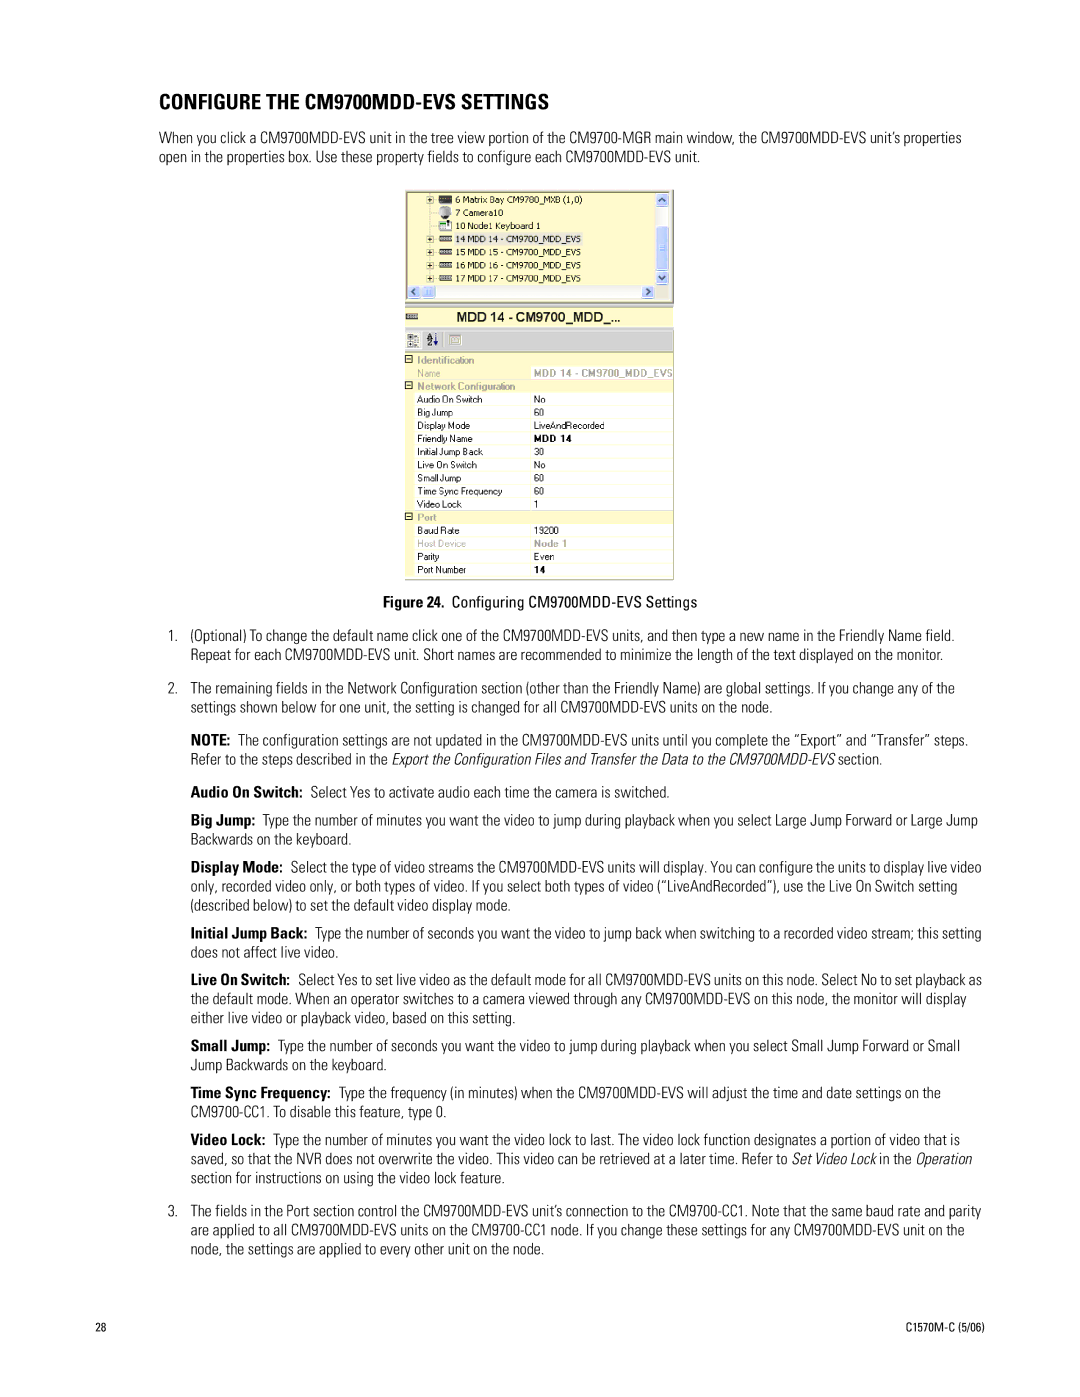
CONFIGURE THE CM9700MDD-EVS SETTINGS

When you click a CM9700MDD-EVS unit in the tree view portion of the CM9700-MGR main window, the CM9700MDD-EVS unit’s properties open in the properties box. Use these property fields to configure each CM9700MDD-EVS unit.

Figure 24. Configuring CM9700MDD-EVS Settings

1.(Optional) To change the default name click one of the CM9700MDD-EVS units, and then type a new name in the Friendly Name field. Repeat for each CM9700MDD-EVS unit. Short names are recommended to minimize the length of the text displayed on the monitor.

2.The remaining fields in the Network Configuration section (other than the Friendly Name) are global settings. If you change any of the settings shown below for one unit, the setting is changed for all CM9700MDD-EVS units on the node.

NOTE: The configuration settings are not updated in the CM9700MDD-EVS units until you complete the “Export” and “Transfer” steps. Refer to the steps described in the Export the Configuration Files and Transfer the Data to the CM9700MDD-EVSsection.

Audio On Switch: Select Yes to activate audio each time the camera is switched.

Big Jump: Type the number of minutes you want the video to jump during playback when you select Large Jump Forward or Large Jump Backwards on the keyboard.

Display Mode: Select the type of video streams the CM9700MDD-EVS units will display. You can configure the units to display live video only, recorded video only, or both types of video. If you select both types of video (“LiveAndRecorded”), use the Live On Switch setting (described below) to set the default video display mode.

Initial Jump Back: Type the number of seconds you want the video to jump back when switching to a recorded video stream; this setting does not affect live video.

Live On Switch: Select Yes to set live video as the default mode for all CM9700MDD-EVS units on this node. Select No to set playback as the default mode. When an operator switches to a camera viewed through any CM9700MDD-EVS on this node, the monitor will display either live video or playback video, based on this setting.

Small Jump: Type the number of seconds you want the video to jump during playback when you select Small Jump Forward or Small Jump Backwards on the keyboard.

Time Sync Frequency: Type the frequency (in minutes) when the CM9700MDD-EVS will adjust the time and date settings on the CM9700-CC1. To disable this feature, type 0.

Video Lock: Type the number of minutes you want the video lock to last. The video lock function designates a portion of video that is saved, so that the NVR does not overwrite the video. This video can be retrieved at a later time. Refer to Set Video Lock in the Operation section for instructions on using the video lock feature.

3.The fields in the Port section control the CM9700MDD-EVS unit’s connection to the CM9700-CC1. Note that the same baud rate and parity are applied to all CM9700MDD-EVS units on the CM9700-CC1 node. If you change these settings for any CM9700MDD-EVS unit on the node, the settings are applied to every other unit on the node.

28

C1570M-C (5/06)

Page 28
Image 28
Pelco manual Configure the CM9700MDD-EVS Settings, Configuring CM9700MDD-EVS Settings