OPERATING USING GUI
GUI | ÷ When the operating instructions say “Press the button”, this |
GUI (Graphic User Interface) lets you use the TV screen to | means move the cursor to the desired button and press the |
operate the system. | GUI ENTER button. |
÷ Press the GUI MODE button on this unit or the GUI button on | NOTE: |
the remote control and operation indications for the currently | ÷ If you do not perform any of the operations above within 10 ~ 30 |
selected function are displayed on the TV screen. | seconds, the GUI display is canceled. |
÷ To operate, use the %, #, fi, @ buttons on the remote control | ÷ |
(they light up when the GUI mode is on) or the | Set the rear panel PAL/NTSC switch to match your TV’s color |
this unit to move the cursor (the hand shaped mark) displayed | system. The screen will be unclear if the color system does not |
on the TV screen. When the cursor is on the button you want | match. |
to operate, press the GUI ENTER button. |
|
RECEIVER CONTROL BUTTONS
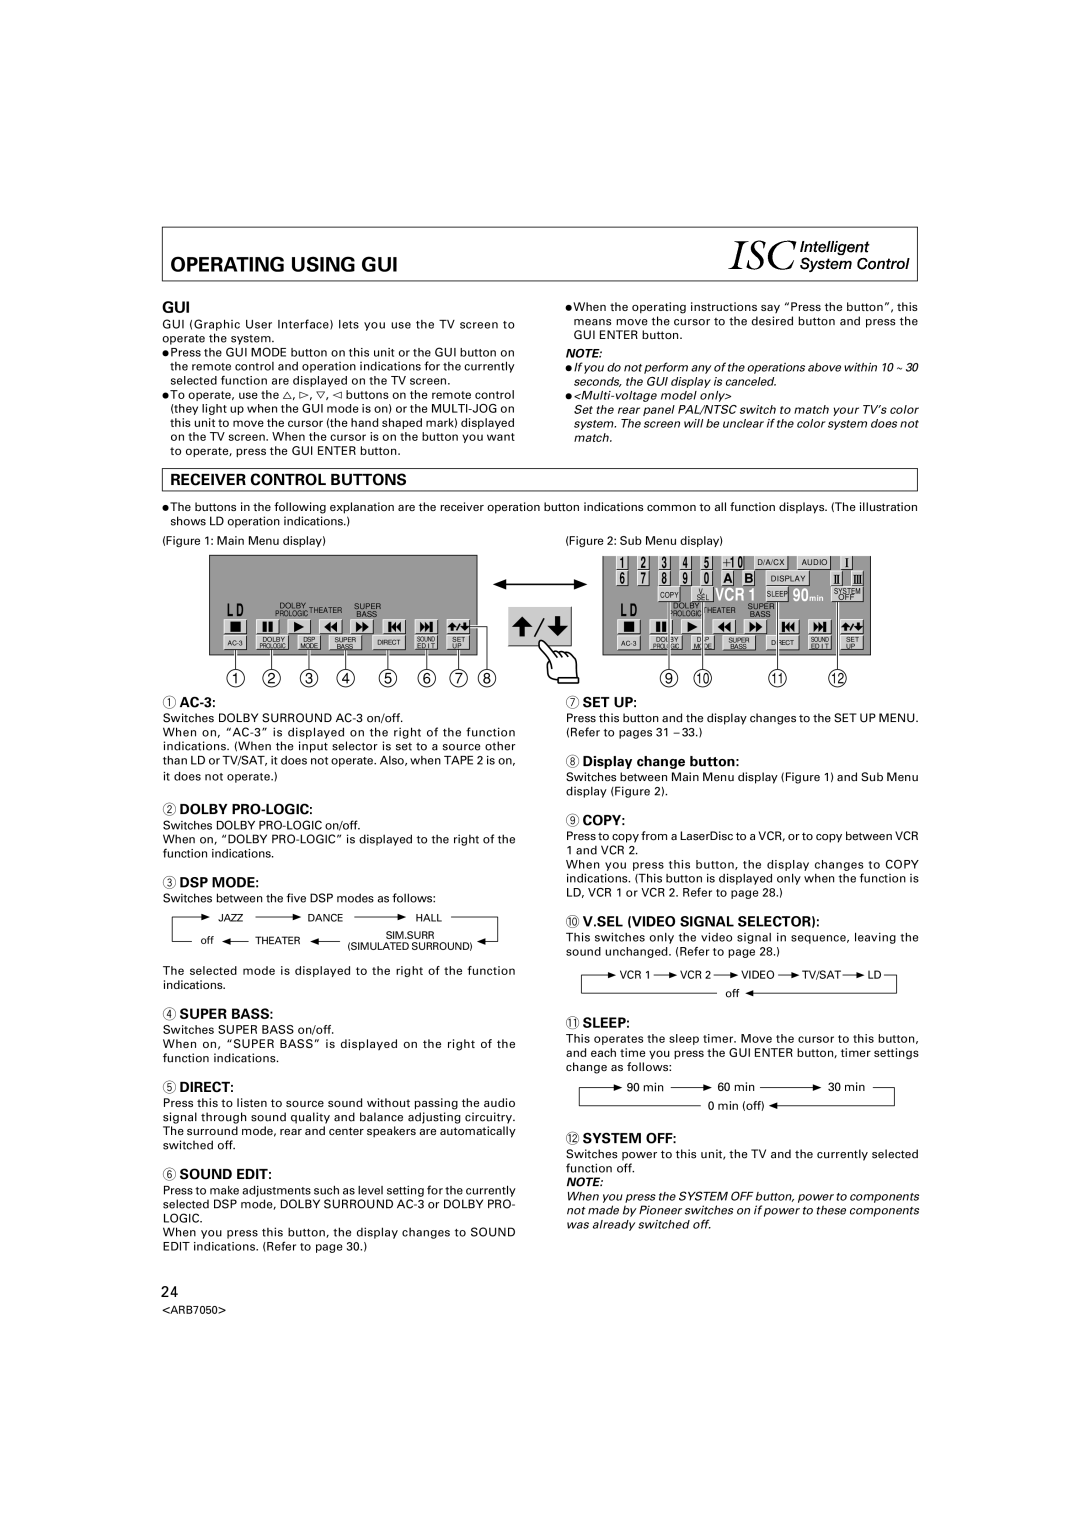
÷The buttons in the following explanation are the receiver operation button indications common to all function displays. (The illustration shows LD operation indications.)
(Figure 1: Main Menu display) | (Figure 2: Sub Menu display) |
|
|
|
|
|
|
|
|
| 1 | 2 | 3 | 4 | 5 | +1 0 |
| D/A/CX | AUDIO |
|
|
|
|
|
|
|
|
|
| 6 | 7 | 8 | 9 | 0 | A | B | DISPLAY |
| |
|
|
|
|
|
|
|
|
|
|
| COPY |
| V. | VCR 1 | SLEEP 90min | SYSTEM | ||
L D |
|
|
|
|
|
|
|
| L D |
|
| SEL | OFF | |||||
DOLBY |
| SUPER |
|
|
|
| DOLBY |
| SUPER |
|
| |||||||
PROLOGICTHEATER |
| BASS |
|
|
|
| PROLOGICTHEATER | BASS |
|
| ||||||||
DOLBY | DSP | SUPER | DIRECT | SOUND | SET |
|
| DOLBY |
| DSP | SUPER | DIRECT | SOUND | SET | ||||
PROLOGIC | MODE | BASS |
| ED I T | UP |
|
| PROLOGIC |
| MODE | BASS | ED I T | UP | |||||
|
|
|
|
|
|
|
| |||||||||||
1 | 2 | 3 | 4 |
| 5 | 6 | 7 | 8 |
|
| 9 |
| 10 |
|
| 11 |
| 12 |
1 |
|
|
|
|
|
|
|
| 7 SET UP: |
|
|
|
|
|
|
|
|
|
Switches DOLBY SURROUND
When on,
it does not operate.)
Press this button and the display changes to the SET UP MENU. (Refer to pages 31 – 33.)
8Display change button:
Switches between Main Menu display (Figure 1) and Sub Menu display (Figure 2).
2DOLBY PRO-LOGIC:
Switches DOLBY
When on, “DOLBY
3DSP MODE:
Switches between the five DSP modes as follows:
3 JAZZ | 3 DANCE | 3 HALL |
|
off 2 | THEATER 2 | SIM.SURR | 2 |
(SIMULATED SURROUND) |
The selected mode is displayed to the right of the function indications.
9COPY:
Press to copy from a LaserDisc to a VCR, or to copy between VCR 1 and VCR 2.
When you press this button, the display changes to COPY indications. (This button is displayed only when the function is LD, VCR 1 or VCR 2. Refer to page 28.)
0V.SEL (VIDEO SIGNAL SELECTOR):
This switches only the video signal in sequence, leaving the sound unchanged. (Refer to page 28.)
3 VCR 1 3 VCR 2 3 VIDEO 3 TV/SAT 3 LD off 2
4SUPER BASS:
Switches SUPER BASS on/off.
When on, “SUPER BASS” is displayed on the right of the function indications.
5DIRECT:
Press this to listen to source sound without passing the audio signal through sound quality and balance adjusting circuitry. The surround mode, rear and center speakers are automatically switched off.
6SOUND EDIT:
Press to make adjustments such as level setting for the currently selected DSP mode, DOLBY SURROUND
LOGIC.
When you press this button, the display changes to SOUND EDIT indications. (Refer to page 30.)
-SLEEP:
This operates the sleep timer. Move the cursor to this button, and each time you press the GUI ENTER button, timer settings change as follows:
3 90 min | 3 60 min | 3 30 min |
0 min (off) 2
=SYSTEM OFF:
Switches power to this unit, the TV and the currently selected function off.
NOTE:
When you press the SYSTEM OFF button, power to components not made by Pioneer switches on if power to these components was already switched off.
24
<ARB7050>