Manuals
/
Pitco Frialator
/
Kitchen Appliance
/
Fryer
Pitco Frialator
L22-345
manual
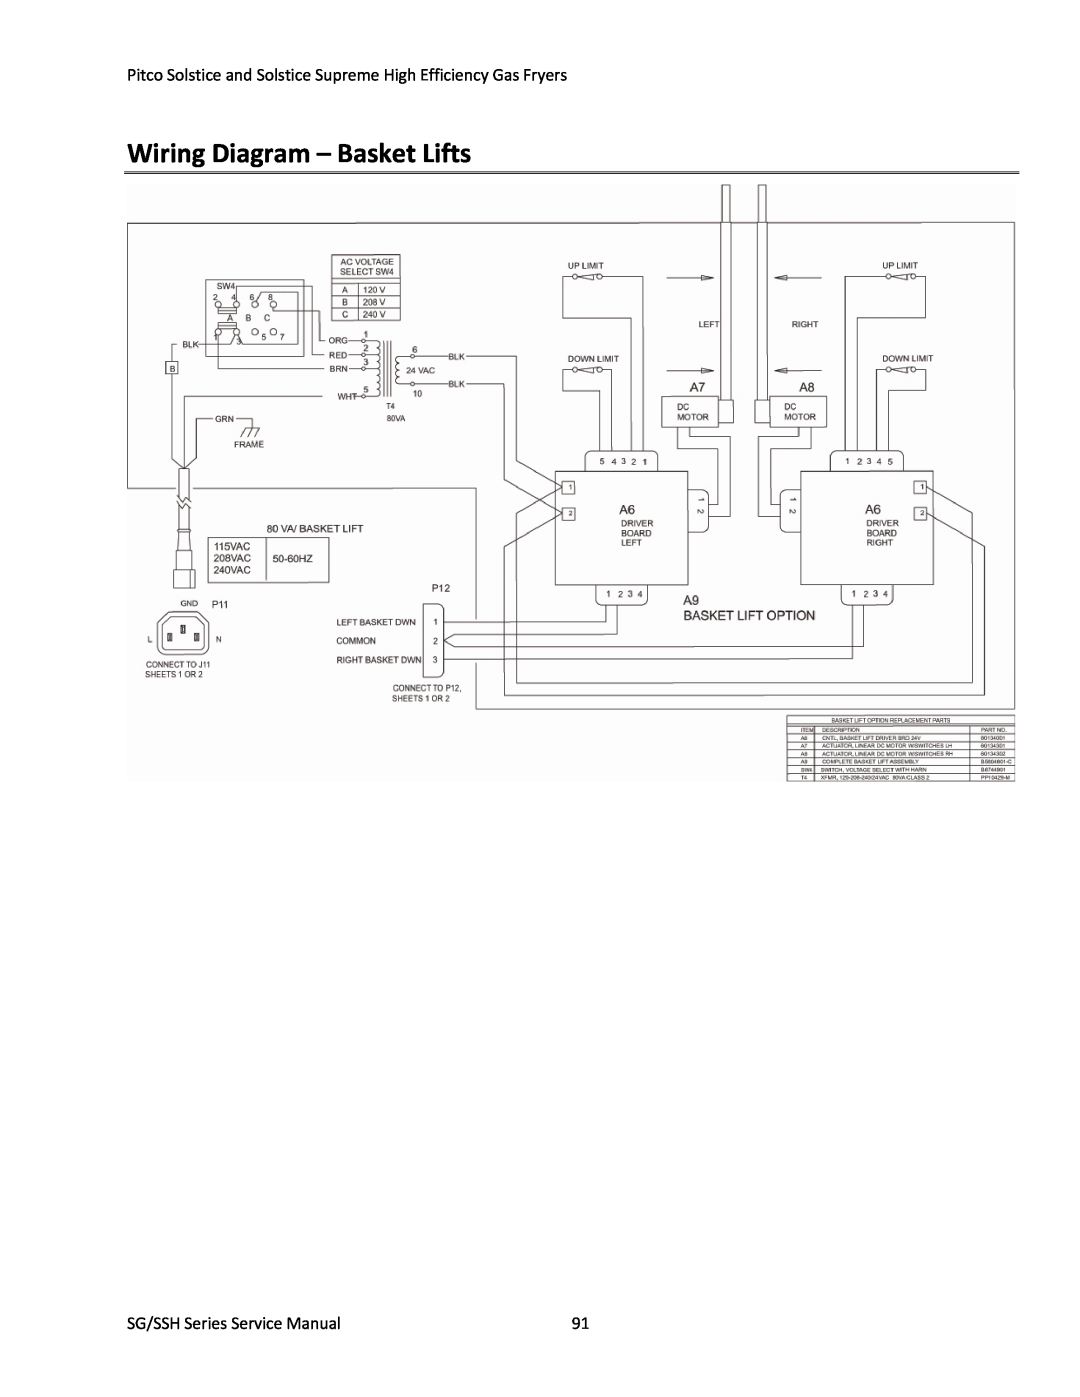
Wiring Diagram – Basket Lifts, SG/SSH Series Service Manual
Models:
L22-345
1
91
94
94
Download
94 pages
46.74 Kb
87
88
89
90
91
92
93
94
Troubleshooting
Wiring Diagrams
Accessing Fryer for Servicing
Replacing the Burner Assembly
Adjusting Pilot Pressure
Backup Solid State Control
Safety
Solstice Service Manual
Replacing the DVI Switch
Page 91
Image 91
Page 90
Page 92
Page 91
Image 91
Page 90
Page 92
Contents
High Efficiency Gas Fryers SG/SSH Series
Solstice Service Manual
L22-345R0
EQUIPMENT REFERENECE INFORMATION
Notice
MAILING ADDRESS
SHIPPING ADDRESS
24V Model
Table of Contents
Theory of Operation
mV Model
Troubleshooting and Problem Isolation
Filter System
Simplified Wiring Diagrams
Wiring Diagrams
Theory of Operation
Heating System
Fryer Components Operation
Filter System
Safety System
Optional Basket Lift
Controller Operational Modes
Serial Numbers
24V Model
2. Slide button to solid state
Accessing Fryer for Servicing
4. Unplug all power cords
1. Press off button on control panel
Cleaning the Gas Valve Vent Tube
Taking a Supply Gas Pressure Reading
Checking the Burner Manifold Gas Pressure
Supply Pressure Table
Removing Solid State Thermostat If Necessary
Taking a Manifold Gas Pressure Reading
Adjusting Pilot Pressure
Adjusting Manifold Gas Pressure
Manifold Gas Pressure Table
4.Tighten collet and replace knob cap
Calibrating Solid State Thermostat
2.With a 5/16 inch socket, loosen the collet
3.Rotate the knob to point at actual temperature
Removing the Controller Front Panel Bezel
Replacing the Controllers and Wiring Harness
Removing the Solid State Wiring Harness
6. Remove the controller wiring harness
Replacing the Relay Board and Paper
Replacing the Ignition Module
Replacing the Spinal Tap
8. Disconnect the connection from the valve
Top View of Plugs
Side View of Plugs
Replacing an Igniter/Pilot Assembly
10. Remove the burner
Replacing the Self‐Cleaning Burner Solenoid
Replacing the Gas Valve
SG/SSH Series Service Manual
Replacing the Transformer Box
9.Remove the transformer
Replacing the DVI Switch
Replacing the Burners
Replacing the Burner Assembly
11. Remove the SCB runner tube
Replacing the Burner Assembly
SG/SSH Series Service Manual
NOTE: For SSH models only
Replacing the Frypot
7. Remove the flange elbow
14. Remove the splash back by lifting up
NOTE: Lifting the tank requires two 2 technicians
Removing the Basket Lift Cover
Replacing the Basket Lift Components
Replacing the Transformer
Replacing the Basket Lift Driver Board
Replacing the Basket Lift Actuator
Adjusting the Magnetic Sensor
5.Remove the top retaining bushing by unscrewing
9. Remove the actuator collar
8. Rotate up the actuator collar
Gas Conversion
mV Model
Taking an Incoming Supply Gas Pressure Reading
Supply Pressure Table
Taking a Manifold Gas Pressure Reading
7 to
4. When adjustment is complete
Thermopile mV Table
Adjusting the Thermopile
Measuring Thermopile
Taking a Millivolt Reading
Hi-Limit Thermostat
Replacing the Thermostat
10. Remove and replace the temperature bulb
9. Apply Teflon paste to the fitting
11. Finger tighten the fitting
NOTES
Calibrating the Thermostat
Replacing the Hi‐Limit Thermostat
Filter System
Replacing the Return Valve
Replacing the Flush Hose Assembly and Valve
11. Remove the nut using a 7/16 inch wrench
8. Slide the bracket to the back of the assembly
9. Lift bracket out and slide forward
piping
14. Remove the piping using a 15/16 inch wrench
on the valve and an adjustable wrench on the
12. Remove the handle
1. Disconnect plug from pump box
Replacing the Heat Tape
Removing Rear Mounting Bracket
Replacing the Waste Oil and Components
Removing the Check Valve
4. Remove the valve lever
7.Remove the valve using two adjustable wrenches
6. Lift off the mounting bracket
Removing the Filter Pump and Motor
Replacing the Filter Pump and Motor
8. Remove the bracket
Replacing Seal Kit
Removing the Filter Pump from the Motor
Replacing the Return Switch
11. Pull the red return handle out of the fryer
4.Slide out the drain line
Replacing the Drain Line or Gasket
3. Slide off the drain manifold gasket
2. Lift off the drain manifold clamp
Replacing the Circuit Breaker
Replacing the Pump Relay and Circuit Breaker
Replacing the Pump Relay
Troubleshooting and Problem Isolation
Interpretation of Solid State Controller Lights
Troubleshooting and Problem Isolation
Solid State Thermostat Field Calibration
Gas Valve
Component Troubleshooting
Roll Out Switch
Probe
Transformer
Drain Valve and Return Valve Switches
Ignition Module
Computer Control
Relay Board
Primary Solid State Control
Digital Solid State Control
Backup Solid State Control
Probe Resistance Chart
Main Burner
Orifice Size Chart
Model
Gas Type
Orifice Size Required at Other Elevations
Orifice Size at Sea Level Chart
Wiring Diagrams
Wiring Diagram – Full Vat with SCB
Simplified Wiring Diagrams
Wiring Diagram - Twin Vat with SCB
Wiring Diagram – Basket Lifts
Wiring Diagram – Filter Motor 115V‐60Hz
Wiring Diagrams – Filter Motor 208‐240V
SG/SSH Series Service Manual L22-345R0
Notes
Top
Page
Image
Contents