1

28

-

28

-

2

28

-

28

-

3

28

-

28

-

4

28

-

28

-

24

Security panel

After setting the gain controls, you

can install the security panel to

prevent tampering and accidental

misadjustment.

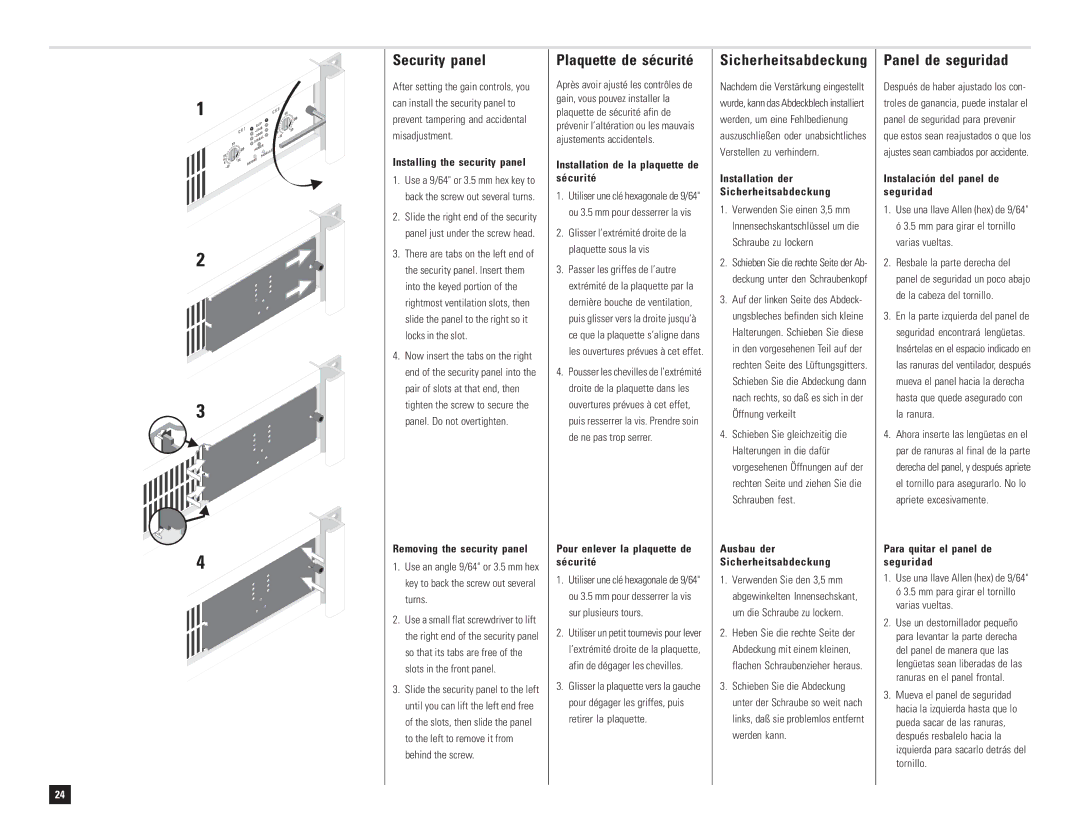
Installing the security panel

1.Use a 9/64" or 3.5 mm hex key to back the screw out several turns.

2.Slide the right end of the security panel just under the screw head.

3.There are tabs on the left end of the security panel. Insert them into the keyed portion of the rightmost ventilation slots, then slide the panel to the right so it locks in the slot.

4.Now insert the tabs on the right end of the security panel into the pair of slots at that end, then tighten the screw to secure the panel. Do not overtighten.

Removing the security panel

1.Use an angle 9/64" or 3.5 mm hex key to back the screw out several turns.

2.Use a small flat screwdriver to lift the right end of the security panel so that its tabs are free of the slots in the front panel.

3.Slide the security panel to the left until you can lift the left end free of the slots, then slide the panel to the left to remove it from behind the screw.

Plaquette de sécurité

Après avoir ajusté les contrôles de gain, vous pouvez installer la plaquette de sécurité afin de prévenir l’altération ou les mauvais ajustements accidentels.

Installation de la plaquette de sécurité

1.Utiliser une clé hexagonale de 9/64" ou 3.5 mm pour desserrer la vis

2.Glisser l’extrémité droite de la plaquette sous la vis

3.Passer les griffes de l’autre extrémité de la plaquette par la dernière bouche de ventilation, puis glisser vers la droite jusqu’à ce que la plaquette s’aligne dans les ouvertures prévues à cet effet.

4.Pousser les chevilles de l’extrémité droite de la plaquette dans les ouvertures prévues à cet effet, puis resserrer la vis. Prendre soin de ne pas trop serrer.

Pour enlever la plaquette de sécurité

1.Utiliser une clé hexagonale de 9/64" ou 3.5 mm pour desserrer la vis sur plusieurs tours.

2.Utiliser un petit tournevis pour lever l’extrémité droite de la plaquette, afin de dégager les chevilles.

3.Glisser la plaquette vers la gauche pour dégager les griffes, puis retirer la plaquette.

Sicherheitsabdeckung

Nachdem die Verstärkung eingestellt wurde, kann das Abdeckblech installiert werden, um eine Fehlbedienung auszuschließen oder unabsichtliches Verstellen zu verhindern.

Installation der

Sicherheitsabdeckung

1.Verwenden Sie einen 3,5 mm Innensechskantschlüssel um die Schraube zu lockern

2.Schieben Sie die rechte Seite der Ab- deckung unter den Schraubenkopf

3.Auf der linken Seite des Abdeck- ungsbleches befinden sich kleine Halterungen. Schieben Sie diese in den vorgesehenen Teil auf der rechten Seite des Lüftungsgitters. Schieben Sie die Abdeckung dann nach rechts, so daß es sich in der Öffnung verkeilt

4.Schieben Sie gleichzeitig die Halterungen in die dafür vorgesehenen Öffnungen auf der rechten Seite und ziehen Sie die Schrauben fest.

Ausbau der

Sicherheitsabdeckung

1.Verwenden Sie den 3,5 mm abgewinkelten Innensechskant, um die Schraube zu lockern.

2.Heben Sie die rechte Seite der Abdeckung mit einem kleinen, flachen Schraubenzieher heraus.

3.Schieben Sie die Abdeckung unter der Schraube so weit nach links, daß sie problemlos entfernt werden kann.

Panel de seguridad

Después de haber ajustado los con- troles de ganancia, puede instalar el panel de seguridad para prevenir que estos sean reajustados o que los ajustes sean cambiados por accidente.

Instalación del panel de seguridad

1.Use una llave Allen (hex) de 9/64" ó 3.5 mm para girar el tornillo varias vueltas.

2.Resbale la parte derecha del panel de seguridad un poco abajo de la cabeza del tornillo.

3.En la parte izquierda del panel de seguridad encontrará lengüetas. Insértelas en el espacio indicado en las ranuras del ventilador, después mueva el panel hacia la derecha hasta que quede asegurado con la ranura.

4.Ahora inserte las lengüetas en el par de ranuras al final de la parte derecha del panel, y después apriete el tornillo para asegurarlo. No lo apriete excesivamente.

Para quitar el panel de seguridad

1.Use una llave Allen (hex) de 9/64" ó 3.5 mm para girar el tornillo varias vueltas.

2.Use un destornillador pequeño para levantar la parte derecha del panel de manera que las lengüetas sean liberadas de las ranuras en el panel frontal.

3.Mueva el panel de seguridad hacia la izquierda hasta que lo pueda sacar de las ranuras, después resbalelo hacia la izquierda para sacarlo detrás del tornillo.

Page 24
Image 24
QSC Audio DCA 1222 user manual Security panel, Plaquette de sécurité, Sicherheitsabdeckung, Panel de seguridad

DCA 1222 specifications

The QSC Audio DCA 1222 is a powerful digital amplifier designed for professional audio applications. Known for its reliability and performance, the DCA 1222 is ideal for live sound, installations, and touring environments. This amplifier offers a seamless blend of advanced technologies and user-friendly features, making it a top choice among audio engineers and sound professionals.

One of the standout features of the DCA 1222 is its robust power handling capability. With a power output of 2,200 watts, it can drive a variety of speaker systems, making it versatile enough for different setups. The amplifier provides two channels, allowing for flexible system configurations. Each channel can deliver a solid 1,100 watts at 4 ohms, ensuring powerful audio output without distortion.

The DCA 1222 employs QSC’s exclusive PowerWave technology, which optimizes performance and efficiency. This technology ensures that the amplifier runs cool, even under high load, which is crucial for prolonged usage in demanding environments. Additionally, the Class D circuitry contributes to the lightweight design of the amplifier, facilitating easy transport and installation.

In terms of connectivity, the DCA 1222 comes equipped with a comprehensive array of input and output options. It features both XLR and TRS inputs, making it compatible with a wide range of audio sources. The output connectors are designed to work seamlessly with various speaker systems. Moreover, the amplifier includes a gain control for each channel, allowing users to fine-tune the audio levels according to the specific needs of their setup.

Built-in processing features enhance the overall functionality of the DCA 1222. It includes a selection of comprehensive crossovers, limiters, and equalization options, allowing for precise sound shaping. This level of control helps ensure optimal performance in different acoustic environments.

The amplifier also features an intuitive front-panel LCD display, providing real-time feedback on performance metrics such as output levels, temperature, and protection indicators. This user-friendly interface simplifies monitoring and allows for quick adjustments during live events.

In summary, the QSC Audio DCA 1222 is a powerhouse amplifier equipped with advanced technologies, high power output, extensive connectivity options, and user-friendly features. Its design and capabilities make it a reliable choice for professional audio applications, ensuring exceptional sound quality and performance in any setting.