Manuals
/
Ricoh
/
Computer Equipment
/
All in One Printer
Ricoh
PRIPORT VT2130
manual
Ii=, Machine Interior
Models:
PRIPORT VT2130
1
7
60
60
Download
60 pages
17.8 Kb
4
5
6
7
8
9
10
11
Troubleshooting
Specs
Install
Other Indicators Light
Maintenance
Access to Machine
Adjusting the Image Position
Setting the Originals
Master Roll Replacement
Turn on the main switch
Page 7
Image 7
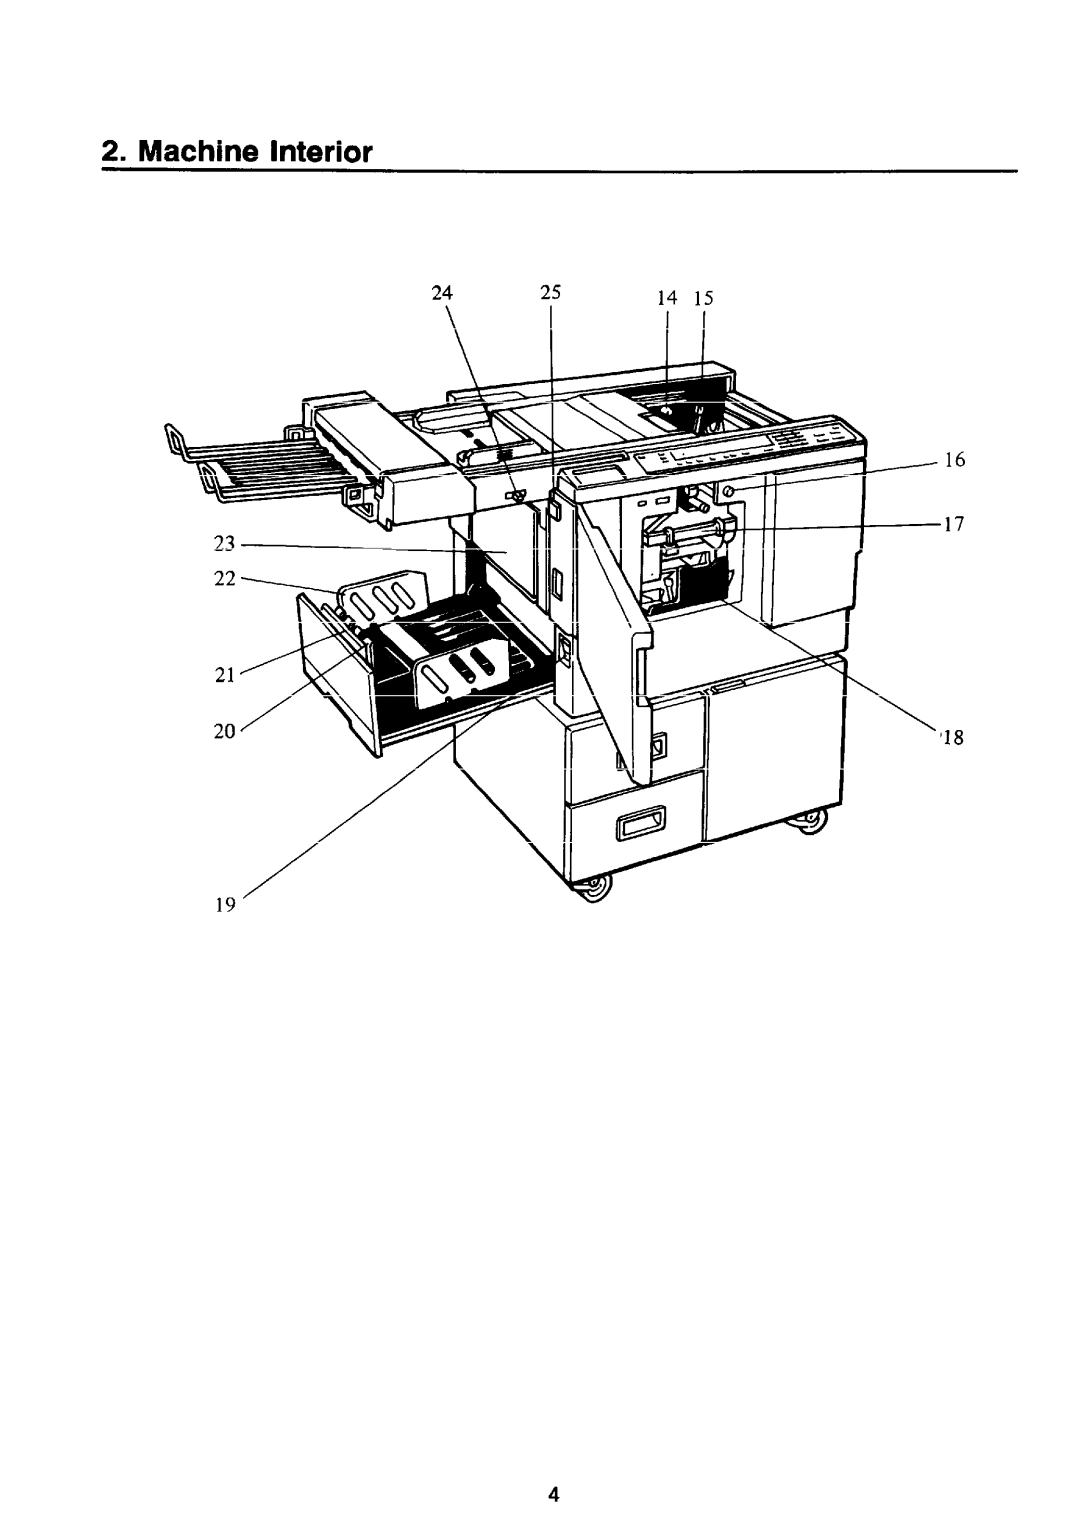
2. Machine Interior
24
25
14 15
16
17
Ii=
\
’18
19‘
4
Page 6
Page 8
Page 7
Image 7
Page 6
Page 8
Contents
Iiigom
Page
Introduction
Table of Contents
Machine Exterior
Guide to Components
Page
Machine Interior
Ii= \
Cover
Platetable
Buttonmaster
OQ0000
Operation Panel
Page
Machine Environment
Installation Requirements
Power Connection
Access to Machine
Operating Cautions
DO’S and DON’TS
General Cautions
Originalswith
Originals
You can use the following type of originals Thickness
Max Min
Iii
MinMaxMin
Avoid using the foliowing kinds
Printing Paper
Print Size
Preparation for Printing
Operation
Open the paper
Open the paper delivery table
Turn on the main switch
Lift the paper delivery side plates
Image Mode keys
Setting the Originals
Select the image mode using
Press the Print Start key
Enter the number of prints required using the Number keys
Printina
Press the Master Making key
Restoring Paper Feed and Paper Delivery Tabies
Slide in the paper delivery table Turn off the main switch
Remove the paper from the paper feed table
Press
Adjusting the Image Position
Left Image Position key
Shifting the image position backward
Press the Lower Paper Feed Table key
Shifting the image to the right
Press the Lower Paper Feed Table
Shifting the image to the left
Changing the Paper Size
So bx
Set the side pads Move the side pad levers to the right
Printing on Thick or Thin Paper
Printing on thin paper
Push down the feed roller pressure lever
Place Postcard Size Paper on Feed
Printing on Postcard Size Paper
Postcard size original
Place the postcard sized paper on
Open the original table
Various Originals
9o sheets/rein issd@d a@OrnatiCallY
Changing the Printing Speed
Press the Speed key. To increase
To Stop the Machine During a Printing Run
Open the front door
Changing the Drum Unit for Color Printing
Page
Printing in Two Colors
Press the Memory key
Set using the Number keys
Special Functions
Group Printing from the Same Original
Set the original face down on
Press the Memory key again. The Memory returns to Memory
93%
Combine 2 Oriainals
For Example
81/2
Press the Combine 2 Originals key
Key. Check
Various Run Lengths Using the Same Master
Press
Master Making
Original Photo mode Line mode
Photo Mode Printing
Loadina Pa~er
Replenishing Supplies
Press the Lower Paper Feed Table key
Supplying Ink
Open the original table
Master Roll Replacement
Page
Thermal Head Cleaning
Maintenance
Clean the thermal head when 2 master rolls have been used
Rli
Platen Cover / Exposure Glass
Platen Cover / Exposure Glass
Check the misfeed or malfunction location
Troubleshooting
Indicators
Remove the jammed master and pressthe Resetkey. Seepage
Prevent Original misfeeds
When the Misfeed ~ Indicator Lights
Copy
To prevent paper feed jams
Page
Page
Difficult to remov~ th’e paper from the paper feed section
When the misfed ~a~er is underneath the drum
Page
When the Supply/Exchange fi Indicator Lights
Incomplete master eject box No master eject box Installation
When the master eject box is full, do the following
Other Indicators Light
Poor Printina
Original
Operating Cautions
Imiscellaneous
Page
Storing 735 x 607 x 569 mm 28.9 23.9x 22.4 Inches
SPECIFICATION1
Power Source
Power Consumption Dimensions W Xdxh
Size Remarks
Kg 220.4 lb
Optional Equipment Consumables Name Priport Master
120V version
Top
Page
Image
Contents