Color Monitor
CoverSMO-210TP 5/30/03 257 PM
Graphic Symbol Explanation
Important Safeguards
1SMO-210TPENG 5/30/03 256 PM Page e-4
1SMO-210TPENG 5/30/03 256 PM Page e-5
FCC & Ices Information
User-Installer Caution
Contents
Event List
View Setting CLOCK/DISPLAY SET
Overview
Functions and Features
Overview
Names and Functions of Parts
Menu
ID Reset
Multiscreen
Sequence
Camera in BNC
Camera INRJ-45
VCR
Alarm
AUX
~AC
Installation Environments
Installation
Unpacking
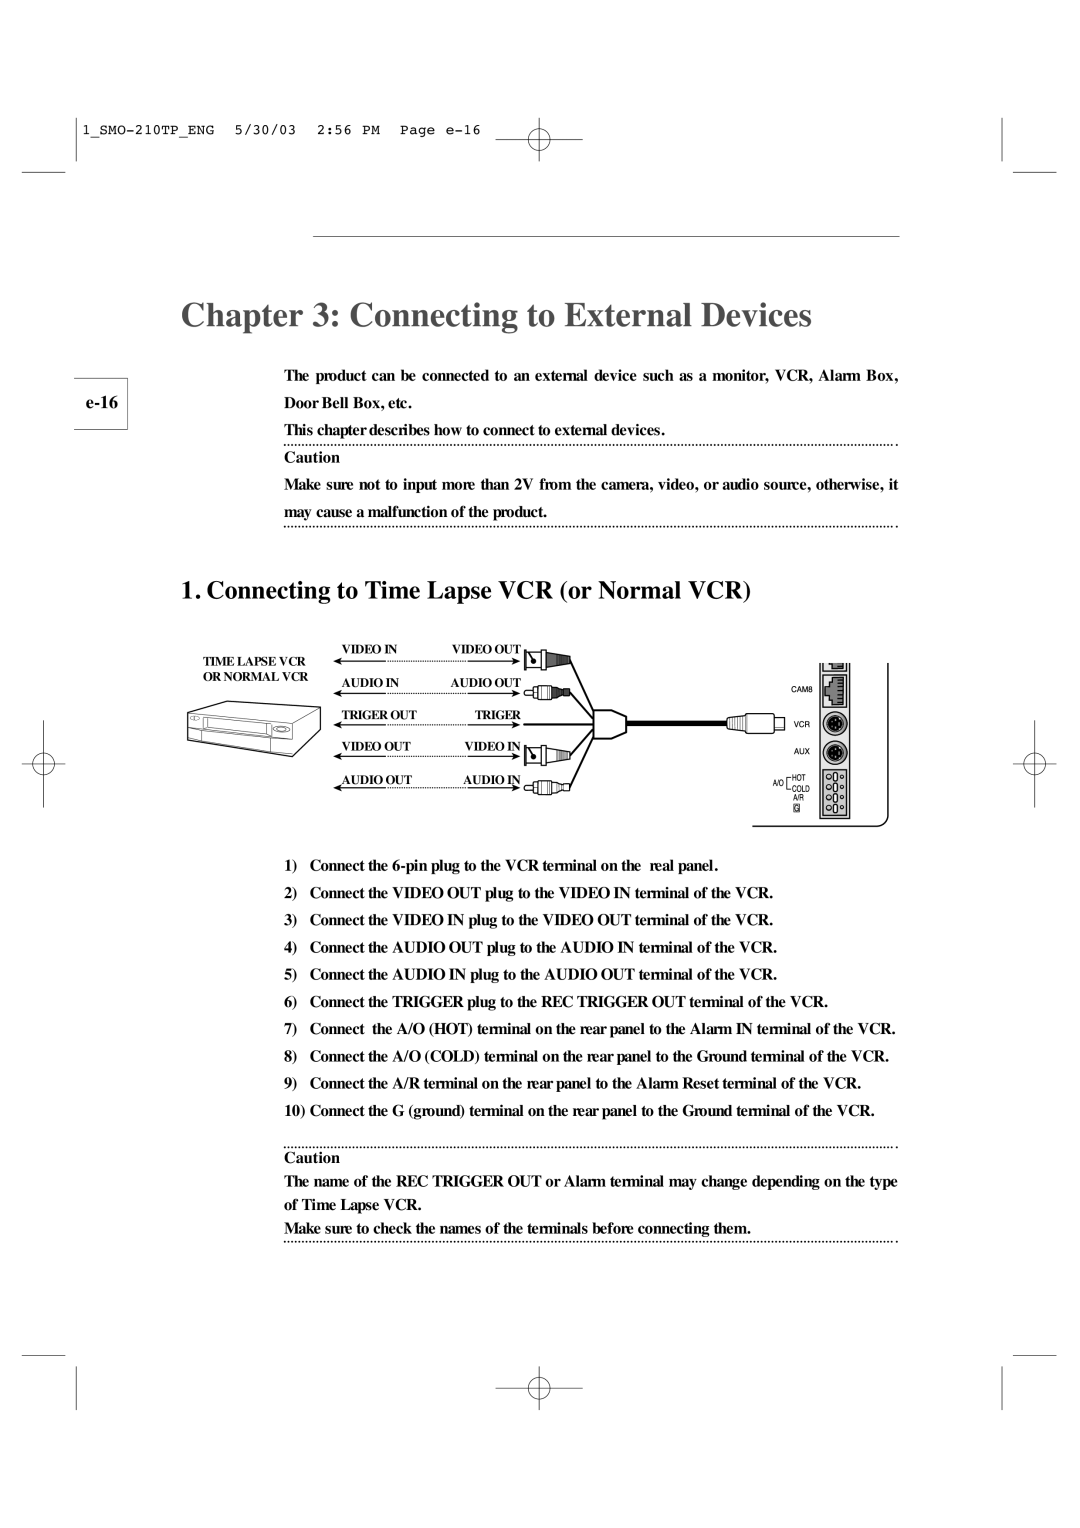
Connecting to Time Lapse VCR or Normal VCR
Connecting to External Devices
Connecting the Ordinary monitor
Connecting the Alarm Sensor
Select the Display Mode
Turn the Power Switch On
Basic Operation
Basic Operation
When you want to watch in Multi Screen Mode
When you want to watch on LIVE/P.B./TRIPLEX screen
When you want to watch in Full Screen Mode
Resetting Channels
When you want to watch in Sequence Screen Mode
Multiscreen button will not operate in the following cases
Sequence button will not operate in the following cases
Full Screen Mode
When you want to watch in Freeze Screen Mode
Split Screen Mode
Freeze button will not operate in the following cases
When you want to watch on PIP Screen Mode
When you want to watch in Zoom Screen Mode
Using PIP Screen
Zoom button will not operate in the following cases
When you want to watch the Event Replay screen
When you want to watch the VCR output
When an Alarm/Motion signal is input
PIP button will not operate in the following cases
When Channel Loss is detected
When you want to watch a Door Bell screen
SUB Menu
Setup Menu Settings
Setup Menu
CLOCK/DISPLAY SET
View Setting
Border Color White ↔ Black
Display Type ALL ↔ Title ↔ DATE/TIME ↔ None
Date Type YY/MM/DD ↔ MM/DD/YY ↔ DD/MM/YY Date YY/MM/DD
Time Hhmmss
Camera Setup
Press the Menu button to return to the previous menu
1SMO-210TPENG 5/30/03 256 PM Page e-30
Shutter
White Balance ATW, AWC, Manual
Special
Motion Detect
Preset
System Setting
Alarm Buzzer
Alarm
Alarm Hold Time
Audio Record
Record
SPOT-OUTPUT
PB Through
System ID
Hidden Camera
Sequence
Language
Password Check
Password Change
Door Bell List
Event List
Recording
Recording in Time Lapse or Normal Mode
Alarm/Motion Channel Double-Recording
Alarm Occurrence
Alarm, Motion, Loss and Door Bell
1SMO-210TPENG 5/30/03 256 PM Page e-43
Motion Occurrence
Loss Occurrence
Door Bell Occurrence
Only PAL Video System
Specifications
Appendix
Troubleshooting
Memo
Explication des symboles graphiques
Consignes Importantes
2SMO-210TPFRE 5/30/03 252 PM Page f-4
2SMO-210TPFRE 5/30/03 252 PM Page f-5
2SMO-210TPFRE 5/30/03 252 PM Page f-6
Table des matières
Chapitre 5 Paramètres du menu installation
Fonctions et caractéristiques
Chapitre 1 Présentation
Présentation
Nom et fonctions des éléments
Volume +/- Règle le volume
AUX Control
Boutons Disposes EN Cercle LEFT, RIGHT, Enter
Number Key Pavé numérique 0 ~
Avertissement
Panneau arrière
Pour brancher le cordon d’alimentation
Environnements de l’installation
Chapitre 2 Installation
Déballage
Chapitre 3 Connexion à des périphériques
Connexion du moniteur standard
Connexion du capteur d’alarme
Connexion du boîtier de sonnette
Fonctionnement de base
Sélectionnez le mode d’affichage
Chapitre 4 Fonctionnement de base
Pour une visualisation en mode Multi Screen Multi-écrans
Pour une visualisation en mode Full Screen Plein écran
Pour une visualisation sur un écran LIVE/P.B./TRIPLEX
EN DIRECT/LECTURE/TRIPLEX
Le bouton Sequence ne fonctionne pas dans les cas suivants
Réinitialisation des canaux
En mode Full Screen Plein écran
Pour une visualisation en mode Freeze Screen GEL l’écran
En mode Split Screen Ecran partagé
Le bouton Freeze ne fonctionne pas dans les cas suivants
Utilisation de l’écran PIP
Pour une visualisation en mode Zoom Screen Ecran Zoom
Le bouton Zoom ne fonctionne pas dans les cas suivants
Le bouton PIP ne fonctionne pas dans les cas suivants
Lors de l’entrée d’un signal Alarm/Motion Alarme/Mouvement
Pour une visualisation de la sortie magnétoscope
Lors d’une détection de perte de canal
Pour la visualisation de l’écran Appels
SOUS-MENU
Chapitre 5 Paramètres du menu installation
Menu Installation
Reglage Horloge
Installation
Reglage Moniteur
Couleur DE Bord Blanc ↔ Noir
Type D’AFFICHAGE Tout ↔ Titre ↔ DATE/HEURE ↔ Sans
Type DE Date AA/MM/JJ ↔ MM/JJ/AA ↔ JJ/MM/AA
Heure Hhmmss
Reglages Cameras
Reglages Cameras
Caméra ID Identification Caméra
2SMO-210TPFRE 5/30/03 252 PM Page f-30
Shutter Obturateur
Balance DES Blancs ATW, AWC, Manuel
Focus Mise AU Point
Detection DE Mouvement
Reglage Systeme
Buzzer D’ALARME
ALARME…
Temps D’ALARME
ENR Audio
’ENREGISTREMENT
Sortie Spot
Lecture
Systeme ID
Masquer Camera
Sélection DE Langue
Test MOT DE Passe
CHANGE. M. Passe
Liste DES Appels
Liste DES Evenements
Chapitre 6 Enregistrement
Enregistrement en mode Par intervalles ou Normal
«LISTE DES EVENEMENTS»
Chapitre 7 Alarme, mouvement, perte et appels
Déclenchement d’une alarme
Ms ou plus
Déclenchement d’un mouvement
Déclenchement d’une Perte
«LISTE DES APPLES»
Déclenchement d’une apples
CRT
Annexe
Caractéristiques techniques
Remarque
Dépannage
Remarque
Erklärung der grafischen Symbole
Wichtige Sicherheitshinweise
3SMO-210TPGER 5/30/03 255 PM Page g-4
3SMO-210TPGER 5/30/03 255 PM Page g-5
3SMO-210TPGER 5/30/03 255 PM Page g-6
Inhalt
Abschnitt 5 Einstellungen des EINSTELL-Menüs
Funktionen und Leistungsmerkmale
Abschnitt 1 Übersicht
Übersicht
Bezeichnungen und Funktionen der Teile
POWER-Taste
LIVE/P.B./TRIPLEX Live/Wiedergabe/Triplex
SET Einstellen
Multiscreen Mehrfachbild
Menu Menü
Sequence Sequenz
Freeze Standbild
Warnhinweise
Camera in RJ-45
Anschluss für das Netzkabel
Installationsumgebung
Abschnitt 2 Installation
Auspacken
Videorekorder Langzeit oder normal anschließen
Abschnitt 3 Externe Geräte anschließen
Klingelbox anschließen
Alarmsensor anschließen
Grundfunktionen
Abschnitt 4 Grundfunktionen
Schalten Sie den Netzschalter ein
Anzeigemodus auswählen
Bilder im Mehrbildmodus anzeigen
Bilder im Vollbildmodus anzeigen
Kanäle zurücksetzen
Bilder im Sequenzbildmodus anzeigen
Die Taste Multiscreen ist in folgenden Fällen deaktiviert
Die Taste Sequenz ist in folgenden Fällen deaktiviert
Im Vollbildmodus
Bilder im Standbildmodus anzeigen
Im Teilbildmodus
Die Taste Freeze ist in folgenden Fällen deaktiviert
Bilder im PIP-Modus anzeigen
Bilder im Vergrößerungsmodus anzeigen
Die Taste Zoom ist in folgenden Fällen deaktiviert
PIP-Anzeige verwenden
Ereigniswiedergabe anzeigen
Wenn ein Alarm- oder Bewegungssignal empfangen wird
Die Taste PIP ist in folgenden Fällen deaktiviert
Die Taste PB Through ist in folgenden Fällen deaktiviert
Klingelbild anzeigen
Wenn ein Signalverlust erkannt wird
Untermenü
Abschnitt 5 Einstellungen des EINSTELL-Menüs
Einstell Menüe
UHR/ANZEIGE Menue
Bildeinstellungen
Randfarbe Weiss ↔ Schwarz
Anzeige Format Alle ↔ Text ↔ ZEIT/DATUM ↔ Keine
Datum Format JJ/MM/TT ↔ MM/TT/JJ ↔ TT/MM/JJ Datum JJ/MM/TT
Zeit Hhmmss
Kameramenue
Kameramenue
3SMO-210TPGER 5/30/03 255 PM Page g-29
3SMO-210TPGER 5/30/03 255 PM Page g-30
Shutter Verschluss
Weissabgleich ATW, AWC, MANUELL…
SPEZIAL…
Benutzer
VIDEOSENSOR-MENUE
Systemmenue
Systemmenue
Haltezeit
ALARM…
Audioalarm
Audio Aufnahme
AUFNAHME…
Spotmonitor
PB Through Wiedergabe über
System Adresse
Kamera Verbergen
Sequenz
Sprachauswahl
Passwortabfrage
Passwortwechsel
Türglocken Liste
Ereignisprotokoll
Aufzeichnen im Langzeit- oder im Normalmodus
Doppelte Aufzeichnung bei Alarm oder Bewegungsmeldung
Abschnitt 6 Aufzeichnung
Alarmauslösung
Abschnitt 7 Alarm, Bewegung, Signalverlust und Türgong
3SMO-210TPGER 5/30/03 255 PM Page g-43
Bewegungsmeldung
Signalverlust
Betätigung der Klingel
NUR PAL-VIDEOSYSTEM
Anhang
Technische Daten
Hinweis
Fehlersuche
3SMO-210TPGER 5/30/03 255 PM Page g-49
Descrizione dei simboli
Norme DI Sicurezza
4SMO-210TPITA 5/30/03 255 PM
4SMO-210TPITA 5/30/03 255 PM
4SMO-210TPITA 5/30/03 255 PM
Sommario
Specifiche tecniche Risoluzione dei problemi
Funzioni e caratteristiche
Capitolo 1 Panora
Panoramica
Rotella DI Comando SINISTRA, DESTRA, Invio
Nomi e funzioni delle parti
Iris CLOSE/OPEN
Tasti numerici0 ~
Focus FAR/NEAR
Attenzione
Pannello posteriore
Collegamento al cavo di alimentazione
Ambienti di installazione
Capitolo 2 Installazione
Apertura della confezione
Capitolo 3 Collegamento a dispositivi esterni
Collegamento del monitor ordinario
Collegamento del sensore di allarme
Collegamento della scatola del suoneria
Accensione
Capitolo 4 Operazioni di base
Operazioni base
Il tasto LIVE/P.B./TRIPLEX non è attivo nei seguenti casi
Visualizzazione in modalità LIVE/P.B./TRIPLEX
Visualizzazione in modalità Multischermo Multi Screen
Reimpostazione dei canali
Visualizzazione in modalità Sequenza Sequence Screen
Il tasto Multiscreen è disattivato nei seguenti casi
Il tasto Sequence è disattivato nei seguenti casi
Modalità Schermo intero Full Screen
Visualizzazione in modalità Fermo immagine Freeze Screen
Modalità Schermo diviso Split Screen
Il tasto Freeze è disattivato nei seguenti casi
Visualizzazione in modalità Zoom
Setup
Visualizzazione in modalità Immagine nell’immagine PIP
Il tasto Zoom è disattivato nei seguenti casi
Visualizzazione dello schermo Event Replay
Visualizzazione dell’uscita del videoregistratore
Il tasto PIP è disattivato nei seguenti casi
Il tasto PB Through è disattivato nel seguente caso
Rilevamento di una perdita del canale
Visualizzazione dello schermo suoneria
Sottomenu
Capitolo 5 Impostazioni del menu Setup
Menu DI Setup
OROLOGIO/IMPOSTAZIONE Display
Regolazione Vista
Colore Margine Bianco ↔ Nero
Tipo Display Tutti ↔ Titolo ↔ DATA/ORA ↔ Nessuno
Tipo Data AA/MM/GG ↔ MM/GG/AA ↔ GG/MM/AA
ORA Hhmmss
Regolazione Camera
Regolazione Camera
Premere il tasto Menu per ritornare al menu precedente
Dimensione U/D
Shutter Otturatore
Bilanciamento Bianco ATW, AWC, Manuale
Speciali
Rilevatore DL Movimento
Rilevatore DL Movimento Preset
Selezione Lingua
Impostazione Sistema
Segnale Allarme
Allarme
Durata Allarme
Registrazione
Sistema Indirizzo
Camera NAS Costa
Sequenza
Selezionelingua
Controllo Password
CAMBIA. Password
Lista Suoneria
Lista Eventi
Doppia registrazione sul canale di allarme/movimento
Capitolo 6 Registrazione
Registrazione in modalità Time Lapse o Normale
Evento Allarme
Capitolo 7 Allarme, movimento, perdita e suoneria
4SMO-210TPITA 5/30/03 255 PM
Evento Movimento
Evento Perdita
Evento Suoneria
Solo Sistema Video PAL
Appendice
Specifiche tecniche
Nota
Risoluzione dei problemi
Memo
Explicación de símbolos gráficos
Instrucciones DE Seguridad
5SMO-210TPSPA 5/30/03 254 PM Page s-4
5SMO-210TPSPA 5/30/03 254 PM Page s-5
5SMO-210TPSPA 5/30/03 254 PM Page s-6
Índice
Ajustes DEL Sistema Lista Eventos Lista DE Timbre
VER Ajustes RELOJ/AJUSTE DEL Display
Aspectos generales
Capítulo 1 Aspectos generales
Funciones y características
Directo + Diferido
Nombres y funciones de las piezas
+/- Volumen
Interruptor DE Encendido Enciende y apaga la alimentación
Rueda Giratoria LEFT, RIGHT, Enter
Zoom TELE/WIDE
Multi Screen
Teclas numéricas 0 ~
Precaución
Panel posterior
Donde se conecta el cable de alimentación
Entornos de instalació
Capítulo 2 Instalación
Desembalado
Capítulo 3. Conexión a dispositivos externos
Conexión del monitor principal
Conexión del sensor de alarmas
Conexión del decodificador de timbres
Funcionamiento básico
Capítulo 4 Funcionamiento básico
Conecte el interruptor de encendido
Seleccione el modo de visualización
DIRECTO/ DIFERIDO/TRIPLEX
Para ver una pantalla LIVE/P.B./TRIPLEX
Para ver en modo Full Screen Pantalla completa
Para ver en modo Multi Screen Multipantalla
Reinicio de canales
Para ver en modo Sequence Secuencia
El botón Multiscreen no funciona en los siguientes casos
El botón Sequence no funciona en los siguientes casos
En el modo Full Screen Pantalla completa
Para ver en modo Freeze Congelar
En el modo Split Screen Pantalla dividida
El botón Freeze no funciona en los siguientes casos
Para ver en modo PIP
Para ver en modo Zoom
El botón Zoom no funciona en los siguientes casos
Uso de la pantalla PIP
Para ver la salida del vídeo
Cuando hay una señal de Alarma/Movimiento
Para ver la pantalla Event Replay Reproducción de eventos
El botón PIP no funciona en los siguientes casos
Cuando se detecta la pérdida de canal
Para ver una pantalla de Timbre
Menú Secundario
Capítulo 5 Ajustes del menú de configuración
Menu Configuracion
RELOJ/AJUSTE DEL Display
Configuracion
VER Ajustes
Color Borde Blanco ↔ Negro
FORM. Pantalla Todo ↔ Titulo ↔ HORA/FECHA ↔ Nada
FORM. DE Fecha YY/MM/DD ↔ MM/DD/YY ↔ DD/MM/YY
Hora Hhmmss
Configuracion DE LA Camara
Configuracion DE LA Camara
Pulse el botón Menu para volver al menú anterior
5SMO-210TPSPA 5/30/03 254 PM Page s-30
5SMO-210TPSPA 5/30/03 254 PM Page s-31
Balance DE Blancos ATW, AWC, Manual
Especial
Usuario
Detteccion DE Movimiento
DE Fabrica
Idioma
Ajustes DEL Sistema
Zumbador
ALARMA…
Duracion DE Alarma
Fuente DE Audio
Grabción
Salida MON. Auxiliar
Reproduccion
Direction DEL Sistema
Ocultar Camara
Secuencia
Seleccion DE Idioma
Comprobar Contraseña
Lista DE Timbre
Lista Eventos
Grabación en modo Time Lapse Horario programado o Normal
Grabación doble de canales con alarma/movimiento
Capítulo 6 Grabación
Incidencia de alarma
Capítulo 7 Alarma, Movimiento, Pérdida y Timbre
VCR
Incidencia de movimiento
Incidencia de pérdida
Incidencia de timbre
Especificaciones
Apéndice
Solución de problemas
5SMO-210TPSPA 5/30/03 254 PM Page s-49