VA-SW804 VA-SW80LITE
Contents
DVR Utility Software Features
Software Version
Network Configuration
IP address setting range
DVR1 DVR2 DVR3DVR4
Network Configuration
System Requirements
Recommended graphics chip
TCP/IP Settings
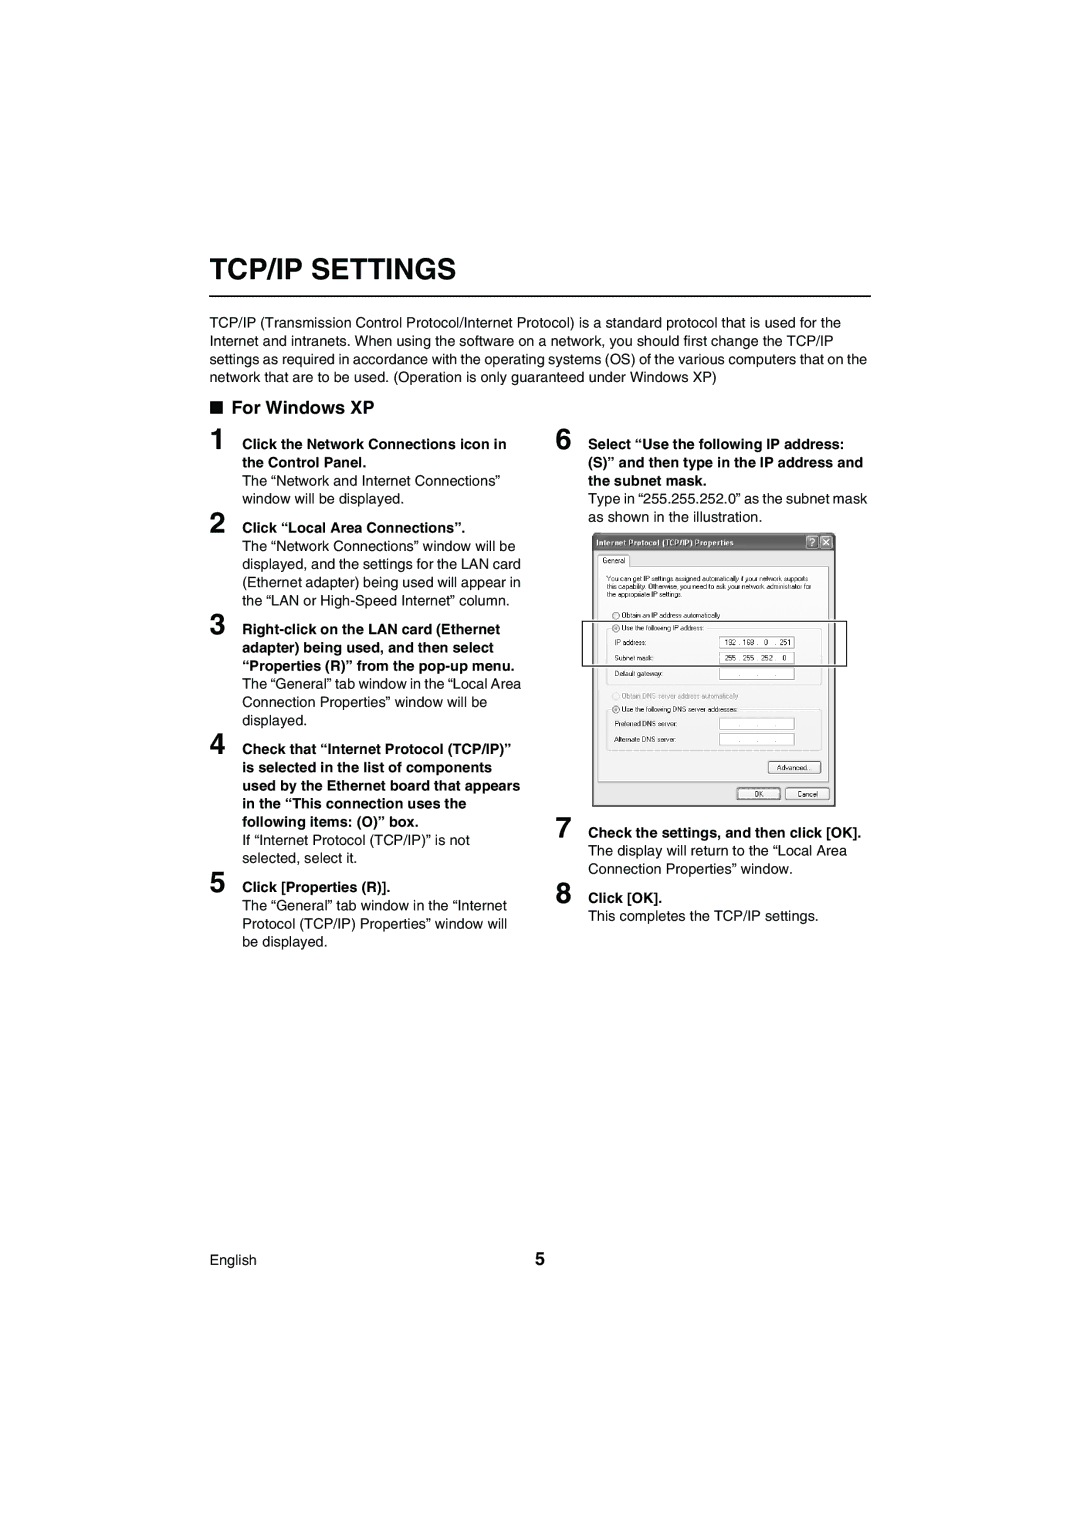
For Windows XP
Click Next in the Choose Destination Location window
Installing the Software
Welcome window appears
Click Next in the Select Program Folder window
Installing the Software
Logging IN/LOGGING OFF/DISPLAY Language Setting
User Level
Authentication check
Logging IN/LOGGING OFF/DISPLAY Language Setting
Hardware key installation
Logging
Display While Communication is in Progress
Display Language Setting
Logging Off
Click
Basic Window Flowchart
Clock & System P.23
Sequence P.44
Tamper Detect P.74
Timer Download P.66
Broadcast P.41
Exit
System Setup tab
Basic Network Settings
Initial Setup Setup Window P.18
User Level ID4
Clock SET tab
Basic Network Settings
System Update tab
INFORMATION1 tab
Menu Settings Menu Window P.28
Operation of Setting Buttons
System Setup tab
English, French, Spanish, German
Initial Setup Setup Window
LOG-IN Password
Register DVR tab Operation only possible at master computer
Create List
Select Auto in the TCP/IP ADDR. box
Click
Boxes respectively, and then click
Select Manual in the TCP/IP ADDR. box
Registration list display
Specify the address of the registration to be deleted
Clock SET tab
Clock and System Update Settings
Default setting according to the computer’s internal clock
Click the Clock SET tab index
Clock and System Update Settings
System Update tab
INFORMATION1 tab
Initialize HDD
Used Time
Power Failure
INFORMATION2 tab
Firmware Version
LANGUAGE/LANGUE/IDIOMA/SPRACHE Default setting English
Basic flow of menu settings Select a setting tab
Current setting data is loaded and displayed
LANGUAGE/D.S.TIME SET tab
Following example shows the default settings
Menu Settings Menu Window
Daylight Saving Default setting no USE
EXT. Clock Adjust Time
REC Mode SET tab
Series REC Default setting OFF
Overwrite Default setting on
Disk Full Reset button is forcibly locked
Resuming recording that has been halted
5S, 10S, 20S, 40S, 1M, 2M, 3M, 4M, 5M, 10M, 15M, CC
Week
Timer REC SET tab
SET Default setting OFF
START/STOP
Click Over 24H
Select MON from the Week drop-down list box in row
Select WED from the Week drop-down list box in row
Use the Month and DAY spin buttons to set the month and day
This completes the holiday setting
Holiday SET tab
Up to 20 days can be specified as holidays
Camera Title Default setting on Title for connected camera
DATE/TIME Default setting on
Alarm Count Default setting on Cumulative number of alarms
DISPLAY/BUZZER SET tab
NON REC Default setting OFF
Only enabled when Overwrite is set to OFF
KEY in Default setting OFF
Buzzer
Monitor SET tab
Available settings 1-30 seconds
Alarm Monitor SET
Monitor SET
Mask SET
TITLE/MOTION SET tab
Camera Title
User Level ID3/4
Broadcast Transmission Settings Broadcast Window
Timer Record
Record
Clock SET User Level ID4
Broadcast Transmission Settings Broadcast Window
System Update
Select the required menu and then click Open
Quad screen
Image Display Windows
Display Screen Type
Multi screen
Switching Display Windows
Image Display Windows
Sequence Display Function
Title Bar
Quad screen Multi screen Full screen
Click 1 on the toolbar
Monitoring Live Images User Level ID1 or higher
Monitoring with Quad Screens
Double-click a DVR in the Target window
Monitoring with Multi Screens
Monitoring Live Images
User Level ID1 or higher
Display example DVR-1 Live 01-20
Image Audio Output
Disconnecting DVRs
Volume adjustment
Output channel selection
Recording Images
Normal Recording User Level ID3 or higher
Click the title bar 2 of the recording window
Recording Images
Normal recording from the multi screen
Click 4 on the recording control panel
Timer Recording
Alarm Recording User Level ID4
Playing Back Recorded Images
Switches to live image mode
Playing Back Recorded Images
Click in the playback control panel
Playing Back Recorded Images
Functions of Each Playback Control Panel Component
Time/Date Search
Searching
User Level ID2 or higher
Display the playback window for the DVR to be searched
Alarm Search
Searching
Click5
Select the alarm to be played back from the alarm list
Selected alarm will change to blue
After checking the images in the preview Window, click
Display the thumbnail images
Alarm Thumbnail Search
Alarm Search window will be displayed
Click the title bar for the thumbnail to be played back
Still playback at the image to be saved
Saving Still Images
Playing back images in the main window
Click the still button in the playback control panel
Specifying the Image Range
Download
User Level ID2/3 or higher
Click Download Start Point in the saving control panel
Log window
Download
Functions of Each Download Window Element
Download Start POINT/DOWNLOAD END Point
ADD
Filename
Download
Preview
Basic Downloading Operations Individual Download
Completion of download
Downloading all preset files
Preset List Operations Batch Downloads
Deleting a preset file
Checking images
Timer Download
Folder Path
Timer Download
Status
Disk Space
If the Week setting for Schedule is set to DLY
Timer download procedure
Set the timer download settings as follows
Set the download starting time
Specify the download destination folder
Timer download standby
Program orange display Download timer reservation set
Select the SET check box
Download range 600
Image range setting for downloading
Example of incorrect setting
Download start time Download range 600 English
Timer Download
Basic timer download operation and specifications
Example DVR-1200306231500.mp2
Download Timeout
Communication Error
User Canceled
Start Time
Tamper DETECTIONUser Level ID2 higher
Displaying detection results
If tampering was detected
Operating Environment
Installation/Saving Location
Main Functions
Starting
Option menu
MP2 Viewer Window Structure and Functions of Each Part
File menu
Zoom in Increases the image display size
Slide bar
Filename Playback mode
MP2 Viewer
Title bar
Review button
MP2 Viewer Opening Files Playback Control
Select and open the image file
Cue button
MP2 Viewer Saves a Still Image
Prints Still Images
MM-DD-YY Hhmmss
MP2 Viewer Searches for Images
Detecting Tampering of Images