FO-DC550
Checks Passports Drivers licenses
For Your Records
Contents
Index
User Programs Selecting a Setting for a User Program
Specifications Software License Material Safety Data Sheet
10cm 20cm
Important points when selecting an installation site
Do not install your machine in areas that are
Supply and Consumables
Trademark acknowledgements
USB 2.0 compatible
Safety precautions
Environmental Information
Conventions used in this manual and online manual
Using the manual
Online Manual on the accessory CD-ROM
Introduction
Main Features
Environment and people friendly design
Fax function Laser printer function
Color scanner function
Network connection option
Part Names
Preparations
Operation panel
Clear ALL key
Copy Ratio key
Press to select an enlargement or reduction ratio
Language setting
Power on and OFF
Power on
Turn the power switch to the on position
Auto power shut-off mode
Power off
Power save modes
Preheat mode
Paper
Paper type Size Weight Capacity
Loading Paper
Or curled edges
Follow these guidelines when using special papers
Loading the Paper Tray
Special papers
Gently push the paper tray back into the machine
Paper size, change the paper size setting as explained
Changing a Trays Paper Size Setting p.19
Envelopes
Important points when inserting paper in the bypass tray
Bypass Feed including special paper
Press the Tray Select key to select the bypass tray
Loading paper in the bypass tray
Open the bypass tray and extend the tray
Press the Menu key
Changing a Trays Paper Size Setting
Follow these steps to change a trays paper size setting
Select the tray, and then press
Copying books or originals with folds or creases
Using the document glass
Making Copies
Normal Copying
Placed at once
Using the Rspf
Default output mode will be non-sort mode. p.65
Document feeder tray
Paper output tray extension
Stream feeding mode
Originals that cannot be used in the Rspf
Capacity of paper output tray
Press the numeric keys to set the number of copies
Setting the number of copies
Selecting the Tray
Press the Tray Select key
Making a Copy Darker or Lighter
REDUCTION/ENLARGEMENT/ZOOM
Selecting a preset ratio
Fine adjustment of the ratio
Use the key or the key for fine adjustment
Rspf
Convenient Copy Functions
Automatic TWO-SIDED Copying
If you need to clear the data scanned into memory, press
Clear key . When the Clear key is pressed,
Number of copies setting is also cleared
Press the Enter key
Place the originals in the RSPF. p.21
Press the Enter key
Sort copy
Sort Copy
Sort appears and then press
Copies of multiple original pages can be sorted into sets
Offset function during sort copy
Place the originals. p.21
If the memory becomes full
1 copy
Copying Multiple Originals Onto a Single Sheet of Paper
Setting is also cleared
2IN1 appears and then press
Place the originals. p.21 Press the E-SORT/SP.FUN key until
Rspf AB
Creating Margins When Copying
Margin shift
Place the originals Press the E-SORT/SP.FUN key until
To cancel margin shift mode, press the Clear ALL key
Sharpdesk
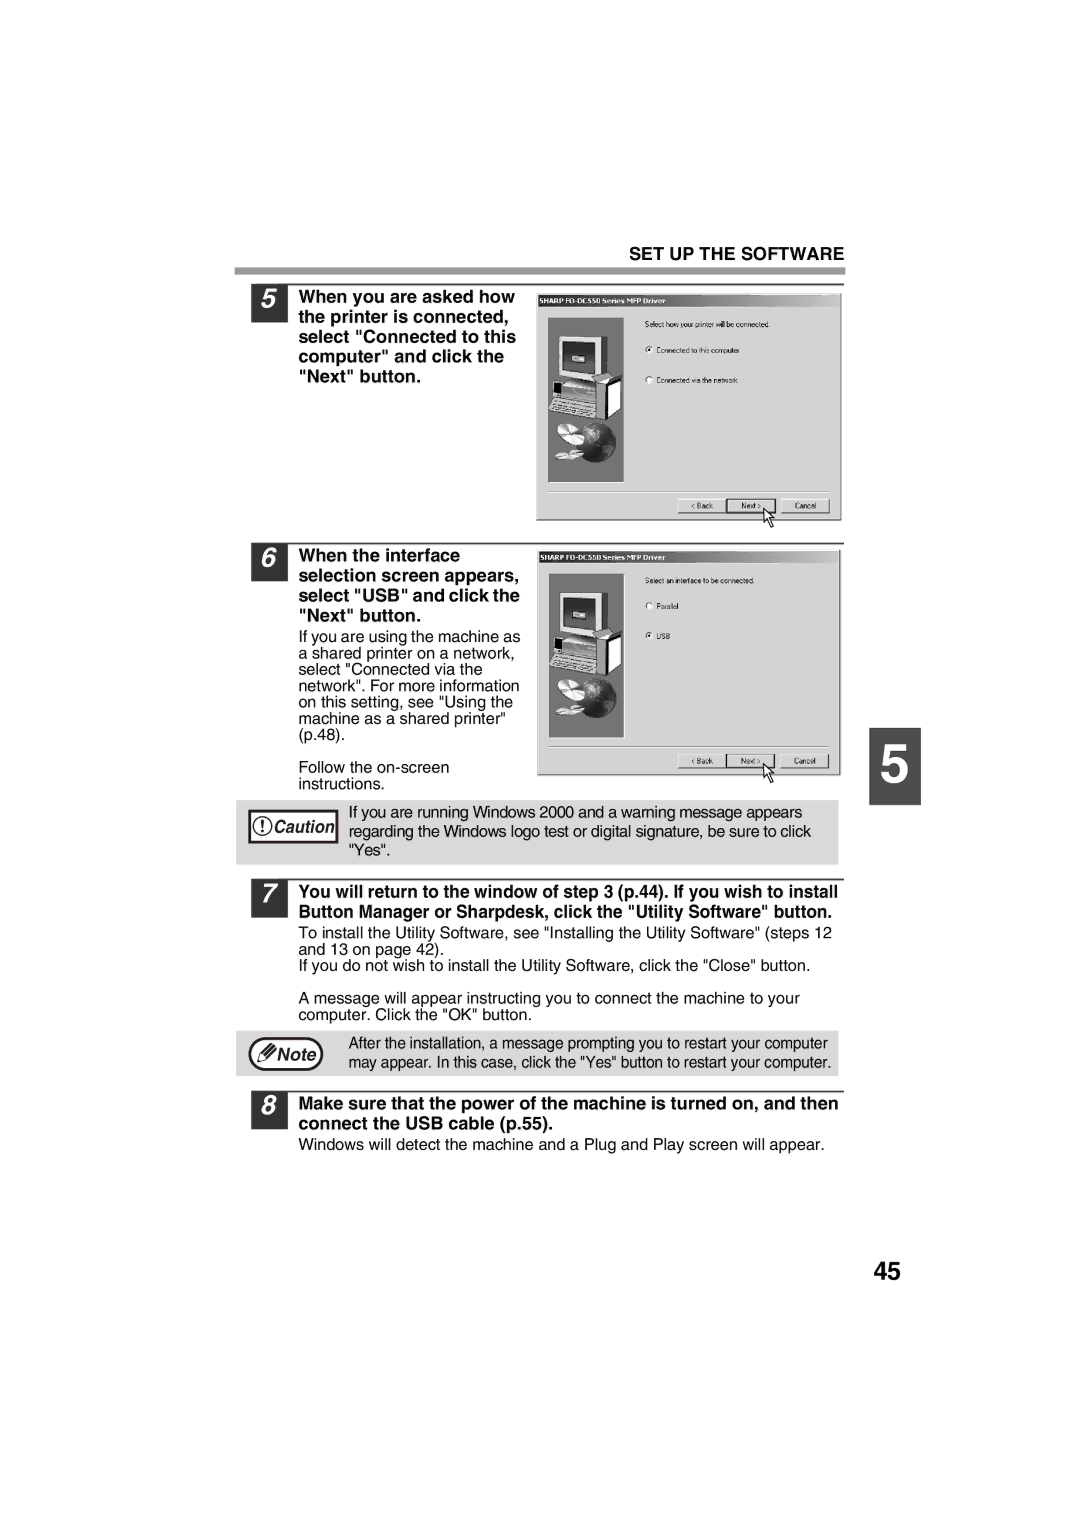
SET UP the Software
Software for FO-DC550
MFP driver
MFP Driver Button Cable Operating system
Before Installation
Installation environment and usable software
Hardware and software requirements
Then install it using the new connection method
Installing the Software
Standard Installation USB only
Double-click the setup icon
When the Finish screen appears, click the Close button
SET UP the Software
Windows XP USB/Parallel
This completes the installation of the software
Install the USB 2.0 Composite Device
Welcome window will appear. Click the Next button
SET UP the Software
Connect the USB/parallel cable p.55
Windows 98/Me/2000 USB
SET UP the Software
Windows 95/98/Me/NT 4.0/2000 Parallel
Select LPT1 for the printer port
Is connected to the same network
Using the machine as a shared printer
Perform steps 2 through 7 in Custom Installation p.40 p.41
Click the MFP Driver button
You will return to the window of . Click the Close button
That you are using and click the Next button
Printer port selection window, verify the network printer
That is shared and whether the machine is to be used as
Windows XP
Setting UP Button Manager
SET UP the Software
Click view all Control Panel options
Windows 98/Me/2000
Select Sharp FO-DC550 and click the Properties button
Select Sharp Button Manager F in Send to this application
Connecting a USB cable
Connecting the Machine to Your Computer
Connecting a parallel cable
User programs p.66
System requirements for USB 2.0 Hi-Speed mode
Following system is required to use USB 2.0 Hi-Speed mode
Make sure that paper is loaded in the tray
Using the Printer Mode
Basic Procedure for Printing
Canceling a print job
Scanning from the operation panel of the machine
Using the Scanner Mode
Scanning Using the Keys on the Machine
Modes Copying Printing Scanning
Scanning from Your Computer
Operation in COPY, PRINTER, and Scanner Modes
Button Manager scan menu
Click to read the online manual
HOW to USE the Online Manual
Installing Acrobat Reader
Follow the on-screen instructions to install Acrobat Reader
User Programs
User Settings
Copy mode
Pattern
MIN
50%
OFF
300dpi
HI-SPEED
English
Normal
LOW
American
FULL-SPEED
Print mode
Press the Menu key and then press the Enter key
Selecting a Setting for a User Program
Appears. Adjust the exposure and press the Enter key
AUTO/TEXT/PHOTO Auto
Base settings
Key entry beep One beep Base setting beep
Invalid key beep
Display Messages
Troubleshooting and Maintenance
Indication Cause and remedy Lamp indicator Display
TD Cartridge
Install a TD
Replace
Drum
Too light
Troubleshooting the Machine
Select the correct original type for Original
Copies are too dark or
Troubleshooting and Maintenance
Paper misfeed
Problem Cause and solution Misfeed occur
Paper is outside of the specified Size and weight range
Paper is not loaded properly
Memory FULL, Press Start to
Then set the paper size
Click the start button and then click Control Panel
Problems During Setup of the Software
MFP driver cannot be installed Windows 2000/XP
Click Performance and Maintenance, and then click System
Device Manager tab
Plug and play screen does not appear USB only
Click the icon beside Universal Serial Bus controllers
Click the Ports tab
Click System, click the Hardware tab, and click the Device
Manager button
Click Icon beside Other Devices
If you need to remove the software, follow these steps
Setting of the other printer back to LPT1
Removing the software
Click Add or Remove Programs
Misfeed in the paper feed area p.80
Misfeed Removal
Misfeed in the paper feed area
Misfeed in the fusing area
Misfeed in the transport area
Document feeder cover
Misfeed in the Rspf
LockUnlock
Scan Head Locking Switch
TD Cartridge Replacement
Gently insert the TD cartridge until it Locks into place
Gently pull the TD cartridge
Out while pressing the lock Release button
While pushing the lock release button
Troubleshooting and Maintenance
Doing so may cause smudges on the copies
Drum Cartridge Replacement
External light
Press the key or key to display the count of each function
Checking the Total Count
Document glass and the back side of the Rspf
Cleaning the Machine
Wipe the cabinet with a soft, clean cloth
Cabinet
Transfer charger
Supply Part number Usable life
About Supplies
TD cartridge and drum cartridge
Supply list
Sheet Paper Feed Unit AR-D16
System Configuration
Optional Equipment
Network Expansion KIT AR-NB2 N
Parallel interface cable
Using the AR-D16 with the printer function
Interface cable
USB interface cable
Appendix
Specifications
Power consumption
Fusing system
Resolution
Power supply
Interface
Printer Function
Print speed
Emulation
Scanner Function
Paper capacity
Paper weight
Sheet paper feed unit AR-D16
Paper size
Software License
100
Limited Warranty on Media
Composition / Information on Ingredients
101
Product and Company Identification
102
Stability and Reactivity
103
Exposure Controls / Personal Protection
Physical and Chemical Properties
104
105
106
107
108
Date Rivised Mar Date Issued Sep Msds No. F-31231
109
Symbols
Index
110
111
112
Battery Disposal
2004E KS1 TINSE1323QSZZ
FO-DC550