AIR Purifier
Luftreiniger
Bedienungsanleitung
Manuel D’UTILISATION
Please read before operating your new Air Purifier
Common illustration has used KC-850E
Features
Contents
Important Safety Instructions
Periodically remove dust from the plug
Installation Guidelines
Avoid locations where grease or oily smoke is generated
Filter Guidelines
Addition, the sensors may malfunction as a result
Back
Illustrative Diagram Front
Part Names
Dust Monitor
Front Monitor
Dust Monitor Odour Monitor
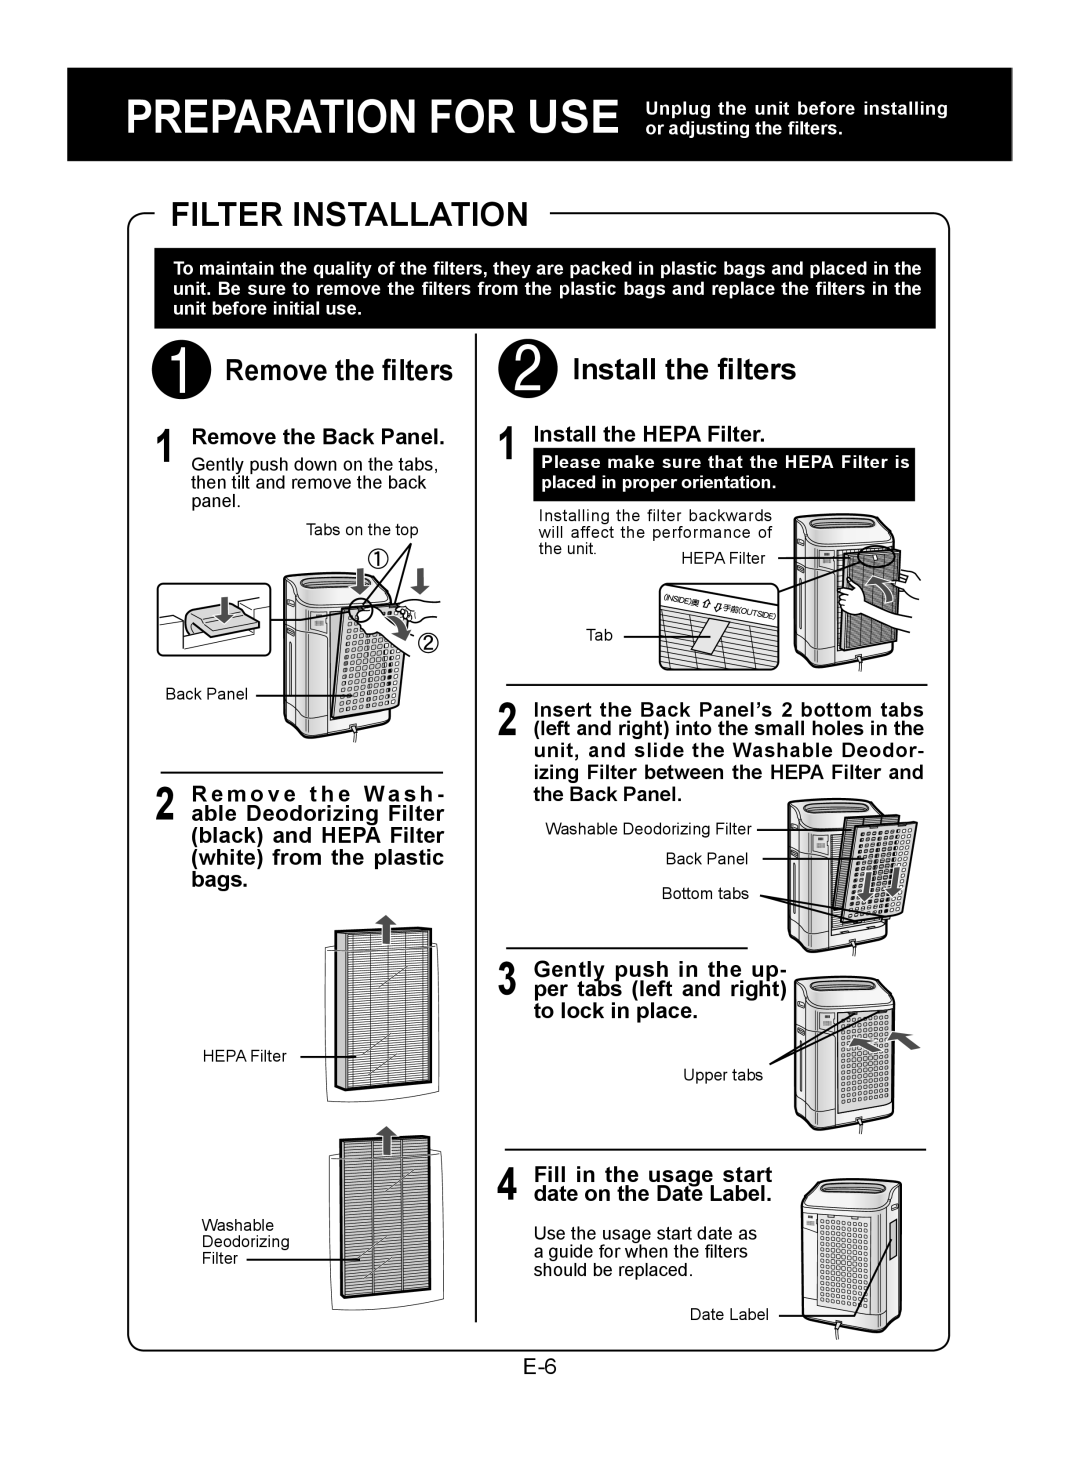
Fill in the usage start date on the Date Label
Filter Installation
Install the Hepa Filter
Refilling the Water Tank
After filling, securely tighten the Tank Cap
Replace the Water Tank in the unit
Check to see that there is no water leaking
Clean AIR & Humidify Mode
About Automatic Humidify Mode
Operation
Main Unit Display
Clean AIR Mode
Clean ION Shower Mode
Press the Clean AIR Mode Button on the display
Pollen
Water Supply Indicator Light
Sound indicator setting for water supply
Press the Power OFF Button
Use when the light on the front panel is too bright
Sensor Filter Care
Care and Maintenance
Unit
Care Cycle Every day when Humidifying
Water Tank
Washable Deodorizing Filter Care
Replace the filter in unit. See E-6
Humidifying Tray
Rinse the Humidifying
Impurities
Replace the Humidifying Filter and re
Humidifying Filter
Remove the Water Tank and Humidifying Tray
Remove the Humidifying Filter from the Humidifying Tray
Preparing the descaling solu- tion
Filter Replacement Guidelines
Washable Deodorizing Filter
Refer to Please read before operating your new Air Purifier
Humidifying filter
Troubleshooting
Symptom
If error occurs again, contact the Sharp Service Centre
Lamp Indication Error Details Remedy
Specifications
Standby Power
Other Countries outside the EU
Information on Disposal for Business Users European Union
Sharp Corporation
OSAKA, Japan
Русский Nederlands Français Deutsch English
Hinweis
Dieselbe Abbildung wurde auch beim Modell „KC-850E verwendet
Leistungsmerkmale
Inhalt
Wichtige Sicherheitshinweise
Richtlinien ZUR Installation
Sicheitheitshinweise FÜR DEN Betrieb
Richtlinien ZUM Umgang MIT Filtern
Anderenfalls funktioniert das Gerät nicht ordnungsgemäß
Explosionszeichung Vorderseite
Rückseite
Luftauslass Hauptgerät Anzeige Vorderanzeige
Rierungsfilter schwarz
Geruchsanzeige
Anzeigenfeld AN DER Vorderseite
Staubanzeige
Filterinstallation
Auffüllen DES Wasserbehälters
Setzen Sie den Wasserbehälter wieder in das Gerät ein
Vorsicht
Tankgriff Wasserbehälter Luftbefeuch- tungswanne
Betrieb
Anzeigen AM Hauptgerät
Wissenswertes über den automatischen Luftbefeuchtungsmodus
Gensteuertaste
Gebläsegeschwindigkeit
Luftreinigungsmodus
IONENDUSCHE-REINIGUNGSMODUS
WASSERVORRATS-ANZEIGELEUCHTE
Drücken Sie die AUS-Taste
Abbruch
Empfi ndlichkeit die rechte Abbildung an
Pflege UND Wartung
Rückwand UND Sensoren
Gerät
SENSORFILTER-PFLEGE
Wasserbehälter
Achtung
Bei täglicher Luftbefeuchtung
Dung zu vermeiden
Luftbefeuchtungswanne
Luftbefeuchtungsfilter
Verwendung von Zitronensäure
Luftbefeuchtungsfilter
Richtlinien FÜR DEN Filteraustausch
Auswaschbarer Desodorierungsfilter
Problem
Störungsbeseitigung
Leuchtanzeige Fehlerdetails Abhilfemassnahme
Technische Daten
Standby-Betrieb
Anderen Ländern außerhalb der EU
Service Procedure / Service Vorgehensweise
Français Deutsch English
Illustration commune utilisant le « KC-850E »
Caractéristiques
Table DES Matières
Instructions DE Sécurité Importantes
Dépoussiérez régulièrement la fiche
Guide D’UTILISATION DES Filtres
Guide D’INSTALLATION
Précautions Concernant LE Fonctionnement
DOS DE L’APPAREIL
Désignation DES Pièces
Schéma Illustratif Avant
Moniteur D’ODEUR
Moniteur Avant
Moniteur DE Poussière
Installation DES Filtres
Remplissage DU Réservoir D’EAU
Affichage DE L’UNITÉ Principale
Propos du mode d’humidification automatique
Fonctionnement
Vitesse de ventilateur
Mode D’ÉPURATION DE L’AIR
Mode D’ÉPURATION PAR Pluie Dions
Voyant D’ALIMENTATION EN EAU
Réglage de l’indicateur sonore de l’alimentation en eau
Appuyez sur la touche d’arrêt de l’appareil
Annulation
Soin ET Entretien
Panneau Arrière ET Capteurs
Appareil
Entretien DU Filtre DE Capteur
Réservoir D’EAU
Rincez à l’eau tiède la saleté accumulée sur le
Filtre Désodorisant Lavable
Replacez le filtre dans l’appareil. Voir page F-6
BAC D’HUMIDIFICATION
La fréquence de lentretien dépend de la dureté de leau. Evi
Mois
Dents
Filtre D’HUMIDIFICATION
Retirez le réservoir d’eau et le bac d’humidification
Retirez le filtre d’humidification du bac d’humidification
Évitez de renverser de l’eau du bac d’humidi- fication
Guide DE Remplacement DES Filtres
Filtre désodorisant lavable
Filtre d’humidification
Filtre d’humidification
Résolution DES Problèmes
Symptôme
Affichage Lumineux
Affichage Lumineux Origine Solution
DE L’ERREUR
Caractéristiques
Consommation en veille
Pays hors de lUnion européenne
Memo
Polsk Русский
Opmerking
Voorbeeldillustratie van de KC-850E
Kenmerken
Inhoud
Belangrijke Veiligheidsvoorschriften
Stof de stekker regelmatig af
Richtlijnen Voor Installatie
Voorzorgsmaatregelen Voor Gebruik
Richtlijnen Voor Gebruik VAN DE Filters
Reinig de buitenkant alleen met behulp van een zachte doek
Achterzijde
Benaming VAN DE Onderdelen
Overzicht Voorzijde
Geurmonitor
Display
Stofmonitor
Installatie VAN DE Filters
Vullen VAN HET Waterreservoir
Draai na het vullen de dop van het waterre
Servoir stevig vast
Plaats het waterreservoir in de luchtreiniger
Bediening
HET Programma Luchtreinigen & Luchtbevochtigen
Bedieningspaneel VAN HET Hoofdtoestel
Luchtbevochtigen
De ventilatorsnelheid
HET Programma Clean ION Shower
HET Programma Luchtreinigen
Druk op de UIT-knop
Water BIJVUL-INDICATOR
Instellen van een geluidssignaal voor het water bijvullen
Filterindicator
Zorg EN Onderhoud
Achterpaneel EN Sensoren
Luchtreiniger
Waterreservoir
Plaats het filter terug in de luchtreiniger. Zie pagina N-6
Het waterreservoir is niet vaatwasbestendig
Zijn, moeten deze worden schoongemaakt
Luchtbevochtigingsbak
Luchtbevochtigingsfilter
Verwijder het waterreservoir en de luchtbevochtigingsbak
Prepareren van de ontkalkings- oplossing
Probeer geen water uit de luchtbevochti- gingsbak te morsen
Afwasbaar geurfilter
Luchtbevochtigingsfilter
Het filter is afwas- en herbruikbaar, maar ook vervangbaar
Luchtbevochtigingsfilter
Problemen Oplossen
Probleem
Indicatie
Oplossing
Technische Gegevens
Stand-by stroomverbruik
Andere landen buiten de Europese Unie
∂dòd áë«ëüdG á≤jô£dG
ÄÉjÉØædG
»HhQhCÉdG OÉëJÉdG hO »a.1
»HhQhCÉdG OÉëJÉdG êQÉN iôNCÉdG ¿Gó∏ÑdG.2
≠c ¿RƒdG
EN1822 πÑb øe H10 »g ÉÑ«g Î∏a áÑJQ
ΠÑ«ùjO äƒüdG iƒàùe
KC-850KC-860E
KC-840
IôNCG
Low hCG High
ÄÉfƒjC’G
ÄGÎ∏ØdG óÑàSG hCG ∞¶f
?ôFÉéùdG
«WÎdG Î∏a §ÑVG
ÉÑ«g Î∏a
«WÎdG Î∏a
∏ØdG GóÑàS’ ΩOÉ≤dG óYƒŸÉH ∑Òcòàd ïjQÉàdG äÉbÉ£H ΩóîàSG.2
Îù«dƒÑdG ,»YÉæüdG ôjôG
¬Ø£TG ,Ö«WÎdG AÉe â- ≥aôH
RÉ¡÷G
∞«¶æàdG ƒ∏fi Ò†
∞«¶æàdG
«æ«üdG ∞«¶æJ hCG ´õf
¿ÉæSCG
Aéÿg ÜôùJ ‹ÉàdÉH h ¿GõÿG
Aéÿg äÉØ∏fl øe ¢ü∏îàdG ÖüdG øe ¿ƒμj ɪæ«M
¡jôμdG íFGhôdG
¡jôμdG íFGhôdG ádGREG
Πù¨dG πÑb QÉѨdG RCGôJÉa AÉe â
«WÎdG óæY Ωƒj πc ájÉædG IQhO
RÉ¡÷G ∞∏àJ ¿CG äÉضæª∏d øμÁ
«ëüdG
£ù∏d ∞∏àdG ÖÑùJ É¡∏c ,π≤üdG ¥ƒëùe ,ÔãdG ,øjõæÑdG
±É≤jE’G QR §¨VEG
AɨdEÓd
ÉØC£e RÉ¡÷G ¿ƒμj ÚM iôNCG
RÉ¡édG ±É≤jE’ ±É≤jE’G QR §¨VEG
≤HÉSQÉàîªdGk
RÉ¡édG±É≤jE’±É≤jE’GQR§¨VEG
IóŸ ‹ÉdG iƒàùŸG ≈∏Y RÉ¡÷G πª«S
RÉ¡÷G π«¨ûàH AóÑdG h
«¨ûàdG Vh ‘ AGƒ¡dG Ö«WôJ h ∞«¶æJ
65%
ÁLQO 24 ~ 60%
≈∏YCÉdG
¿GõÿG ¢†Ñ≤e Aéÿg ¿GõN «WÎdG á«æ«U ¿GõÿG AÉ£Z ¥ÓZE’G ºμMCG
¿GõN â«ÑãJ óæY ¢†Ñ≤ªdG á≤W äƒU ªùàS
KÉ«eƒj AɪdG ¿GõN »a OƒLƒªdG AɪdG ô««¨àH ºb
¥ÓZE’G
¥QRCG
¡jôμdG íFGhôdG
QÉѨdG
ÌcCG hCG 65% ÉY
AGƒ¡dGêôfl AGƒ¡dG êôfl «ù«FôdG¢VôdGáTÉT
«eÉeC’GáTÉûdG
«ù«FôdGIóMƒdG
¿GõÿG¢†Ñ≤e
AGƒ¡dG êôfl hCG/h πNóe óùH º≤J ’
ºFÉb Vh ‘ ƒg h ÉehOk RÉ¡÷G π«¨ûàH ºb
Áë«ëU IQƒüH RÉ¡÷G πªY ΩóY ‘ ∂dP ÖÑùà«S
∞∏à∏d äÉùéŸG ¢VôàJ hCG RÉ¡÷G í£S ´óüàj ób
240 ~220
AGƒ¡dG êôfl hCG πNóe ‘ iôNCG OGƒe ájCG hCG ∂ÑUEG πNóJ ’
»FGƒ¡dG OƒLh ¿Éμe hCG √ÉŒG Ò«¨àH ºb
Gòg IAGôb AÉLôdG .ÜQÉT øe AGƒ¡dG »≤æe ºμFGôûd ºcôμûf
AGƒ¡dG ‘ IQÉ«£dG iôNC’G äÉÄjõ÷G h QÉѨdG
ÁÄÑJ πμd äÉYÉS 10 ≈àM πªj
¡ØûàμJ »àdG áHƒWôdG h AGƒ¡dG AÉ≤f ≈∏Y
ÉÑ«g ôà∏a
KC-840E KC-850E KC-860E