SECTION 2
GENERAL
MZ-N10
This section is extracted from instruction manual.
Looking at controls
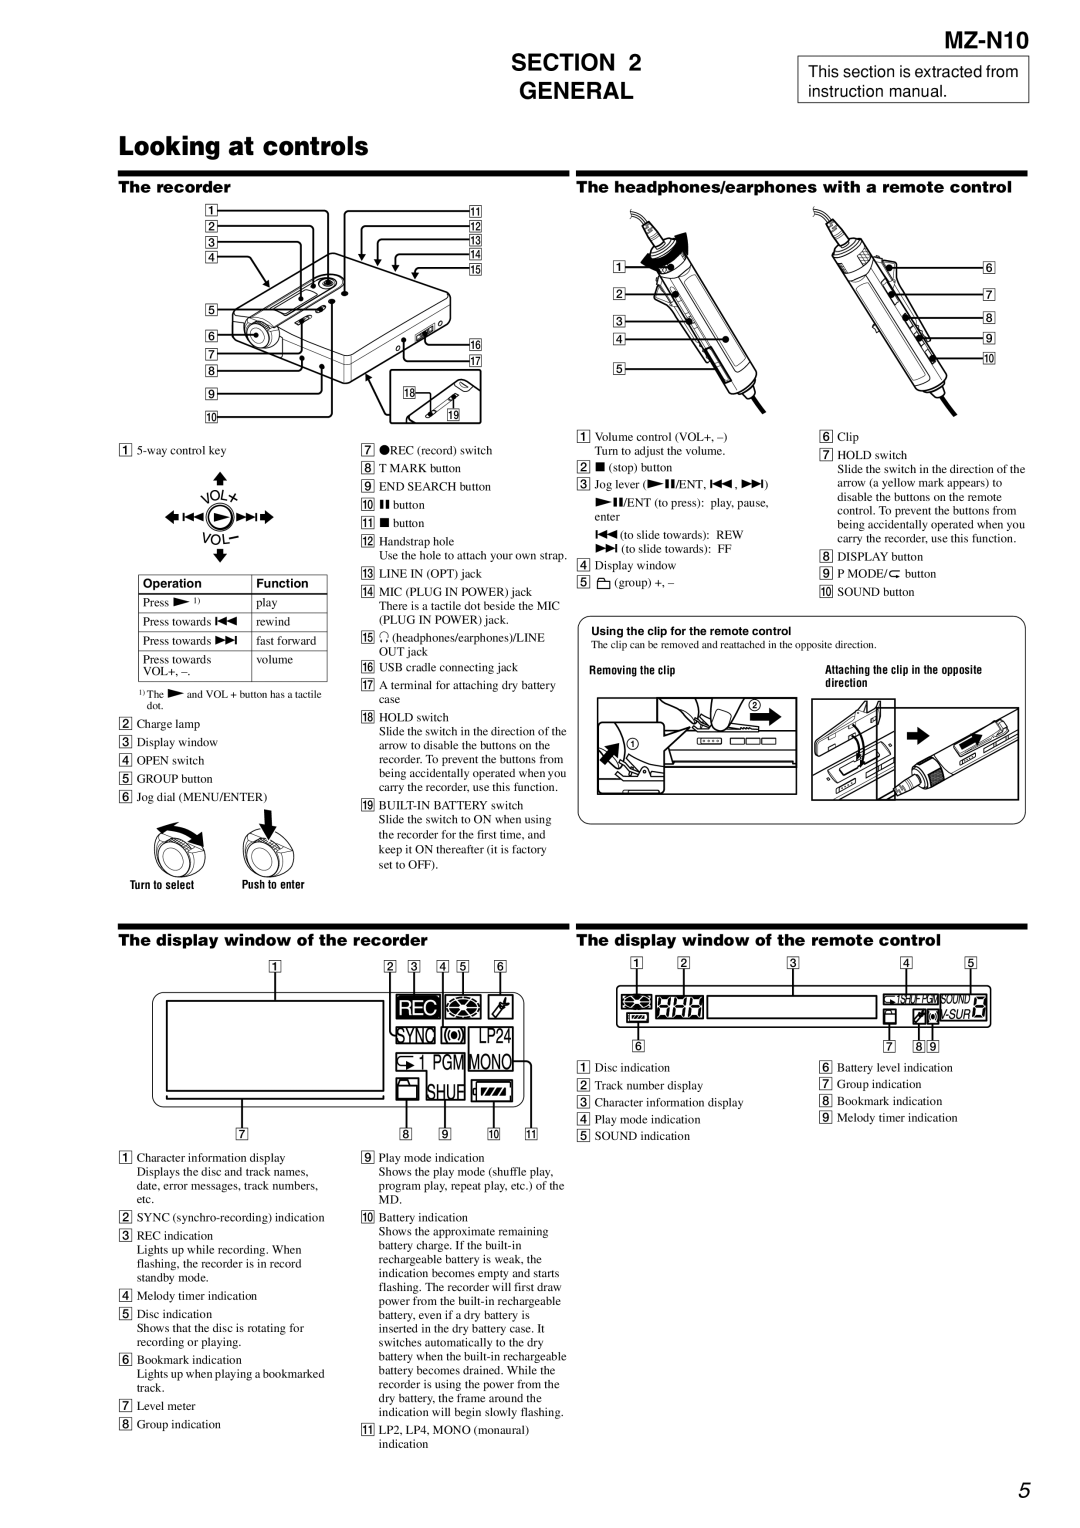
The recorder
1
2
3
4
5
6
7
8
9
q;
The headphones/earphones with a remote control
qa |
|
|
qs |
|
|
qd |
|
|
qf |
|
|
qg | A | F |
| B | G |
| C | H |
|
| |
qh | D | I |
|
| |
qj | E | J |
|
|
qk
ql
A
Operation | Function |
Press N 1) | play |
Press towards . rewind | |
| |
Press towards > fast forward | |
G zREC (record) switch |
H T MARK button |
I END SEARCH button |
J X button |
K x button |
L Handstrap hole |
Use the hole to attach your own strap. |
M LINE IN (OPT) jack |
N MIC (PLUG IN POWER) jack |
There is a tactile dot beside the MIC |
(PLUG IN POWER) jack. |
O i (headphones/earphones)/LINE |
A Volume control (VOL+,
Turn to adjust the volume.
B x (stop) button
CJog lever (NX/ENT, ., >)
NX/ENT (to press): play, pause, enter
.(to slide towards): REW
>(to slide towards): FF
DDisplay window
E![]() (group) +, –
(group) +, –
Using the clip for the remote control
FClip
GHOLD switch
Slide the switch in the direction of the arrow (a yellow mark appears) to disable the buttons on the remote control. To prevent the buttons from being accidentally operated when you carry the recorder, use this function.
HDISPLAY button
IP MODE/![]() button
button
JSOUND button
Press towards | volume |
VOL+, |
|
1)The N and VOL + button has a tactile dot.
B Charge lamp
C Display window
D OPEN switch
E GROUP button
F Jog dial (MENU/ENTER)
Turn to select | Push to enter |
OUT jack |
P USB cradle connecting jack |
Q A terminal for attaching dry battery |
case |
R HOLD switch |
Slide the switch in the direction of the |
arrow to disable the buttons on the |
recorder. To prevent the buttons from |
being accidentally operated when you |
carry the recorder, use this function. |
S |
Slide the switch to ON when using |
the recorder for the first time, and |
keep it ON thereafter (it is factory |
set to OFF). |
The clip can be removed and reattached in the opposite direction.
Removing the clip | Attaching the clip in the opposite |
| direction |
2 |
1 |
The display window of the recorder |
|
|
|
|
|
|
| The display window of the remote control |
|
| |||||||||||||||||||||||||
1 | 2 3 | 4 5 | 6 |
|
|
| A B |
| C |
|
|
| D | E | |||||||||||||||||||||
|
|
|
|
|
|
|
|
|
|
|
|
|
|
|
|
|
|
|
|
|
|
|
|
|
|
|
|
|
|
|
|
|
|
|
|
|
|
|
|
|
|
|
|
|
|
|
|
|
|
|
|
|
|
|
|
|
|
|
|
|
|
|
|
|
|
|
|
|
|
|
|
|
|
|
|
|
|
|
|
|
|
|
|
|
|
|
|
|
|
|
|
|
|
|
|
|
|
|
|
|
|
|
|
|
|
|
|
|
|
|
|
|
|
|
|
|
|
|
|
|
|
|
|
|
|
|
|
|
|
|
|
|
|
|
|
|
|
|
|
|
|
|
|
7
A Character information display Displays the disc and track names, date, error messages, track numbers, etc.
BSYNC
CREC indication
Lights up while recording. When flashing, the recorder is in record standby mode.
DMelody timer indication
EDisc indication
Shows that the disc is rotating for recording or playing.
FBookmark indication
Lights up when playing a bookmarked track.
GLevel meter
HGroup indication
8 9 q; qa
I Play mode indication
Shows the play mode (shuffle play, program play, repeat play, etc.) of the MD.
J Battery indication
Shows the approximate remaining battery charge. If the
K LP2, LP4, MONO (monaural) indication
F
A Disc indication
B Track number display
C Character information display D Play mode indication
E SOUND indication
G HI
F Battery level indication G Group indication
H Bookmark indication I Melody timer indication
5