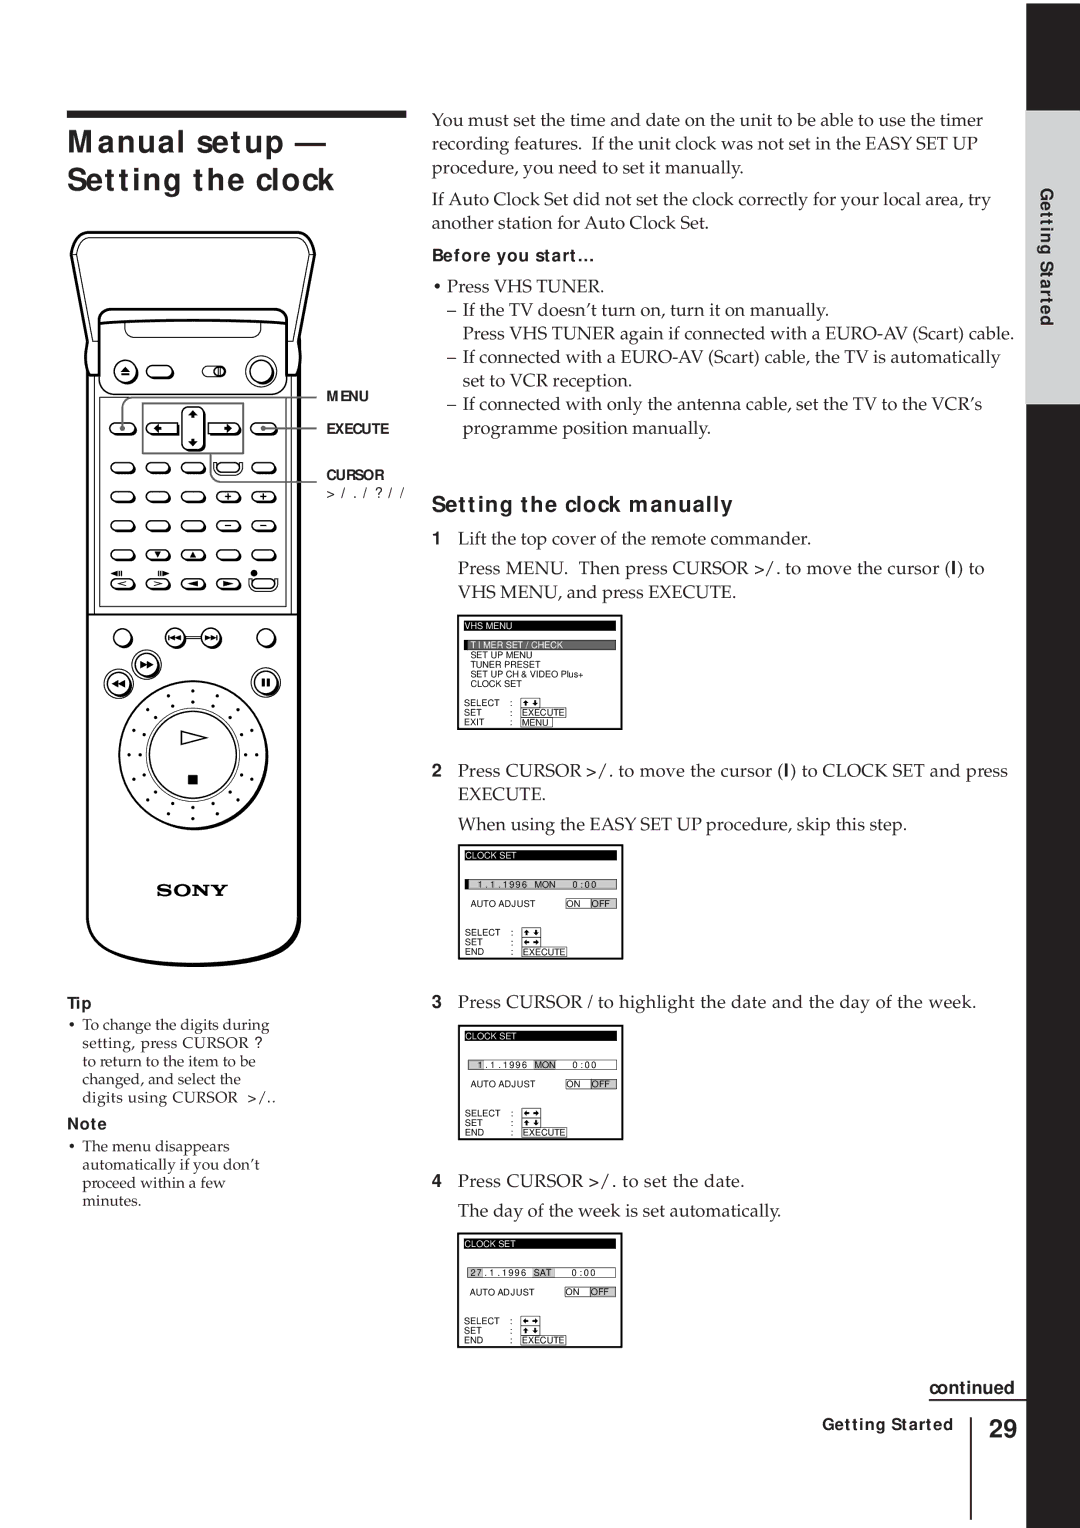
Manual setup — Setting the clock
MENU
EXECUTE
CURSOR
> / . / ? / /
Tip
•To change the digits during setting, press CURSOR ? to return to the item to be changed, and select the digits using CURSOR >/..
Note
•The menu disappears automatically if you don’t proceed within a few minutes.
You must set the time and date on the unit to be able to use the timer recording features. If the unit clock was not set in the EASY SET UP procedure, you need to set it manually.
If Auto Clock Set did not set the clock correctly for your local area, try another station for Auto Clock Set.
Before you start…
•Press VHS TUNER.
–If the TV doesn’t turn on, turn it on manually.
Press VHS TUNER again if connected with a
–If connected with a
–If connected with only the antenna cable, set the TV to the VCR’s programme position manually.
Setting the clock manually
1Lift the top cover of the remote commander.
Press MENU. Then press CURSOR >/. to move the cursor (I) to VHS MENU, and press EXECUTE.
VHS MENU
![]()
![]() T I MER SET / CHECK
T I MER SET / CHECK
SET UP MENU
TUNER PRESET
SET UP CH & VIDEO Plus+
CLOCK SET
SELECT | : |
|
|
|
SET | : | EXECUTE | ||
EXIT | : | MENU |
| |
2Press CURSOR >/. to move the cursor (I) to CLOCK SET and press
EXECUTE.
When using the EASY SET UP procedure, skip this step.
CLOCK SET
1 . 1 . 1 9 9 6 MON | 0 : 0 0 | |||||
AUTO ADJUST |
|
|
| |||
| ON | OFF | ||||
SELECT | : |
|
|
|
|
|
|
|
|
|
| ||
SET | : |
|
|
|
|
|
END | : | EXECUTE |
|
|
| |
3Press CURSOR / to highlight the date and the day of the week.
CLOCK SET
| 1 | . 1 . 1 9 9 6 | MON |
| 0 : 0 0 | |||||
| AUTO ADJUST |
|
|
| ||||||
|
| ON | OFF | |||||||
SELECT | : |
|
|
|
|
|
|
| ||
|
|
|
|
|
|
| ||||
SET | : |
|
|
|
|
|
|
| ||
END | : | EXECUTE |
|
|
| |||||
4Press CURSOR >/. to set the date. The day of the week is set automatically.
CLOCK SET
| 2 7 | . 1 . 1 9 9 6 | SAT |
| 0 : 0 0 | |||||
| AUTO ADJUST |
|
|
| ||||||
|
| ON | OFF | |||||||
SELECT | : |
|
|
|
|
|
|
| ||
|
|
|
|
|
|
| ||||
SET | : |
|
|
|
|
|
|
| ||
END | : | EXECUTE |
|
|
| |||||
continued
Getting Started
Getting Started
29
