Setting the timer manually
VHS TUNER
1 2 3
4 5 6
7 8 9
>10 0
MENU |
EXECUTE |
If VIDEO Plus+ is not available in your area, follow the instructions below to set the timer to record programmes
Before you start…
•Check that the unit’s clock is set to the correct time.
•Insert a tape with its safety tab in place. Make sure the tape is longer than the total recording time.
•Press VHS TUNER.
–If the TV doesn’t turn on, turn it on manually, and press VHS TUNER again if connected with a
–If connected with a
–If connected with only the antenna cable, set the TV to the VCR’s programme position manually.
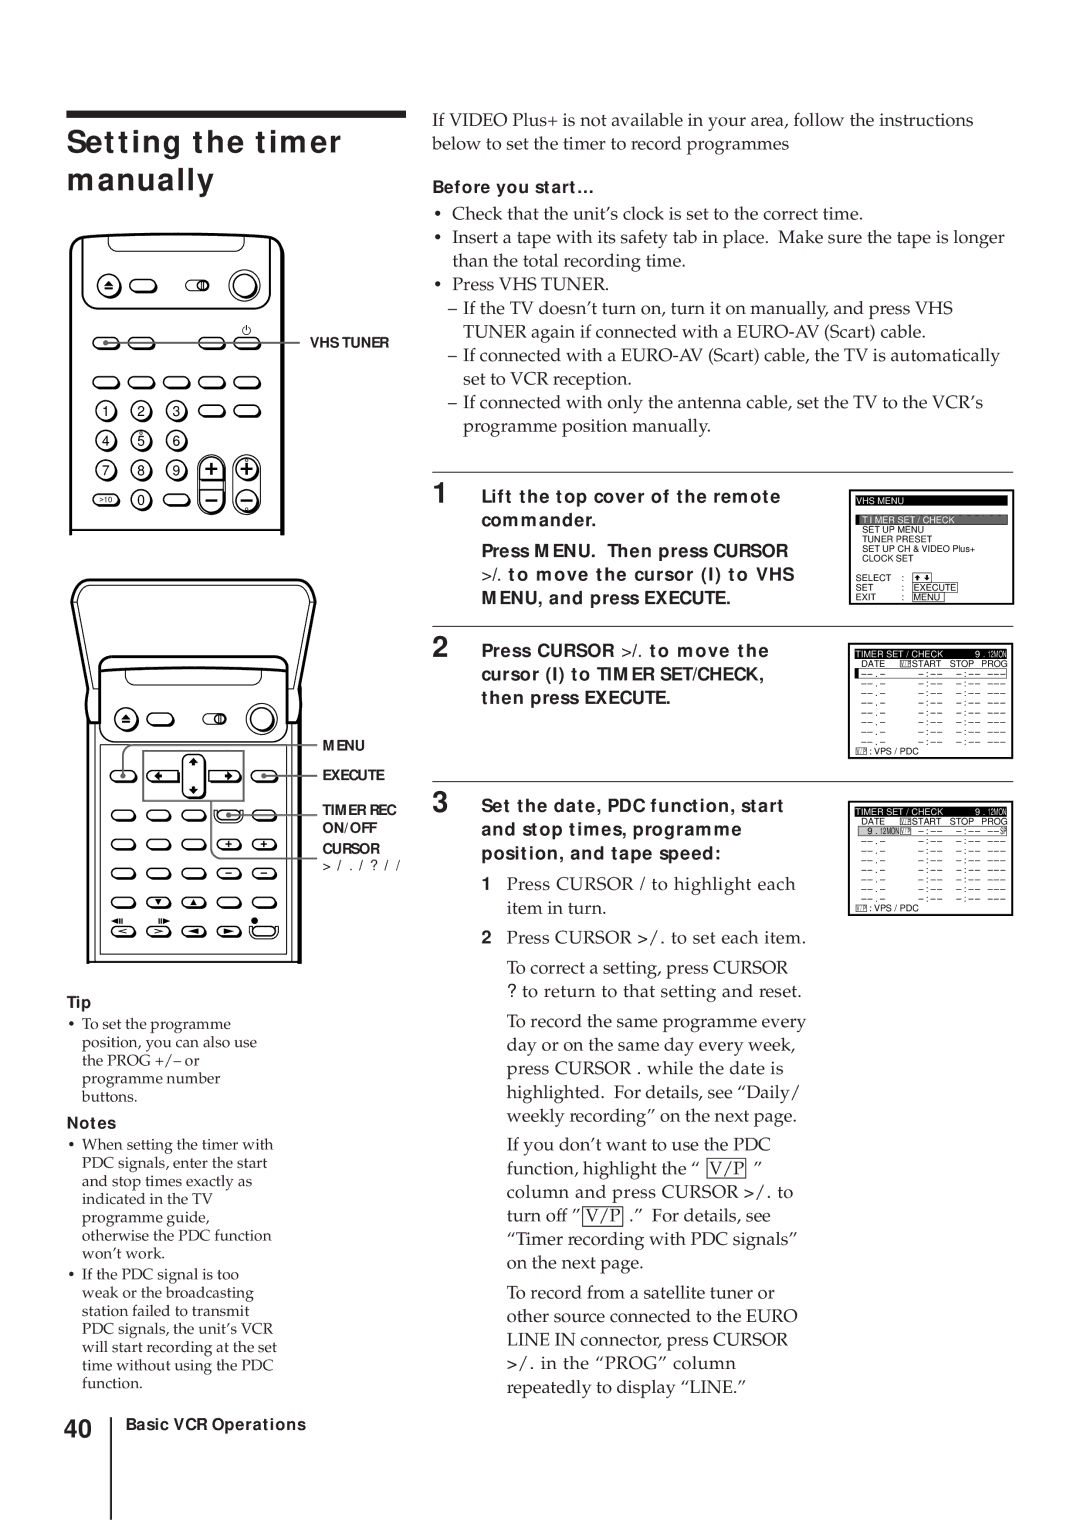
1 Lift the top cover of the remote |
|
|
|
|
|
|
|
| ||
| VHS MENU |
|
|
|
|
|
| |||
commander. |
|
|
|
|
|
|
|
|
| |
| T I MER SET / CHECK |
| ||||||||
|
|
| SET UP MENU |
|
|
|
| |||
Press MENU. Then press CURSOR |
| TUNER PRESET |
|
|
|
| ||||
| CLOCK SET |
|
|
|
|
|
| |||
|
|
| SET UP CH & VIDEO Plus+ | |||||||
>/. to move the cursor (I) to VHS |
| SELECT | : |
|
|
|
|
|
| |
|
|
|
|
|
|
| ||||
MENU, and press EXECUTE. |
| SET | : | EXECUTE |
|
|
| |||
| EXIT | : | MENU |
|
|
|
| |||
|
|
|
|
|
|
|
|
|
|
|
2 Press CURSOR >/. to move the |
|
|
|
|
|
| ||||
|
| TIMER SET / CHECK |
| 9 . 12MON |
|
| ||||
cursor (I) to TIMER SET/CHECK, |
|
| DATE | V / P START | STOP PROG |
|
| |||
|
| – |
|
|
| |||||
then press EXECUTE. |
|
| – |
|
|
| ||||
|
| – |
|
| ||||||
|
| – |
|
| ||||||
|
|
| – |
|
| |||||
|
|
| – |
|
| |||||
|
|
| – |
|
| |||||
|
|
| – |
|
| |||||
|
|
| V / P : VPS / PDC |
|
|
|
| |||
TIMER REC |
ON/OFF |
CURSOR |
> / . / ? / / |
Tip
•To set the programme position, you can also use the PROG +/– or programme number buttons.
Notes
•When setting the timer with PDC signals, enter the start and stop times exactly as indicated in the TV programme guide, otherwise the PDC function won’t work.
•If the PDC signal is too weak or the broadcasting station failed to transmit PDC signals, the unit’s VCR will start recording at the set time without using the PDC function.
3 Set the date, PDC function, start and stop times, programme position, and tape speed:
1Press CURSOR / to highlight each item in turn.
2Press CURSOR >/. to set each item.
To correct a setting, press CURSOR
?to return to that setting and reset.
To record the same programme every day or on the same day every week, press CURSOR . while the date is highlighted. For details, see “Daily/ weekly recording” on the next page.
If you don’t want to use the PDC function, highlight the “ V/P ” column and press CURSOR >/. to turn off ” V/P .” For details, see
“Timer recording with PDC signals” on the next page.
To record from a satellite tuner or other source connected to the EURO LINE IN connector, press CURSOR >/. in the “PROG” column repeatedly to display “LINE.”
|
|
|
|
|
|
|
| TIMER SET / CHECK | 9 | . 12MON |
| ||
|
| DATE | V / P START | STOP | PROG |
|
|
| 9 . 12MON | V / P | – – SP |
| |
|
| – | – – – |
| ||
|
| – | – – – | |||
|
| – | – – – | |||
|
| – | – – – | |||
|
| – | – – – | |||
|
| – | – – – | |||
|
| – | – – – | |||
| V / P : VPS / PDC |
|
|
| ||
40
Basic VCR Operations
