IR10
Fore attempting to operate the receiver
Read ALL Instructions Carefully be
Following explicit definitions apply to this manual
For U.S.A. only
Accessories included with the receiver
Q1 Antenna W1 Handstrap
T1 Ni-Cd batteries
Table of Contents
Operating Theory
Front and side panels
Panel Description
Emits the receive audio
Top panel
Adjusts the audio output level
Varies the squelch threshold point for audio mute
Varies the RF gain in LSB, USB and CW modes
Function display
Memo VFO Easy VSC AT T
Appears while the function Func switch is pushed
Appears while the sleep timer is activated p
Appears while in memory mode p
Appears while in VFO mode p
Secondary Function while pushing Func
Keypad
Memory search function p
Secondary Function while pushing Func
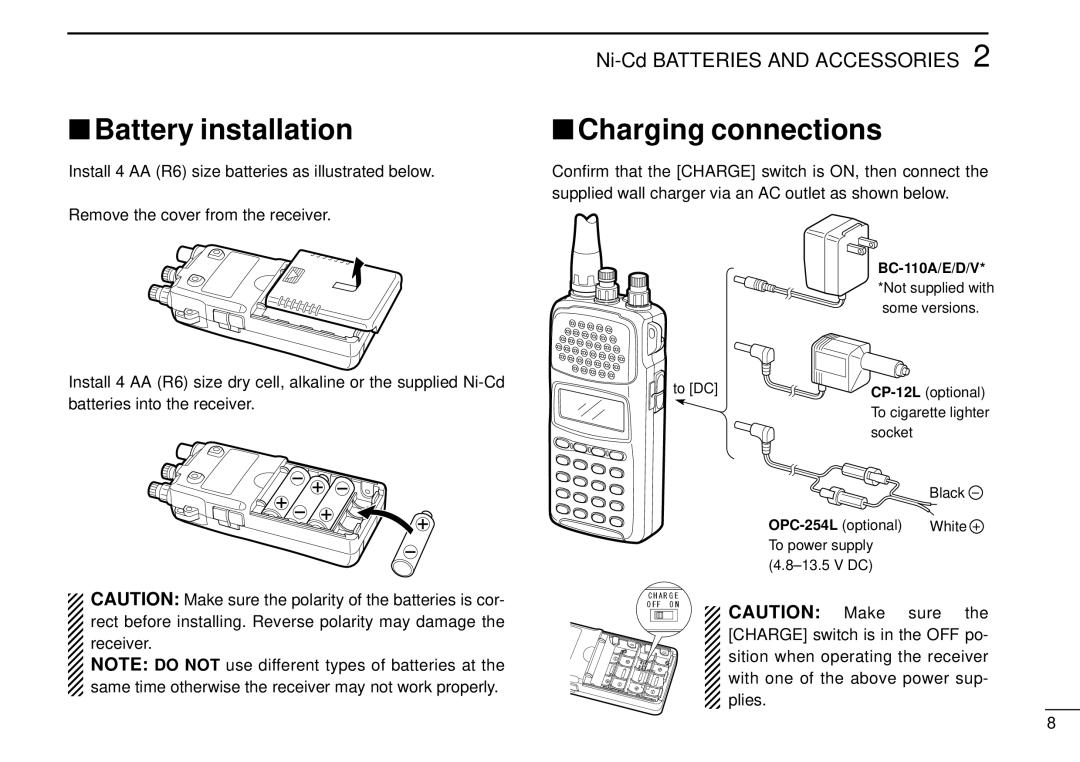
Charging Ni-Cd batteries
Charging precautions
About Ni-Cd batteries
Charging connections
Battery installation
Antenna
Accessory attachment
Belt clip
Handstrap
Turn power on
Selecting VFO mode
Adjust the volume
Basic Operation
Adjust the RF gain
Adjust the squelch
Select VFO mode
What is squelch?
What are receive modes?
Selecting a receive mode
Call up the tuning step set mode
Selecting a tuning step
Select the tuning step
What are tuning steps?
Select the frequency
Tuning a frequency via the keypad
Enter the frequency
Select VFO mode and a receive mode
Tuning a frequency via the dial
Tune a frequency
Rotate Dial to change the fre- quency
What are dial select steps?
Dial select steps
Push and hold FUNC, then rotate Dial
Band scope function
What is the band scope function?
Preparation
While pushing FUNC, push 1BSCOPE
Set band scope function
Adjust squelch
Adjust volume
Select the receive mode
Select VFO
Example 59.75 MHz
Use the tuning dial
Example 59.25 MHz
Tune the station
Listening example 2 airband broadcast in AM mode
Example 118.00 MHz Example 118.925 MHz
Enter a frequency of 118.0000 MHz* using the keypad p
Selecting Memory mode
Memory Mode
Select Memory mode
What is memory mode?
Selecting a Bank channel
Selecting a Bank and memory channel
Selecting a memory channel-1
Selecting a memory channel-2
Setting other information
Bank and memory channel setting
Programming a memory channel
Programming
Select VFO mode p Set the frequency and receive mode p
Setting receive conditions
While pushing FUNC, push V/MMW
Programming details
Set up
Programming details
Programming the data
Data setting
Push 0 and 7 to enter the mem- ory channel number
While pushing FUNC, push V/MMW for 2 sec
1While pushing FUNC, push V/MMW to enter memory write mode
Setting the frequency
Set the Bank and memory channel
Push
Rotate Dial or push 0 then 1 to select channel
Push Edit to enter memory set- ting mode
Modeam
Programming details Cont
What is the memory copy function?
Copy to VFO mode
Memory copy
Copy to the other memory channel
59.7500 MHz, WFM, A45 to VFO
Copying example
Scanning Operation
What is scanning?
Repeatedly scans operatable frequency range
A00 FM only A05 B00-R99 A07 A06
A01 A03 A04
Set the volume and squelch levels
Set receive mode
Before scanning
What is VSC?
Set the scan delay
What is scan delay?
Set the VSC
Memory scan
Full scan
Start and stop the scan
Start and stop scanning
Program scan
Select program scan channel
Auto memory write scan
For your convenience
During auto-memory write scanning
Select Bank scan and Bank number
Bank scan
While pushing FUNC, push 8BANK-S
Select mode select scan and mode
Mode select scan
Program skip setting Cont
Program skip setting
Memory skip setting
Skip function
Set Signavi function
Signavi function
Select scan type and start scanning
3Push Scan or CLR to stop scan- ning
Priority Watch
What is priority watch?
Types of priority watch
A01A32
Program a priority channel
Into Priority Channel VFO Mode p or Memory mode p
Set Main frequency
You want to program
Easy mode operation
Easy Mode
Select Easy mode
Push Easy to select Easy mode Appears
Edit Function
Attenuator settings can be toggled on or OFF
Memory channel edit
You can store the following items into a memory channel
A00
Memory channel edit flow chart
Set frequency
Enter memory edit mode
Set channel names
Enter channel Names via Keypad or by ro Tating Dial
Rotate Dial to select receive mode
Set receive mode and skip condition
Set attenuator condition
Set Bank names
Select or program a tuning step
Easy mode channel edit
Program scan channel edit
Set the start frequency for scan frequency range
Start Freq
Enter edit mode
Program scan or Easy mode channel edit
Set start frequency
Set scan delay time
Set receive mode and tuning step
Rotate Dial to select scan delay time
Push and hold Edit to enter the set contents
What is SET mode?
SET Mode
Opening message
Entering SET mode
Beep audio
Display contrast
Backlight Condition
Power save
Program skip
Memory skip
CI-V address
Scan delay
CI-V baud
CI-V transceive
Setting AFC
Low battery indicator
Low battery indicator activates when the installed batter
Other Functions
Lock function
Monitor function
Set monitor
Set lock
NB/ANL function
ATT function
Set ATT
Set NB/ANL
User TS setting
Sleep timer function
Set sleep timer
Set tuning step
Memory search function
Enter memory search mode
Enter memory channel names
Enter memory channel names via the keypad or Dial
Selecting a memory channel
Searching
Push Scan to start memory channel search
Push ENT to select a memory channel
Set auto mode
Auto mode and TS function
Set auto TS
Partial reset
Resetting the CPU
All reset
Data cloning
Set cloning mode and start cloning
Connect an optional OPC-474 be Tween both SP jacks
Alphanumeric input
Alphanumeric KEY Assignment
Command table
Control Commands
Data format
Data area
RS-232C Cable
Power supply 15VDC Computer Optional
To CI-V
Problem Possible Cause Solution
Troubleshooting
Troubleshooting
General
Specifications
Protects the receiver from everyday wear and tear
Options
Allows you to transfer data between receivers
Kamihigashi, Hirano-ku, Osaka 547 Japan