User Guide
Consejo
Table of Contents
2E. CalendarandTools
2D. Contacts
118
3B. Web and Data Services
113
117
Index
Introduction Your Phone’s Menu
Press the right softkey forthe following options
Contacts Photos
Iii
Update Firmware 9Voice Memo
# Settings
Phone Info
Press Options right softkeyto display the following options
Auto Key Guard Wireless Backup
Getting Started
Press and hold to turn the phone on
1A. Setting Up Service
Setting UpYour Phone
1A. Setting Up Service
ActivatingYour Phone
SprintAccount Passwords
Setting UpYourVoicemail
Account UserName and Password Voicemail Password
Getting Help
Data Services Password
ManagingYourAccount
From AnyOtherPhone
Sprint Operator Services
Sprint
FromYourSprint Phone
Your Phone
Your Phone
Forand download updates. Press Menu/OK
Download available updates
2A. Phone Basics
Key Functions
10 2A. Phone Basics
Viewing the Display Screen
Status Icons
Urgent Messages You have new urgent messages waiting
Bluetooth Icons
12 2A. Phone Basics
Messaging Icons
Others
Voice Call Icons
TurningYourPhoneOff
Batteryand Charger
TurningYour Phone On and Off
TurningYourPhoneOn
See Setting Up Your Phoneon
BatteryCapacity
Installingthe Battery
Removing the Battery
16 2A. Phone Basics
Chargingthe Battery
NavigatingThrough the Menus
Selecting Menu Items
DisplayingYour Phone Number
Setting the Key Guard
Backing UpWithin a Menu
Auto KeyGuard
To disable theAuto Key Guard feature
Making andAnswering Calls
HoldingYour Phone
Dialing Options
Making Calls
Can also mute the ringerand vibration
When your phone is off, all calls go directly to
Answering Calls
20 2A. Phone Basics
EndingaCall
AnsweringaRoamCallWithCallGuardEnabled
Missed Call Notification
Calling Emergency Numbers
Enhanced 911 E911Information
Exiting EmergencyMode
22 2A. Phone Basics
Place the phone nearyour ear during
Because of higher volume levels, do not
In-Call Options
End-of-Call Options
Press Done left softkey to save the entry
Savinga Phone Number
Findinga Phone Number
Dialing and Saving Phone NumbersWith Pauses
Enter all or part of a number
Dialing From the ContactsList
Plus +Code Dialing
To dial or save phone numbers with pauses
Abbreviated Dialing
Speed Dialing
Press to call the displayed number
To place a call usingAbbreviated Dialing
EnteringText
EnteringTextWith the QWERTYKeyboard
OtherText Input Modes
SelectingaText Input Mode
Capitalization Options
PredictiveTextMode
Help to view the Predictive Text instructions
Text Entry Settings
Press Options right softkey Text Mode
From standby mode, press Settings Text Entry AddWord
Highlight an option and press
Customizing PredictiveText Mode Settings
From standby mode, press Settings
To edit ordelete the words you have added
Phone Number Options
Simple Data Exchange
Email Address Options
Street Address Options
Save to Contacts to save the phone number in Contacts
Web Address URLOptions
32 2A. Phone Basics
Ringer Types
2B. Settings
Sound Settings
2B. Settings
Getting New Ringers
34 2B. Settings
Press Settings Sounds Ringer Type
Selecting RingerTypes for Messages
Highlight a vibrate type and press
Setting UpVoice Guide
SelectingVibrateTypes
Selecting a KeyTone
Press Settings Sounds Volume
AdjustingVolumeSettings
Select a volume level, and press Done left softkey
36 2B. Settings
Changing the BacklightTime Length
Display Settings
SelectingAlert Options for Messages
SilenceAll
Changing the Phone’s Menu Style
Changing the Screen Saver
Changing the Display ScreenAnimation
Changing the Contrast
Setting Return to Idle Mode
Changing the Standby Mode Display
Changing theText Greeting
SettingMessage Notification
Messaging Settings
Power Save Mode
Sleep Mode
To edit or delete a preset message
Text Messaging Settings
Setting a CallbackNumber
Managing Preset Messages
Setting an Alert Notification
SMSVoice Messaging Settings
Setting the Speakerphone
Setting the Sender’s Name
Press Settings More... Airplane Mode
Airplane Mode
TTY UseWith Sprint Service
Customer Service via the state Telecommunications
Yourphone
44 2B. Settings
Press Settings More... Accessibility TTY
To turnTTYMode on or off
Navigation Key Shortcuts
Phone Setup Options
Press Settings More... Accessibility HearingAid
Press Settings More... Navigation Keys
Auto-Answer Mode
CallAnswer Mode
Headset Options
Accessing the Restrict and Lock Menu
Security Settings
Setting Power On toAlert
Accessing the Security Menu
Your Phone’s Lock Feature
To add or replace a special number
Press Settings More... Security Special Numbers
Restricting Calls
Special Numbers
Press Settings More... Security Delete/Reset
Deleting Phone Content
ResettingYour Phone and Deleting Stored Data
50 2B. Settings
To disable data services
Security Features for Data Services
Disabling Data Services
Locking Data Services
From standby mode, press
2C. History
Viewing History
To display History
History Details
HistoryThread
History Icons
54 2C. History
History Menu Options
Making a Call FromHistory
Saving a Phone Number From History
Enter a group name and press Save left softkey
Making a New Group EntryFrom History
Deleting History
Press Options right softkey New Group
Displaying the Contacts List
UsingContactsInformationinOtherApplications
2D. Contacts
About Contacts
Work, Pager, Fax, or Other and press
Displaying Contacts Details
Adding a New Contacts Entry
From standby mode, press Contacts right
Press Options right softkey Edit Group Add More
Creating a Group Editing Groups
Adding Members to a Group
58 2D. Contacts
Repeat to remove additional members Press Save left softkey
FindingContacts Entries
Removing Members From a Group
Deleting a Contacts Entry or Group
Map to display the address on a map
Using Contacts Information in OtherApplications
Viewing History From Contacts
To copy information into a message
Tocheck speed dial assignments
Editing a Contacts Entry
AssigningSpeed Dial Numbers
To assign a speed dial numberto an existing phone number
Select Select Image
Selecting a RingerType foran Entry
Printing a Contacts Entry
62 2D. Contacts
Enter the four-digit lock code
SecretContacts Entries
To make an entry secret
To hide secret entries
Wireless Backup
Dialing Sprint Services
Activating and DeactivatingWireless Backup Service
Select Alert me or No alerts
ViewingYour Wireless Backup Status
Setting theWireless Backup Alert
To deactivate the wireless backup service
66 2E. CalendarandTools
2E. Calendar and Tools
Calendar
Adding an Event to the Calendar
Adding a Call Reminderto the Calendar
Press the navigation key right and select Add Call Alarm
2E. CalendarandTools
Your phone can store and manage up to 40 To Do list items
To respond to the alarm
Adding aTo Do List Item to the Calendar
CalendarAlerts
Press YES left softkey
Viewing Events
Printing Events
Deleting Events
70 2E. CalendarandTools
Alarm Clock
To delete old events
To delete all events
To view the time in different locations
CountdownTimer
Calculator
World Clock
Press Tools Stopwatch
Torespond to the alarm
Stopwatch
72 2E. CalendarandTools
ActivatingASR
2F. Voice Services
2F.Voice Services
Automatic Speech Recognition ASR
Opening Menus UsingASR
Making aVoice Call UsingASR
74 2F.Voice Services
To changeASR confirmation
Checking Phone Status UsingASR
ASR Settings
Toreset the adaptation
Voice and Call Memos
Toplay multiple memos
PlayingVoice/Call Memos
ManagingVoice/Call Memos
DeletingVoice/Call Memos
To activate camera mode, you can also press
2G. Camera
Taking Pictures
78 2G. Camera
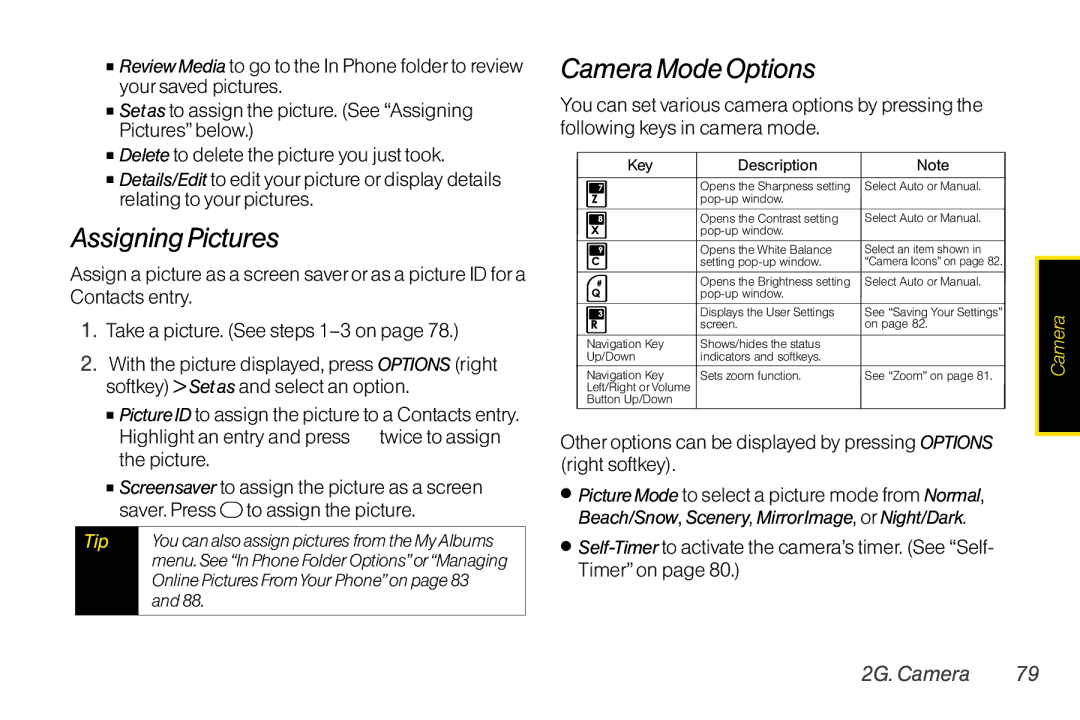
2G. Camera
Camera Mode Options
Self-Timerto activate the camera’s timer. See Self- Timeron
Assigning Pictures
80 2G. Camera
Self-Timer
To cancel the self-timerafter it has started
Multiple Shots
Status Bar to show or hide status indicators and softkeys
Camera Settings
Zoom
From camera mode, press
SavingYour Settings
Toretrieve yoursettings
Camera Icons
InPhone see In Phone Folderbelow
Storing Pictures
Phone Folder
Phone Folder Options
84 2G. Camera
Trimming to crop the selected picture
Sprint Picture Mail account
Press MyAlbums OnlineAlbums
To the service for an additional monthly charge
Sending Sprint Picture Mail
RegisteringYour Sprint Picture Mail Account
Press Send left softkey to send the pictures
SendingPicturesFrom theInPhoneFolder
86 2G. Camera
Select Inbox
Viewing Sprint Picture Mail
To reply to picture mail
While the message is displayed, press Options
ManagingOnlinePicturesFromYour Phone
Using the Sprint Picture MailWebsite
Managing Sprint Picture Mail
Uploading Pictures
DeleteAlbum to delete the selected album
Managing Online Albums
90 2G. Camera
When printing is finished, press
Printing Pictures FromYour Phone
To print pictures directly from yourphone
Any errormessages
Printing problems. Any printererror
Informing you of the specific problems
Explanations, and possible resolutions for
92 2H. Bluetooth
2H. Bluetooth
About Bluetooth
Turning Bluetooth On and Off
Find Me
Bluetooth Menu
Bluetooth Status Indicators
2H. Bluetooth
Block List
Bluetooth Settings Menu
Block List Options
Bluetooth Profiles
Press Tools Bluetooth Trusted List
Pairing Bluetooth Devices
96 2H. Bluetooth
Press Tools Bluetooth
If necessary, enter the passkey and press
Sending Data via Bluetooth
Printing Data via Bluetooth
Select Handset Default, Create PrintJob, or Printer Default
98 2H. Bluetooth
Sprint Service
Voicemail
3A. Sprint Service Basics
Setting UpYourVoicemail
100 3A. Sprint ServiceThe Basics
RetrievingYourVoicemail Messages
One-Touch Message Access
Voicemail Notification
NewVoicemail MessageAlerts
Clearing the Message Icon
Using the Menu Keys onYourPhone
Using Another Phone
102 3A. Sprint ServiceThe Basics
Text MessagingSMS
3A. Sprint ServiceThe Basics 103
ComposingText Messages
To reply to a text message
104 3A. Sprint ServiceThe Basics
ViewingText Messages
Threaded Messaging
Threaded Messaging Options
3A. Sprint ServiceThe Basics 105
Viewing Messages
Message Details
With the oldest.To save messages, lock them
106 3A. Sprint ServiceThe Basics
SMSVoice Messaging
Composing SMSVoice Messages
While the message is displayed, press Reply left softkey
Accessing SMSVoice Messages
3A. Sprint ServiceThe Basics 107
To reply to an SMS voice message
To respond to an incoming call while you’re on a call
To switch back to the first caller
108 3A. Sprint ServiceThe Basics
Caller ID CallWaiting
To activate Call Forwarding
3A. Sprint ServiceThe Basics 109
Making aThree-Way Call
Call Forwarding
Roaming on Other Networks
110 3A. Sprint ServiceThe Basics
Roaming
Roaming Icon
To turn Call Guard on or off
Setting Roam Mode
3A. Sprint ServiceThe Basics 111
Call Guard
Press Read the message and press
Touse data services when Data Roam Guard is active
112 3A. Sprint ServiceThe Basics
Data Roam Guard
Your User Name
3B. Web and Data Services
Getting StartedWith Data Services
3B Web and Data Services 113
Net Guard
To change your Net Guard settings
114 3B Web and Data Services
Launching aWeb Connection
Softkeys
Data Connection Status and Indicators
3B Web and Data Services 115
Navigating theWeb
Going Home
Scrolling
Selecting
Going Back
Getting StartedWith Email
Accessing Messages
Accessing Sprint Instant Messaging
3B Web and Data Services 117
118 3B Web and Data Services
AccessingWireless Chatrooms
Accessing the Download Menus
To access the download menus from theWeb browser
To download a selected item
3B Web and Data Services 119
Selecting an Item to Download
Downloading an Item
To download purchased content from My Content Manager
MyContent Manager
Press to quit the browser and return to standby mode
To access My Content Manager
To open the browser menu
3B Web and Data Services 121
Browser Menu
Opening the Browser Menu
Going to a SpecificWebsite
Reset Browser to reset the browser
View Error Log to display the error log
122 3B Web and Data Services
Deleting a Favorite
Accessing a Favorite
3B Web and Data Services 123
Creating a Favorite
124 3B Web and Data Services
Data Services FAQs
3C. GPS Navigation 125
GPS Services
Activating the Location Feature
3C. GPS Navigation
126 3C. GPS Navigation
Using Sprint Navigation
Sprint Navigation
Registering Sprint Navigation
3C. GPS Navigation 127
Using Sprint Family Locator
Sprint Family Locator
Signing Up forSprint Family Locator
Page
Safety and Warranty Information
UsingYour PhoneWith a HearingAid Device
4A. Important Safety Information
General Precautions
130 4A Important Safety Information
4A Important Safety Information 131
Maintaining Safe Use of and Access toYour Phone
Turning Off Your Phone in DangerousAreas
UsingYour PhoneWith a Hearing Aid Device
132 4A Important Safety Information
Restricting Children’sAccess toYour Phone
To further minimize interference
4A Important Safety Information 133
Charging
Caring for the Battery
134 4A Important Safety Information
ProtectingYour Battery
Radio Frequency RFEnergy
4A Important Safety Information 135
FCC Radio FrequencyEmission
Specific Absorption Rates SARforWireless Phones
136 4A Important Safety Information
PCS mode Part
Part 15 of the FCC Rules
4A Important Safety Information 137
Owner’s Record
FCC Notice
User Guide Proprietary Notice
138 4A Important Safety Information
4B. Warranty
4B. Manufacturer’s Warranty
ONE1YEAR Limited Warranty For a period of one
Manufacturer’sWarranty
Manufacturer’s Warranty
140 4B. Warranty
4B. Warranty
142
Index
Index
Assigning a Speed Dial
Removing Members from
Compatibility HAC Mode
Saving a Phone NumberFrom
Plus + Code Dialing
Web, see also Data Services