FILE NO. SVM-03008

11. HOW TO REPLACE THE MAIN PARTS

11-1. Indoor Unit

No.

Part name


Procedures


Remarks


1

Front panel

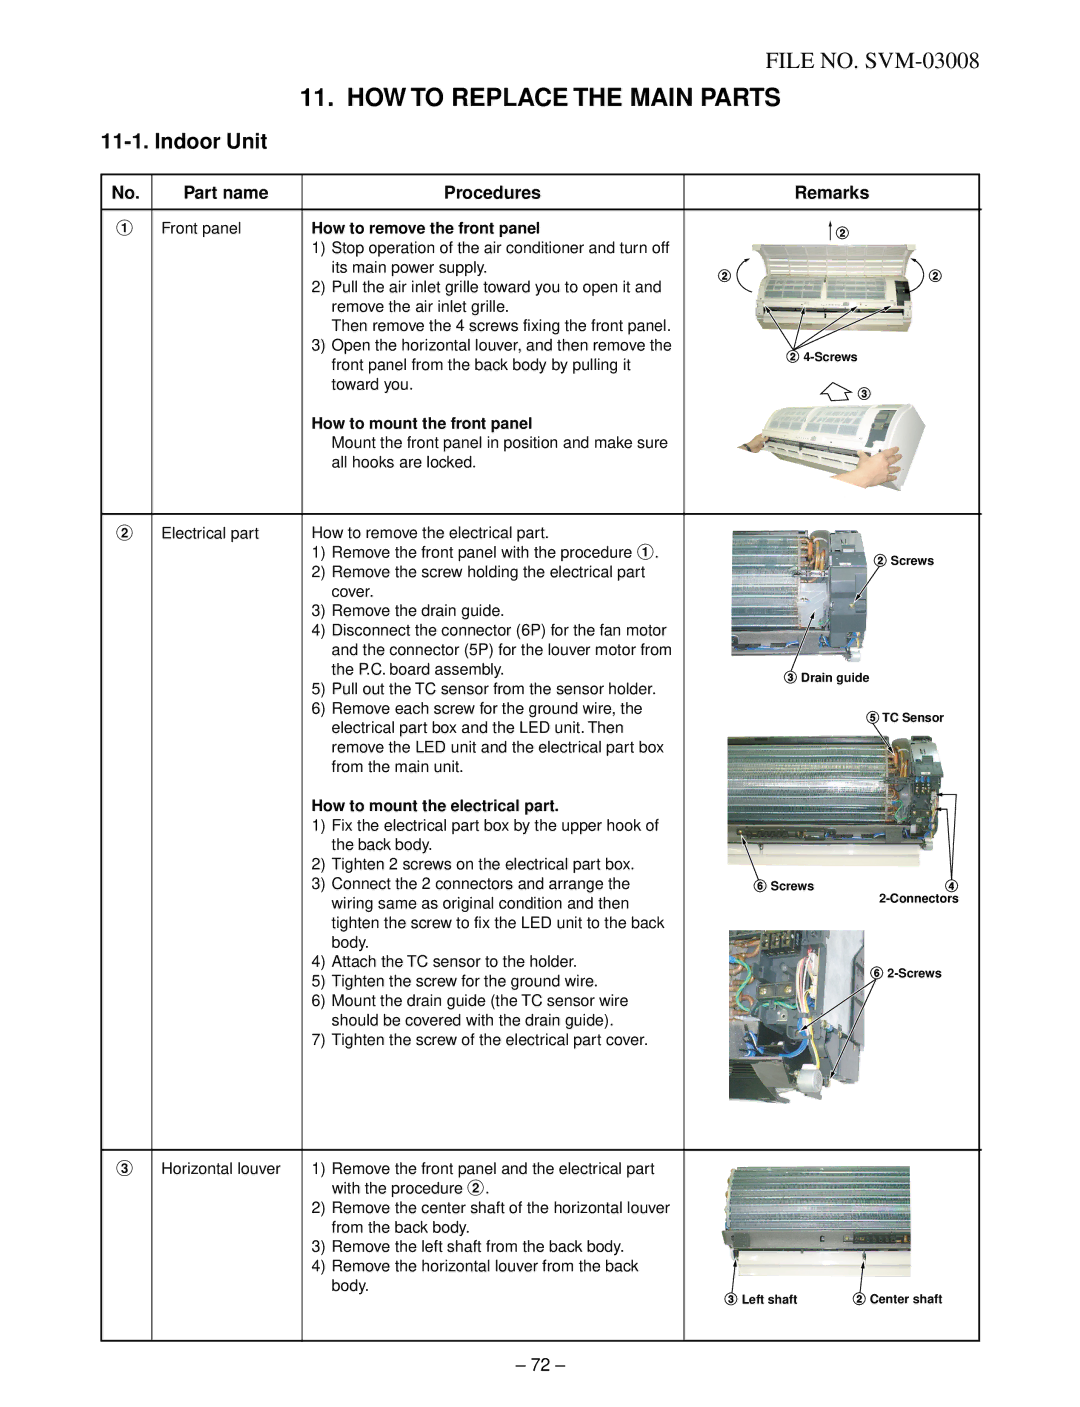
How to remove the front panel


2


1)

Stop operation of the air conditioner and turn off


its main power supply.

2

2


2)

Pull the air inlet grille toward you to open it and


remove the air inlet grille.


Then remove the 4 screws fixing the front panel.


3)

Open the horizontal louver, and then remove the


2 4-Screws


front panel from the back body by pulling it


toward you.


3


How to mount the front panel


Mount the front panel in position and make sure


all hooks are locked.


2

Electrical part

How to remove the electrical part.


1)

Remove the front panel with the procedure 1.


2 Screws


2)

Remove the screw holding the electrical part


cover.


3)

Remove the drain guide.


4)

Disconnect the connector (6P) for the fan motor


and the connector (5P) for the louver motor from


the P.C. board assembly.


3 Drain guide


5)

Pull out the TC sensor from the sensor holder.


6)

Remove each screw for the ground wire, the


5TC Sensor


electrical part box and the LED unit. Then


remove the LED unit and the electrical part box


from the main unit.


How to mount the electrical part.


1)

Fix the electrical part box by the upper hook of


the back body.


2)

Tighten 2 screws on the electrical part box.


3)

Connect the 2 connectors and arrange the


6 Screws

4


wiring same as original condition and then


2-Connectors


tighten the screw to fix the LED unit to the back


body.


4)

Attach the TC sensor to the holder.


6 2-Screws


5)

Tighten the screw for the ground wire.


6)

Mount the drain guide (the TC sensor wire


should be covered with the drain guide).


7)

Tighten the screw of the electrical part cover.


3 Horizontal louver

1)

Remove the front panel and the electrical part


with the procedure 2.


2)

Remove the center shaft of the horizontal louver


from the back body.


3)

Remove the left shaft from the back body.


4)

Remove the horizontal louver from the back


body.

3 Left shaft

2 Center shaft

– 72 –

Page 73
Image 73
Toshiba RAS-13UKV-E2, RAS-13UAV-E2 service manual HOW to Replace the Main Parts, Part name Procedures Remarks

RAS-13UAV-E2, RAS-13UKV-E2 specifications

The Toshiba RAS-13UKV-E2 and RAS-13UAV-E2 air conditioning units represent a significant step forward in both comfort and energy efficiency. Designed for residential and light commercial use, these models are packed with features that cater to diverse climate control needs while adhering to modern standards of sustainability.

One of the standout features of both models is the implementation of inverter technology. This advanced system allows for more precise temperature control by adjusting the compressor speed based on the ambient temperature requirements. This not only enhances energy efficiency but also ensures a quieter operation compared to traditional air conditioning systems. As a result, users benefit from consistent comfort without the disruptive sounds often associated with cooling units.

The RAS-13UKV-E2 and RAS-13UAV-E2 also feature a high energy efficiency rating, which is crucial for reducing electricity bills. The Seasonal Energy Efficiency Ratio (SEER) is a vital measure of energy efficiency over an entire cooling season. Both units excel in this regard, making them an environmentally friendly choice. This is further supported by Toshiba's commitment to incorporating R32 refrigerant, known for its lower environmental impact compared to older refrigerants.

User convenience is enhanced with integrated smart controls. Both models are compatible with wireless remote control features, allowing for easy adjustments from a distance. This is complemented by programmable settings that let users schedule operation times, ensuring that the units run only when needed, which further optimizes energy consumption.

Design-wise, these air conditioners boast a sleek and modern appearance, making them a visually appealing addition to any room. They are constructed with durable materials that ensure longevity and reliability. Moreover, the filters are designed for easy maintenance, ensuring cleaner indoor air quality and prolonging the lifespan of the unit.

The Toshiba RAS-13UKV-E2 and RAS-13UAV-E2 units also come equipped with advanced air purification technologies. These features help to reduce airborne pollutants and allergens, contributing to a healthier indoor environment. With exceptional cooling and heating capabilities, easy installation, and advanced features, these models are designed to meet the modern user's needs for comfort, efficiency, and health. Overall, they represent an excellent investment in both cooling technology and eco-friendly practices.