RX-V2600
For U.K. customers
Special Instructions for U.K. Model
Contents
Features
Supplied accessories
Getting Started
Please check that you received all of the following parts
Installing batteries in the remote controls
Installing batteries Zone 2/Zone 3 remote control
Handling the remote control
Opening and closing the front panel door
Approximately 6 m
To open, press gently on the lower part of the panel
Controls and Functions
Master ON/OFF Audio Select
Multi CH Input
Main Zone ON/OFF
PRESET/TUNING Edit
Tuning Mode AUTO/MAN’L, Display
Volume
FM/AM
Remote control
GUI TOP, Band
Macro ON/OFF
Macro
Power
Volume +
PTY Seek Mode
Standby
Zone 2/Zone 3 remote control
Preset +
ID1/ID2 switch
Volume +
Front panel display
PTY Hold
Rear panel
Wrench Holder
Voltage Selector
AC Outlets
Before connecting speakers
Connections
Connecting speakers
Connecting to the speaker terminals
Di-pole speaker layout
10 mm
Speaker terminal wrench Red positive + Black negative
Red positive + Black negative
Connecting the banana plug
Speaker layout
PRESENCE/ZONE 23 terminals
Connect presence speakers to these terminals
Right Left Surround speakers Surround back speakers
PRE OUT
Using bi-wire and bi-AMP connections
Bi-wire connection
Conventional connection
Bi-AMP connection
Cable indications
Analog jacks
Digital jacks
Audio signal flow for OUT REC
Audio jacks
Audio jacks Digital Audio Optical jacks
Digital Audio Coaxial jacks
Video signal flow for Monitor OUT
Video jacks
Video jacks
Component Video jacks
Connecting Hdmi components
Hdmi out DVD Player Cable TV or
Hdmi Video Monitor
Connecting video components
Connecting a DVD player
Connecting other video components
Satellite tuner
Video Monitor
DVD recorder Or VCR
Connecting to the Multi CH Input jacks
Connecting to the Video AUX jacks on the front panel
Connecting audio components
CD recorder
MD recorder or tape deck
CD player
Connecting an external amplifier
Connecting the antennas
Connecting the AM loop antenna
Indoor FM antenna included
Ground GND terminal AM loop antenna included
Connecting the power cable
Connecting the AC power cable
AC Outlets Switched
Turning on and off this unit
Setting the speaker impedance
This unit will be set to the standby mode
This unit, Zone 2 and Zone 3 are turned off
SP IMP.-8ΩMIN appears in the front panel display
Auto Setup
Optimizer microphone setup
Introduction
Using Auto Setup
Top display appears
Subwoofer
For Wiring, Distance, Size or Level, select
Press n to select Setup Type and then select
For Equalizing, press k / n to select
If you set Setup Type to Auto
If you set Setup Type to Step
Confirming the results
Press n to select Start and then press
Auto Setup
Turn on the power of the video monitor
Playback
Basic operations
Connected to this unit
Front panel Remote control Name of the sound field category
Dial Norm
Program name
Adjusting the tonal quality
Using Silent Cinema
Press Mute on the remote control
Additional operations
To play back Dolby Digital or DTS signals in 5.1 channels
Selecting the Multi CH Input
Enjoying multi-channel software 7.1 channel surround
Auto
Press Select on the remote control to select a decoder
Enjoying 2-channel software in surround
Decoder types for the Surround program
Using Pure Direct
Using the night listening modes
Choices MIN, MID, MAX
Lights up
Using the sleep timer
Listening to unprocessed input signals
Downmixing to 2 channels
Straight
Virtual Cinema DSP
Playing video sources Background
Selecting audio input modes
Displaying information about the input Source
Audio Info. Audio information
Video Info. Video information
Turn on the power of this unit and all connected components
Recording
Front panel or
FM/AM Tuning
Automatic tuning
Press PRESET/TUNING l / h once to begin
Automatic tuning
Manual tuning
Automatic preset tuning
Customized automatic preset tuning
Manual preset tuning
See page 47 for tuning instructions
Memory indicator flashes for about 5 seconds
Preset station group
Selecting preset stations
Repeat steps 1 to 5 to store other stations
Exchanging preset stations
Press and hold PRESET/TUNING Edit for more than 3 seconds
Press PRESET/TUNING Edit again
2,4
Changing the Radio Data System mode
Receiving Radio Data System stations
Press PTY Seek Mode to set this unit in the PTY Seek mode
Press Preset k / n to select the desired program type
PTY Seek function
Selected program type appears in the front panel display
To cancel this function
EON function
What is a sound field?
Changing parameter settings
Editing Sound Field Parameters
Elements of a sound field
Initializing sound field programs
Following display appears
To initialize all sound field programs
Use the Sur.Initialize parameter in the Option menu see
Sound Field Program Descriptions
For movie/video sources
Sources Control
Program
Remote Category Sources Control
For music sources
7ch Stereo
Init. Delay Initial delay
Sound Field Parameter Descriptions
DSP Level DSP level
Room Size Room size
Sur. Init. Delay Surround initial delay
SB. Init. Delay Surround back initial delay
Liveness Liveness
Sur. Room Size Surround room size
Rev. Delay Reverberation delay
Rev. Time Reverberation time
Rev. Level Reverberation level
Dialogue Lift Dialog lift
For 2ch Stereo
For 7ch Stereo
For PL x Music
Decode Type Decoder type For Movie Theater
For THX Cinema
For Surround Standard
For Surround Enhanced
Sound Field Program Speaker Layouts
Monaural Stereo
Audio *2 Audio *3
Channel audio
6.1-channel
Standard
Channel audio 6.1-channel
Audio
Manual Setup Manual setup menu
System Options
Stereo/Surround Stereo/Surround menu
Input Select Input select menu
Auto Setup Auto setup menu
Signal Info. Signal information menu
System Memory System memory menu
Language GUI language menu
Press Exit
Volume Trim Volume trimming
Input Select
Select Input Select and then press h
Press l / h to select OK and press Enter when complete
Rename Rename
Assignment Input/output assignment
Decoder Mode Decoder mode
Audio Select Audio selection
Multi CH Assign Multi channel assignment
Input Channels Input channels
Manual Setup Sound
LFE Level Low-frequency effect level
Speaker Speaker low-frequency effect level
Headphone Headphone low-frequency effect level
Press h to access the settings window
Dynamic Range Dynamic range
Parametric EQ Parametric equalizer
Speaker Speaker dynamic range
Tone Control Tone control
Audio Option Audio options
Audio Delay Audio delay
Initial Volume Initial volume
Max Volume Maximum volume
PR/SB Priority Presence/surround back speaker priority
Manual Setup Video
Mode Mode
Speaker settings
Channel Mute Channel mute
Select Through not to up-scale any analog video signals
Conversion Video conversion
Component I/P Component interlace Progressive
Hdmi Up-Scaling Hdmi up-scaling
Hdmi Aspect Hdmi aspect ratio
Short Message Short message
Position Position
Wall Paper Wall paper
Manual Setup Basic
Use this menu to set up basic system parameters
Test Tone Test tone
Speaker Set Speaker set
Front Front speakers
Center Center speaker
Surround Surround left/right speakers
Surround Back Surround back left/right speakers
Swfr Phase Subwoofer Phase
Speaker Distance Speaker distance
Presence Presence speakers
Bass Out Bass out
Speaker Level Speaker level
Speaker distances
Unit Unit
Manual Setup Option
THX Set THX settings
This menu adjusts the optional system settings
SB Speaker Dist. Surround back speaker distance
Dimmer Dimmer
Multi Zone Multi zone
Speaker B Speaker B
Zone2 Amplifier Zone 2 amplifier
Zone3 Amplifier Zone 3 amplifier
Zone2 Volume Zone 2 volume
Zone3 Volume Zone 3 volume
Zone2 OSD Zone 2 on-screen display
Sur.Initialize Surround initialize
Memory Guard Memory Guard
Hdmi Set Hdmi settings
To save settings
Press Enter to save settings
System Memory
To load settings
Press Enter to load settings
Language
Load Enter appears in the bottom right corner of the window
Advanced Setup
Using Advanced Setup
User preset Preset
Name of the selected parameter Current setting
Wake on RS-232C access Wake on 232C
Remote control AMP ID Remote AMP
Remote control tuner ID Remote TUN
Fan operation mode FAN Mode
Remote Control Features
Control area
Controlling this unit
Controlling other components
Controlling each component
VOL
Setting remote control codes
Remote control code default settings
Set AMP/SOURCE/TV to Source
Input area Component Code Category
Setting remote control AMP codes
Setting remote control tuner codes
Press Learn again to exit from the setup mode
Press Enter
Using Learn
100
Press an input selector button to select a source component
To 10 cm
Press Learn using a ballpoint pen or similar object
Press Learn again to exit the learning mode
101
Learn appears in the display window
Using RE-NAME
102
Using Macro
103
Press a macro button
Macro buttons First Second Third
104
Macro operations
Programming Macro operations
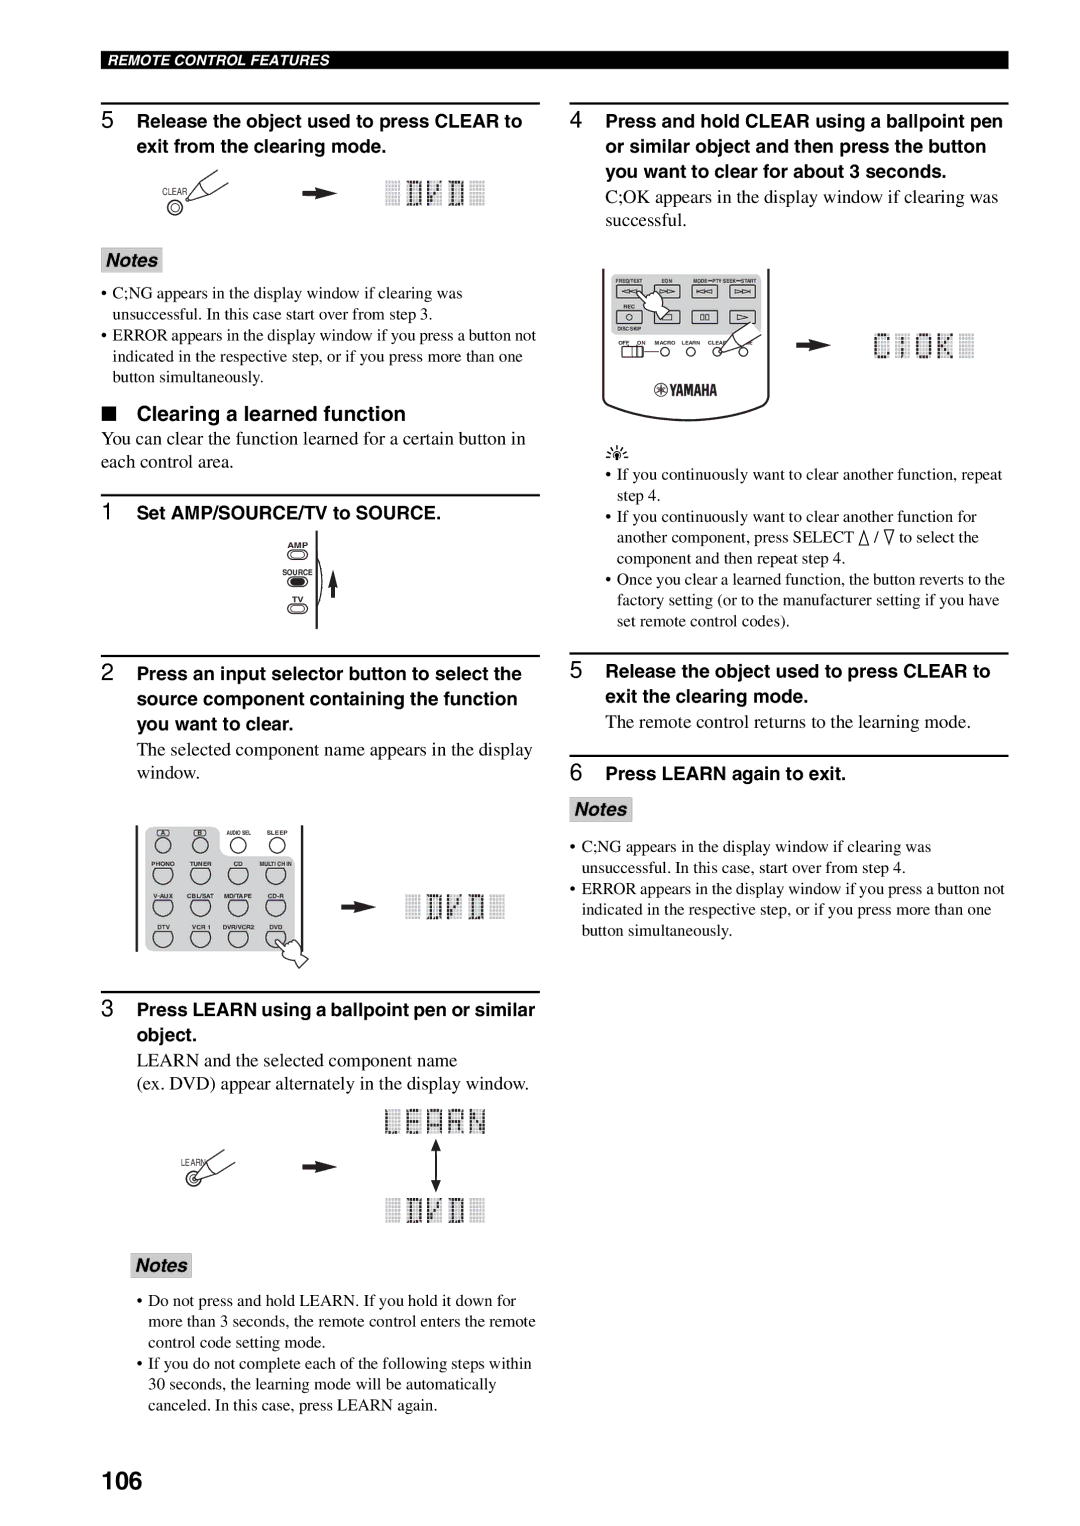
Using Clear
105
Basic Clear operations
Remote control returns to the learning mode
106
Clearing a learned function
Press Learn again to exit
Press Clear to exit the clearing mode
Remote control returns to the macro programming mode
107
Clearing a macro function
Connecting the Zone 2 and Zone 3 components
Using the external amplifiers
Zone 2/ZONE
108
Using the internal amplifiers of this unit
Selecting Zone 2 or Zone
109
Front panel operations
Remote control operations
Set AMP/SOURCE/TV on the remote control to AMP
Controlling Zone 2 and Zone
110
Using the control mode of Zone 2 and Zone
Adjusting the volume level of Zone 2 or
Adjusting the tonal quality of Zone 2 or
111
What is HDMI?
Hdmi
112
Hdmi compatibility with this unit
Setting the Hdmi parameters
Basic Hdmi operations
113
Troubleshooting
114
General
115
116
117
Tuner
Remote control
118
Before Auto Setup
During Auto Setup
119
After Auto Setup
120
Glossary
Audio information
121
122
123
Video information
Sound field program information
124
125
Frequency
Gain
Factor
Specifications
126
127
General
Cable CD Player
CD Recorder
DVD Player
DVD Recorder
LD Player
Tape Deck
MD Recorder
Iii
VCR
Marta
WG00020