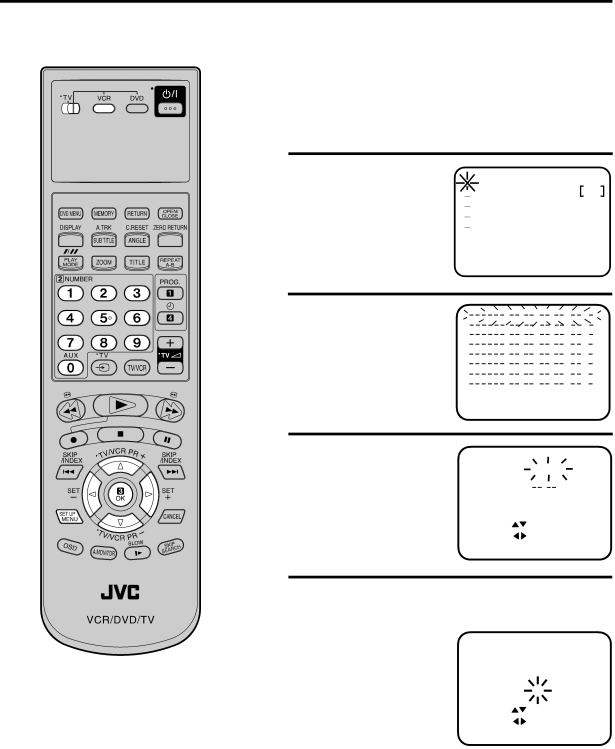
JVC HR-XV1EK manual Timer Recording Manually, Press or to select the Timer REC SET. Then press OK

Page 29

Timer Recording Manually

The built-in timer allows unattended recording of up to 8 programmes within 1 month.

Preparation

Turn on the TV and select the VCR channel on TV.

Make sure TV/VCR/DVD switch has been slided to VCR/ DVD. Then press VCR to select the VCR mode. (The VCR indicator will light)

Load a video cassette with the erase prevention tab intact. Make sure that the time and date are correct.

Example: Timer recording for the 23rd, Friday, on channel 3, 19:30 to 21:30 and LP mode.

1 Press SET UP MENU.

Press or to select the TIMER REC SET. Then press OK.

TIMER REC SET

AUTO REPEAT

VCR SETUP

CHANNEL SETUP SYSTEM SETUP

SELECT :

ENTER : OK

EXIT : MENU

OFF

2 Each line stands for one programme of the 8 memories. Select one line with or .

Then press OK.

:

:

:

:

:

:

:

:

:

:

:

:

:

:

:

:

SELECT : / OK

EXIT : MENU

3 Set the desired dates with or . Then press

to accept them.

Daily/weekly settings

can be found by

pressing or repeatedly (see page 30).

TIMER REC SET

DATE


23 FRI

START

11:30

END


:

CH


1

SPEED

SP

PDC


OFF

SELECT :


SET

:


EXIT

: MENU

4 Set the Starting time (19:30), ending time (21:30) channel (3) and tape speed (LP) in the same way as in step 3.

Note:

When the power supply is interrupted for more than 30 minutes, the preset programme is cleared. In this case, you have to set the timer again.

If you want to set the timer with the PDC function, see "To record with the PDC system" on page 28.

In case of an error, press to go back to the previous step and repeat.

TIMER REC SET

DATE


23

FRI

START

19:30

END


21:30

CH


3


SPEED

LP


PDC


OFF

SELECT :


SET

:


OK : OK

EXIT

: MENU

29

Image 29
Contents Digital Video Cassette Recorder USER’S GuideMoisture Condensation Safety PrecautionsAbove ALL Safety PrecautionsDo not block the recorder’s ventilation openings or holes Video Cassette Recorder FeaturesContents Rear Parts and functionsFront Display window DisplayJVC TV Remote Control Remote controlHow to install the batteries Remote controlBattery precautions Change the custom code for remote controlVCR/DECODER Connections and InstallationConnect a TV with the Scart socket Connection to a Satellite Receiver Playback connectionConnect to a TV with S-Video Output Satellite ReceiverPlayback connection Connecting the optical digital cableConnect to a Stereo Amplifier with Audio Output Connect to an AV Amplifier with built-in digital surroundTo skip a channel position CancelBBC ITVPress or to select On-screen Language SelectionLANGUAGE. Then Press OKClock Dayset Setting the Time and Date ManuallyCH4 Tuning the TV Stations ManuallyCH5 SatelliteGuide Channel Table Setting the Video Plus + Channel Number Guide CHNumber keys Loading and Unloading a Cassette Tape Cassette tape playback Forward/Reverse picture search modeTo stop playback To rewind the tape or forward it rapidlyPlayback sharpness Special playback/Playback sharpness/Skip SearchSpecial playback Repeat Repeat PlaybackTo set the Repeat function DISPLAY-button Counter DisplayZero Return function Recording several Index Marks Video Index Search SystemIndex Search To Stop Recording Recording a TV ProgrammeTo Stop Recording Temporarily TapeRecording a TV Programme Auto Rewind FeatureRecording with a Scart Lead To Display VCR operation StatusTo Extend the Recording Time Instant Timer Recording ITRTo stop the ITR Tape speed SPVideo Plus+ Recording Recording period extension Video Plus+ RecordingTo record with the PDC Programme Delivery Control System Press or to select the Timer REC SET. Then press OK Timer Recording ManuallySet other START, END, CH, Speed as previous pages Timer Recording ManuallyCase of overlapping Timer programmes To confirm a Timer programme Confirmation/Cancellation of the Timer RecordingPress PROG. twice. All the timer programmes will appear To cancel a Timer programmeNicam stereo sound reception Nicam Stereo Recording and PlaybackNicam programmes are divided into 4 types as shown below To record Nicam programmes, select Nicam Auto as followsNicam Stereo Recording and Playback HiFi signal indicationPlayback HI-FIAudio MIX Press or to select VCR SETUP. Then pressAudio Mixing Connection with second Video recorder or Video camera Duplicating a Video TapeDuplicating a disc material onto a video tape Press AUX on the recording unit repeatedly until A3 appearsDisc Setup language can be selected Preparation Setting setup languagePress OPEN/CLOSE Playback procedureSpecial playback Zooming DVD Picture Signal Selection/ZoomingRepeat Playback Repeat PlaybackDVD Some discs may not work withRandom playback Memory playback/Random playbackMemory playback MP3 CD Information MP3 PlaybackLimitations on MP3 CD playback Limitations on displayChanging soundtrack language Cancel or OK buttonChanging Subtitles language Case of Video CD playbackChanging Angles Changing angles / Title selection / DVD menuTitle Selection DVD MenuDepending on the discs, the unit can- not limit playback Parental control settingParental control Country/Area Parental controlTo change the parental lock level Follow steps 1Example Setting menu languageEnglish, French, German Press or to select Audio Language Setting audio soundtrack languageOK Enter Setting subtitle languagePress To select your Desired language, then press OK Enter No SubtitleSetting on Screen display Setting the aspect ratio of TV screenAudio Out Select Setting AudioDynamic Range Control Karaoke VocalPress SET UP Menu in the stop mode Setting OperationPause/Still Title StopSetting Screen Saver DVD only Setting BackgroundSelecting the sound enhancement E.A.M To exit the audio enhancement selection PressPCM Setting initial setup/output sound conversion tableYou can install the initial system setting Preparation Audio Status display of DiscVideo CD OFFTable of languages VCR Problems and troubleshootingSymptoms Possible Solutions DVD/VCR Video head cleaning Problems and troubleshooting / Video head cleaningSymptoms Possible Solutions Video head cloggingAccessories SpecificationsGeneral VCR section