JVC HR-XV1EK manual Disc

Page 36

Disc

This unit applies to DVD discs from Region 2 only.

The loaded Disc (DVD, Video-CD, Audio-CD and MP3-CD) will be recognized automatically. The suitable Disc-formats are: DVD, CD-R and CD-RW.

Some CD-R/RW discs may be incompatible.

This DVD/VCR uses the PAL color system. The NTSC-DVDs can be playback on PAL 60Hz.

Do not play DVD-ROM, DVD-Audio, CDV, CD-G or Photo CD to prevent accidental erasure of prerecorded material.

Some DVDs is played back with a Copy guard system. In case of a dubbing on video tape, strong disturbance may occur. This is not a defect of this DVD/VCR.

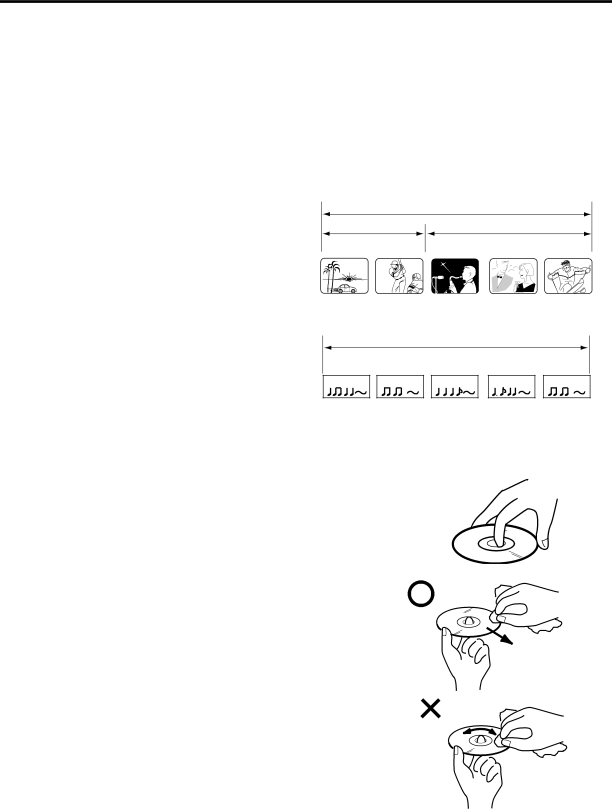
Title

When two or more movies are recorded on a disc, the disc is divided into two or more sections. Each section is called a “TITLE”.

Chapter

The titles can be subdivided into many sections. Each section is called a “CHAPTER”.

Track

DVD DISC


TITLE1

TITLE2

CHAPTER 1 CHAPTER 2 CHAPTER 1

CHAPTER 2 CHAPTER 3


Audio-CD

TRACK 1

TRACK 2

TRACK 3

TRACK 4

TRACK 5

An Audio CD can contain several items.

These are assigned to the tracks.

Removing Disc from Case

Be sure to hold the edge of disc. Do not touch the surface of the disc. Pick up the disc gently from the case.

Do not scratch the disc.

Do not get dirt on the surface of the disc.

Do not stick a label or adhesive tape on the disc.

Do not drop or bend the disc.

Storing Disc

Store the disc in the case to avoid risk of scratches, dirt or damage.

Do not leave disc exposed to direct sunlight or in hot or humid places.

Cleaning Disc

Wipe the disc with a clean, dry cloth from centre to edge.

Do not wipe the disc round.

Do not use liquid or aerosol cleaners.

36

Image 36
Contents Cassette Recorder USER’S Guide Digital VideoSafety Precautions Moisture CondensationSafety Precautions Do not block the recorder’s ventilation openings or holesAbove ALL Features Video Cassette RecorderContents Parts and functions FrontRear Display Display windowRemote control JVC TV Remote ControlRemote control How to install the batteriesBattery precautions Change the custom code for remote controlConnections and Installation Connect a TV with the Scart socketVCR/DECODER Playback connection Connection to a Satellite ReceiverConnect to a TV with S-Video Output Satellite ReceiverConnecting the optical digital cable Playback connectionConnect to a Stereo Amplifier with Audio Output Connect to an AV Amplifier with built-in digital surroundCancel To skip a channel positionBBC ITVOn-screen Language Selection Press or to selectLANGUAGE. Then Press OKSetting the Time and Date Manually Clock DaysetTuning the TV Stations Manually CH4CH5 SatelliteSetting the Video Plus + Channel Number Guide CH Number keysGuide Channel Table Loading and Unloading a Cassette Tape Forward/Reverse picture search mode Cassette tape playbackTo stop playback To rewind the tape or forward it rapidlySpecial playback/Playback sharpness/Skip Search Special playbackPlayback sharpness Repeat Playback To set the Repeat functionRepeat Counter Display Zero Return functionDISPLAY-button Video Index Search System Index SearchRecording several Index Marks Recording a TV Programme To Stop RecordingTo Stop Recording Temporarily TapeAuto Rewind Feature Recording a TV ProgrammeRecording with a Scart Lead To Display VCR operation StatusInstant Timer Recording ITR To Extend the Recording TimeTo stop the ITR Tape speed SPVideo Plus+ Recording Video Plus+ Recording To record with the PDC Programme Delivery Control SystemRecording period extension Timer Recording Manually Press or to select the Timer REC SET. Then press OKTimer Recording Manually Case of overlapping Timer programmesSet other START, END, CH, Speed as previous pages Confirmation/Cancellation of the Timer Recording To confirm a Timer programmePress PROG. twice. All the timer programmes will appear To cancel a Timer programmeNicam Stereo Recording and Playback Nicam stereo sound receptionNicam programmes are divided into 4 types as shown below To record Nicam programmes, select Nicam Auto as followsHiFi signal indication Nicam Stereo Recording and PlaybackPlayback HI-FIPress or to select VCR SETUP. Then press Audio MixingAudio MIX Duplicating a Video Tape Connection with second Video recorder or Video cameraDuplicating a disc material onto a video tape Press AUX on the recording unit repeatedly until A3 appearsDisc Setting setup language Setup language can be selected PreparationPlayback procedure Press OPEN/CLOSESpecial playback DVD Picture Signal Selection/Zooming ZoomingRepeat Playback Repeat PlaybackDVD Some discs may not work withMemory playback/Random playback Memory playbackRandom playback MP3 Playback MP3 CD InformationLimitations on MP3 CD playback Limitations on displayCancel or OK button Changing soundtrack languageChanging Subtitles language Case of Video CD playbackChanging angles / Title selection / DVD menu Changing AnglesTitle Selection DVD MenuParental control setting Parental controlDepending on the discs, the unit can- not limit playback Parental control Country/AreaTo change the parental lock level Follow steps 1Setting menu language English, French, GermanExample Setting audio soundtrack language Press or to select Audio LanguageSetting subtitle language OK EnterPress To select your Desired language, then press OK Enter No SubtitleSetting the aspect ratio of TV screen Setting on Screen displaySetting Audio Audio Out SelectDynamic Range Control Karaoke VocalSetting Operation Press SET UP Menu in the stop modePause/Still Title StopSetting Background Setting Screen Saver DVD onlySelecting the sound enhancement E.A.M To exit the audio enhancement selection PressSetting initial setup/output sound conversion table You can install the initial system setting PreparationPCM Status display of Disc AudioVideo CD OFFTable of languages Problems and troubleshooting Symptoms Possible Solutions DVD/VCRVCR Problems and troubleshooting / Video head cleaning Video head cleaningSymptoms Possible Solutions Video head cloggingSpecifications AccessoriesGeneral VCR section