Bosch Power Tools GPL2 manual Applications, Use with Attachments

Page 9

Applications

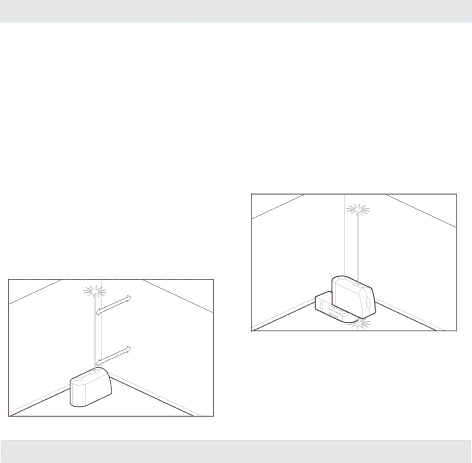
Plumbing a surface

1.Position tool close to the surface to be plumbed.

2.Turn on tool.

3.Measure distance A at a point relatively close to tool and make a note of the distance.

4.Measure distance B at a point further away from tool and make a note of the distance.

Note: The greater the distance between the two points of measurement, the greater

the accuracy.

5.Compare distance A with distance B. If distance A equals distance B, then the surface is plumb. If distance A does not equal distance B, then the surface is not plumb and should be corrected.

Plumb

B

A

Transferring points with the plumb beam

1.Mark the point to be transferred (labeled A in this illustration).

2.Use the Mounting accessory or a Tripod to position the plumb down beam over point A.

3.The plumb up beam will transfer this point along a perfectly vertical axis to point B.

4.Mark point B.

Note: This process may be reversed.

Plumb Transfer

B

A

Use with Attachments

To fasten the tool on the Multiple-Purpose Attachment 8, screw the locking screw 9 of the Multiple-Purpose Attachment into the 1/4” tripod mount 6 on the tool and tighten. To rotate the tool on the Multiple-Purpose Attachment, slightly loosen the screw 9.

Rotate the tool on the Multiple-Purpose Attachment 8 sideward or toward the rear to make the bottom plumb beam visible.

Rotate the tool on the Multiple-Purpose Attachment 8 to project heights with the horizontal laser beam.

With the Multiple-Purpose Attachment 8, the tool can be attached as follows:

Mount the Multiple-Purpose Attachment 8 to a commercially available camera tripod

via the 1/4” tripod mount 13. For fastening to a commercially available construction tripod, use the 5/8” tripod mount 14.

The Multiple-Purpose Attachment 8 can be fastened to steel parts via the magnets 12.

The Multiple-Purpose Attachment 8 can be fastened to drywall or wood walls with screws. For this, insert screws with a minimum length of 2 in. into the screw holes 10 of the Multiple-Purpose Attachment.

The Multiple-Purpose Attachment 8 can also be fastened to pipes or similar beams using a commercially available strap by threading it through the opening 11 for strap attachment.

Working with the Tripod

(Optional Accessory)

A tripod 18 offers a stable, height-adjustable measuring support. Place the tool via the tripod mount 6 onto the 1/4” male thread of the tripod and screw the locking screw of the tripod tight.

-9-

Image 9
Contents Pour obtenir des informations Llame gratis para Service Locations De service après-vente, appelezObtener información Ce numéro gratuit Ubicaciones de servicioGPL General Safety Rules Using the toolFollowing labels are on your laser tool for Equipment Multiple-Purpose AttachmentUse and care Features Intended UsePreparation Operation Technical DataRecalibration Procedure Up & Down Beams Working AdviceLeveling Accuracy Influences on AccuracyCalibrating the Top and Bottom Beams Use with Attachments ApplicationsMaintenance and Service Working with the Measuring Plate Optional AccessoryLaser Viewing Glasses Optional Accessory Day Money Back Refund or Replacement Limited Warranty of Bosch Laser and Measuring Tool ProductsMise EN Garde et n’effacez pas des Consignes générales de sécuritéSécurité sur le lieu de travail De l’utilisateur de faire fonctionner l’équipementSécurité électrique NE Jetez PAS des piles dans un feuEmploi prévu Service après-ventePréparation En plastiqueDonnées techniques Mise en serviceConsignes d’utilisation Réglage de la coupure automatiquePrécision de nivellement Influences sur la précisionContrôler la précision du nivellement Vertical Étalonnage des faisceaux laser du haut Et du bas Procédure d’ÉtalonnageUtiliser avec accessories Mise d’aplomb d’une surfaceTransfert de points ą l’aide du faisceau De mise d’aplomb Travailler avec le trépied accessoire Maintenance et serviceTravailler avec la platine de mesure Accessoire Lunettes de vision du faisceau laser AccessoireRemboursement ou remplacement du produit jusqu’à 30 jours Declaración de FCC Nomas generales de seguridadLas lesiones corporales Operar el equipoBase multifuncional Seguridad eléctricaPreparación Uso previstoCaracterísticas ServicioOperación Datos TécnicosEn el momento en que dejen de moverse los puntos láser Precisión de nivelaciónInstrucciones para la operación Factores que afectan a la precisiónProcedimiento de Recalibración ContinuaciónCalibración de los haces superior e Inferior Utilice con accesorios especial AplicacionesGafas para láser accesorio especial Mantenimiento y servicioPage Page