GE Coli Top owner manual Adjust the oven thermostat-Do it yourself

Page 37

Adjust the oven thermostat—Do it yourself!

You may find that your new oven cooks differently than the one it replaced. Use your new oven for a few weeks to become more familiar with it. If you still think your new oven is too hot or too cold, you can adjust the thermostat yourself.

Do not use thermometers, such as those found in grocery stores, to check the temperature setting of your oven. These thermometers may vary 20–40 degrees.

NOTE: This adjustment will not affect the broiling or the self-cleaning (on some models) temperatures. The adjustment will be retained in memory after a power failure.

How to Adjust the Thermostat (on models with pads only)

Touch the BAKE and BROIL HI/LO pads at the same time for 3 seconds until the display shows SF.

Touch the BAKE pad. A two digit number shows in the display.

Touch BAKE once to decrease (–) the oven temperature, or twice to increase (+).

The oven temperature can be adjusted up as much as 35°F. or down as much as 35°F.

To adjust the temperature on models with number pads, touch the number pads the same way you read them. For example, to change the oven temperature 15°F., touch

1and 5.

To adjust the temperature on models with

+and pads, touch the INCREASE pad to increase the temperature in one degree increments.

Touch the DECREASE pad to decrease the temperature in one degree increments.

When you have made the adjustment, touch the START pad to go back to the time of day display. Use your oven as you would normally.

NOTE: This adjustment will not affect the broiling or self-cleaning temperatures. It will be retained in memory after a power failure.

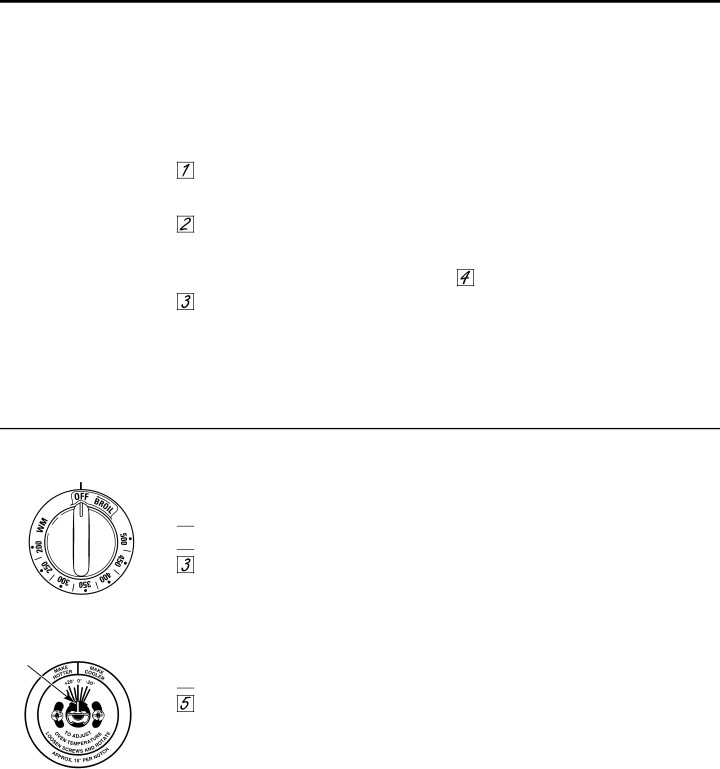
Pull the OVEN CONTROL knob off the shaft, look at the back of the knob and note the current setting before making any adjustment. The knob is factory set with the top screw directly under the pointer.

Front of OVEN TEMP knob (knob appearance may vary).

Pointer

How To Adjust the Thermostat (on models with a control knob only)

Pull off the OVEN CONTROL knob.

Loosen both screws on back of the knob.

Hold both parts of the knob as shown in the illustration of the back of the OVEN CONTROL knob and turn so the lower screw moves in the desired direction. You will hear and feel the notches as you turn the knob. Each notch changes temperature about 10°F.

Tighten the screws.

Return the OVEN CONTROL knob to the oven.

Re-check oven performance before making any additional adjustments.

Back of OVEN TEMP knob.

37

Image 37
Contents Write the model and serial numbers here Model # Serial # ElectricAll ranges can tip and injury could result Important Safety NoticeSafety Precautions Cook Meat and Poultry THOROUGHLY… Coil Surface Units on some models Oven Leveling InstallingSingle Surface Unit-Cook Settings Surface Unit Cook SettingsUsing Heat Settings Tri-Ring BurnerUse only cookware recommended for top-of-range cooking Precise Warm FeatureUsing the Bridge Burner on some models How to SetWarmer Burner on some models Dual Surface Unit Control Knob glass cooktops only Using the Warming Zone on some modelsOn models with a Warming Zone knob Indicator Lights Using the radiant surface units. glass cooktops onlyIndicator light will About the radiant surface units…Selecting types of cookware Home Canning Tips Deep Fat FryingOn some models Oven Controls Page See the Using the self-cleaning oven section Self Clean PadOven Control Knob Clock and Timer FeaturesHour Shut-Off Fahrenheit or Celsius Temperature SelectionTones at the End of a Timed Cycle Oven or Range Lockout depending on model Control LockoutHld on Cook and HoldUsing Auto Recipe Conversion Tone VolumeHour, 24 hour or clock black-out Hour, 24 Hour or Clock Black-Out on some modelsHow to Set the Oven for Baking or Roasting Using the ovenBefore you begin… How to Set the Oven for Broiling Preheating and Pan PlacementAluminum Foil HI BroilTo Set the Timer Using the clock and timer. on some modelsTo Set the Clock To Turn Off the Clock DisplayTo Cancel the Timer To Reset the TimerPower Outage End of Cycle Tones on some modelsTouch the Start Time or Delay Start pad Using the timed baking and roasting features. on some modelsHow to Set the Oven For Roasting When Using the Probe Using the probe. on some modelsConvection Bake Using the convection oven. on some modelsConvection Roast Adapting Recipes…Paper and Plastic Cookware for Convection CookingMetal and Glass Touch the Convection Bake or Convection Roast padTouch the Convection Roast pad How to Set an Immediate Start and Automatic Stop How to Set a Delayed Start and Automatic Stop How to Set the Oven For Proofing on some models Using the proofing and warming features. on some modelsHow to Set the Oven For Warming on some models To Crisp Stale ItemsWhen Using the Warming Drawer Using the warming drawer. on some modelsWarming drawer has three settings To Use the Warming DrawerHow to Adjust the Thermostat on models with pads only Adjust the oven thermostat-Do it yourselfBefore a Clean Cycle Using the self-cleaning oven. on some modelsHow to Set the Oven for Cleaning on models with pads only After a Clean Cycle How to Delay the Start of Cleaning on models with pads onlyHow to Remove Packaging Tape Care and cleaning of the rangeControl Knobs Control PanelOven Vent Porcelain Enamel Cooktop on some modelsOven Heating Elements on some models Stainless Steel Surfaces on some modelsLift-Off Oven Door on some models Cleaning the Oven DoorSame angle Broiler Pan and Grid Oven ShelvesRemovable Oven Floor Removable Warming Drawer Pan on some modelsTo remove the cover Oven Light Replacement on some modelsTo replace the cover To remove Porcelain Oven Interior on some models Storage Drawer Removal on some modelsTo remove a surface unit Surface Units electric coil models onlyTo replace a surface unit Normal Daily Use Cleaning Cleaning the glass cooktopBurned-On Residue Heavy, Burned-On ResidueMetal Marks and Scratches Glass surface-potential for permanent damageDamage from Sugary Spills and Melted Plastic Troubleshooting Tips Before you call for service…Problem Possible Causes What To Do Oven-All Models Problem Possible Causes What To Do Electric Coil ModelsCare and cleaning of your range section Oven temperatureSee the Using the clock and timer section Food does not boilDuring a clean cycle See the Using the self-cleaning oven sectionAfter a clean cycle Clean cycleProblem Possible Causes What To Do On Some Models Page 7262 UÆnºU´W ∞HdÊ««ôß∑ªb«Â«∞ºö±WØU≠W«∞∑FKOLU‹Æ∂q¢c¥d!∞∑uîw≥U±W±FKu±‹≈Æd√ ¢c¥d «∞ºö±W∞∑uîw≥U±W±FKu±‹ ßö„ ∂q «ôß∑ªb«Â «ù´b«œ Aoßu·ßO∂Iv/ß∑∂Iv.«∞DNw∞LfßD`ODWË«∞c¸∞bÈ ∂jËFOU‹Ëb«‹«∞ºD`«∞LAFW√Ê≤Hc´Ad∞p¢∑O`…±Oe´Kv¥∑r¢COd≥UFLW«∞∑w §LOlFFO ≠Bq ∂jØOHOWEgral Renrub ≠Bq ≤UßwÆUŸ «∞F‡L‡Oo«∞I‡‡Kw «∞LMe∞w«∞∑FKOV≤BUz`´s «∞HdÊOVEN≠w«∞∑JrCONTROLSËßUzq ´Kv «±∑b«œ ≥c« «∞J∑OV , ¥LJs √Ê ¢ª∑Kn «∞ºLU‹6121 ∂Oe ∂Oe«∞Fd÷∞uW §Ll≠Bq ≈GjKv´U∞w/±MªHib¡«∞∑AGOquÍC On ndhSKAB î∂Oe¸≈∞Lf «∞Lf£r±IHKW«∞∑JrËßOKW√Ê«∞Fd÷√ËUWc∞p DIH no DIH FFOLiorb OL/IHv TratS ßU´WYaleD «∞∑AGOqb¡ ∞KAuÍ«∞HdÊ∂jØOHOW ØuͱøMøªøHøøi±s«∞Ou±s«∞BO`«∞uÆX´Kv«∞ºU´W∂j¥πV Trats «∞∑AGOqb¡¸≈∞Lf√Ë+¸Í√Ë ¡√Ë Remit FFO/NO ¢AGOq/≠Bq«∞LD∂aEKAB«∞DNwî∂Oe ±MªHiTRATS «∞ºD`´Kv«∞∑LOhË¥e¥b«∞Kr ¢AuÍ«∞K∑Os«∞b´U±∑s «∞HdÊ≥c«±s«∞M∑UzZ√≠Cq´KvË∞KBu‰¢LOd¸√Ë «∞Lπf¢º∑FLq´Mb±U EVNOCU∞Lq¢LOdTSAORºV«∞∑uÆn«ô¢u±U¢OJw«∞Hu¸Í«∞∑AGOqb¡∂jØOHOW ±öEW√¢u±U¢OJw∂jb¡¢AGOq±RîdË¢uÆnØOHOW ´Kv ßUîs∂U¸œ ∑b≠µW¢M∂Ot √∂Dt MHºp «∞HdÊØohow ≠Ij¢ö±fQ¸«¸…«∞LeËœ∞KLuœ¥ö‹∞K∑MEOn tfoS ∂j burcS «¢w¥LJMp, ¢w-¢MEOn…œË¸≠w«∞HdÊ¥JuÊ¥MLU ØohowBq ≠ «∞HdÊ¢Nu¥W «∞ø∂øU»,∞øHøp ±s«∞b«îq∞∑MEOn«∞∂U»¸≠l ¢MEOH‡‡‡‡‡‡‡tU∞LuƇ‡‡‡‡‡‡‡b«∞FMU¥‡‡‡‡‡‡‡‡‡W ±öEøW«∞Luœ¥ö‹Fi≠w«ß∑∂b«‰∞L∂W«∞HdÊ ±JU≤t≈∞v …ù´Uœ «∞Luœ¥ö‹Fi≠w«∞HdÊ∞L∂W«ß∑∂b«‰±JU≤t≈∞vù´Uœ¢t «∞Luœ¥ö‹Fi≠w«∞HdÊ∞L∂W«ß∑∂b«‰≠dʱMEn,¥LJMp«ß∑LU‰…´MbCd˸ ±JU≤t≈∞v«∞b¸Ã…ô´Uœ±öEW «∞Ou±w«∞FUœÍ«∞∑MEOn ¢c¥d ≤eô‚ ¢∂UŸ≤ºJU» ´LKt¥πV«∞cͱU´LKt¥πV«∞cͱU ±Uzq ZËßUÔË«∞LuÆXºU´W ¢ MEOn …œË¸√£MU¡«zbbîs √ÊÆ∂q∞HdÊ ßKOrªKh GDv¢ ¥∑ºd» ∂ªU¸±öE‡‡U‹