Using the SuperStack NETBuilder SI Bridge/Router
Electromagnetic Compatibility Information
Avis Canadien
Canadian Certification Notice
CE Notice
Page
Contents
Mounting Kit Installing on a Tabletop
Isdn U
Paths, Ports, and Virtual Ports Paths and Ports
Setting Up Security
Configuring Serial Ports with DTEs Where to Go From Here
Multiple Static Paths per Port Virtual Ports
Configuring Bridging and Routing
Configuring X.25 Scenario 1 Multiple Destinations, Nonmeshed
116
Using the Monitor Utility 121 Boot Configure Flash Load 122
113 Dialing the Same Phone Number Multiple Times
122 Display Files Dump
125 LAN LEDs
148 Verifying the Memory Dump Procedure 149
Reloading the Software Load Errors
143
179
177
178
180
194
Ordering Dutch Isdn BRI Services 195
RS-530 DTE Cable Pinouts
List conventions that are used throughout this guide
About this Guide
Conventions
Icon Alerts you to
3Com Year 2000 Web
Year
Compliance
Text Conventions
Features of the SuperStack II NETBuilder SI Bridge/Router
Features and Specifications
Features
Feature Description
Back and Front
Panels
Model
DIP Switches
Front panel and are for 3Com use only
Requirements
Reset Button
Serial Device
Features and Specifications
Overview
Using the BRIDGE/ROUTER Your Network
Using Ethernet LAN
Ports
Using the BRIDGE/ROUTER in Your Network
Telco Services
Packet-Switched Services
Using PPP on Dial-Up and Leased Lines
Using Packet-Switched Network Services
Telco Services
Using the BRIDGE/ROUTER in Your Network
Equipment
Installing the Hardware
Required
Bridge/router
Provides the environmental requirements of the SuperStack
Environmental
For more information on cables, see Appendix D
Bridge/routers
Brackets, or mount the bridge/router in a rack
Mounting
Bridge/Router
Brackets
Stacking Bridge/Routers
Mounting the Bridge/Router
Following WAN ports Isdn S/T 43x and 53x, Isdn U 44x
Connectors
Cabling
Functional
Model 44x and 54x Isdn U
Connector Model 43x and 53x Isdn S/T
Models 44x and 54x bridge/routers have an Isdn U connector
Model 46x and 56x T1/FT1
T1/FT1 Telco port uses an RJ-48 connector
Model 45x and 54x 56/64K CSU/DSU
Model
Attaching a
Redundant Power
Redundant Power System RPS
System
Shutting Down
Power switch
Characteristic Setting
Turn on the device
Installing the Hardware
Cover
Installing or Removing AN Interface Module
Removing
Remove the cover
Model
Removing an
Existing Module
These steps
Reinstall the cover and the cover screws
Remove the screw from the standoff if necessary
Move the jumper to the right-hand set of pins
Module Model
Insert the new module
Removing an
Front panel Move the jumper to Left-hand set of pins
Steps
Installing a New
5xx
Remove the screw from the standoff if necessary
Front panel Connectors
Installing a New Module Model 5xx
Installing or Removing AN Interface Module
Turning on
Logging on and Performing Administrative Tasks
Administrative Task Summary
Other end to the RPS
LED Status at Successful Startup
Status
Attaching a Console
Logging on to
Logging on and Performing Administrative Tasks
To use the menu-driven interface, follow these steps
If you have not selected a particular service, enter
To use the command-line interface, follow these steps
Interface
For more information on syntax, see Appendix C
Changing the Root
Password
Accessing and executing software commands and parameters
Return key
Port Baud Rate
Default Console
Changing
Adding User
Information
Setting the Time and Date
Setting System
DELete -SNMP COMmunity anycom ADD -SNMP COMmunity anycom RO
Basic Configuration of Ports Paths
Relationship Between Physical Paths and Logical Ports
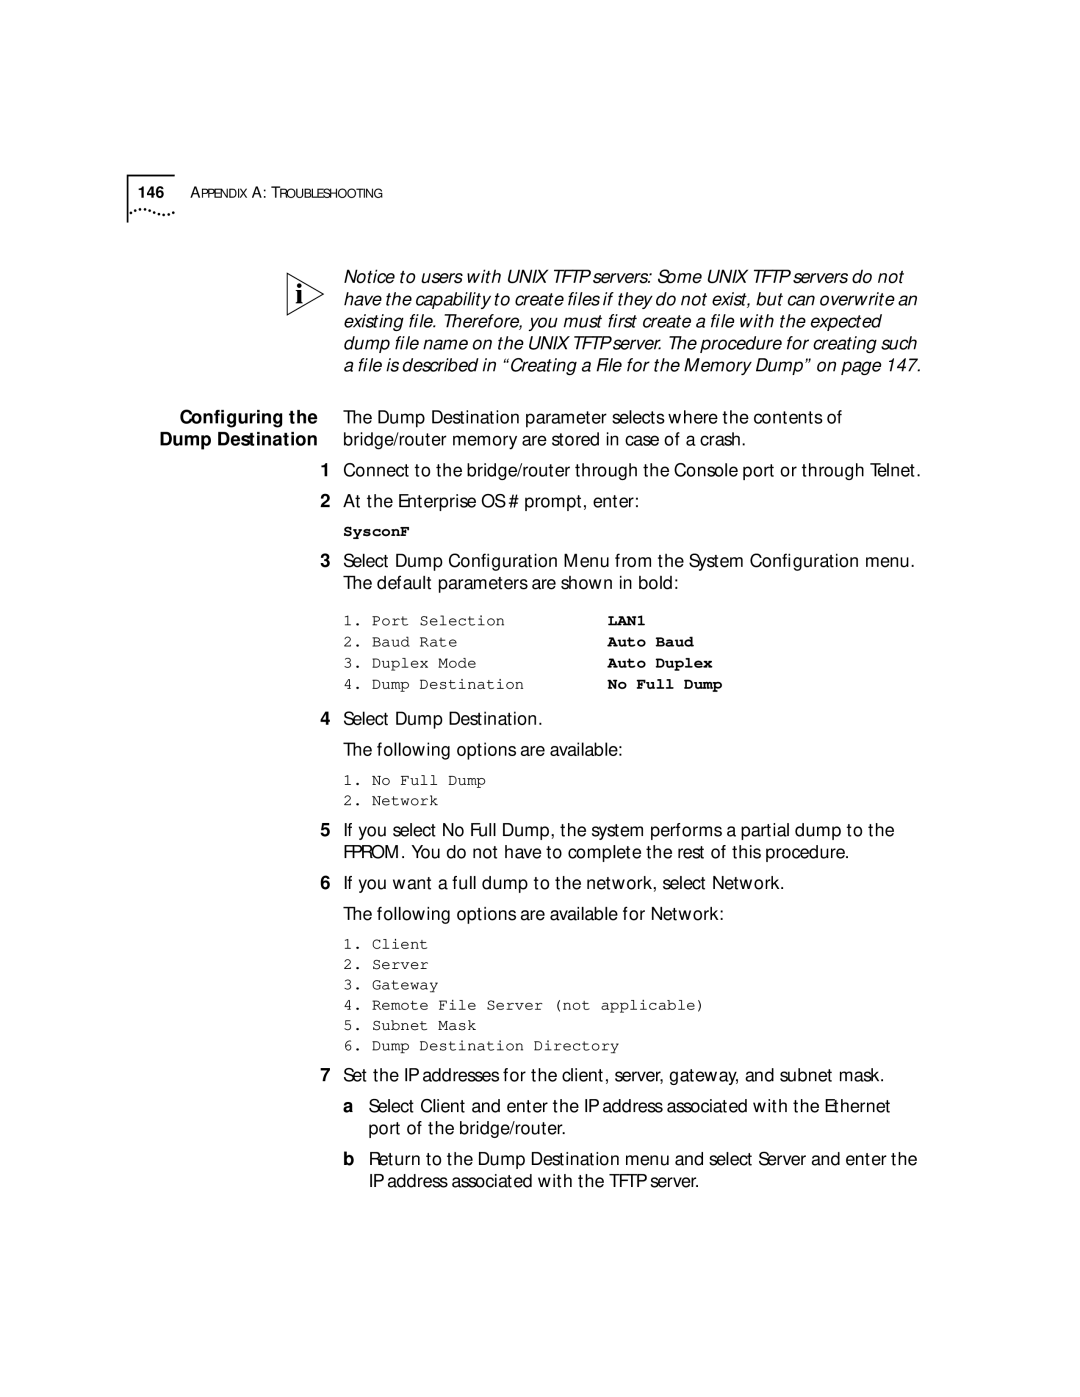
Port and Path Options
Option Description
Topologies that Require Virtual Ports
Node That Virtual Ports
Virtual Ports over Frame Relay
Protocol Technique
Virtual Ports over PPP
Connectivity in Partially Meshed and Nonmeshed Topologies
Parent Ports for Frame Relay
SuperStack II bridge/router
Path and Port
Numbering
Path and Port Numbering for Model 43x , 44x, 53x,
On the WAN Port
Configuring Ethernet Paths Ports
Configuring Isdn
43x, 44x, 53x,
Configuring Isdn Europe, Australia Asia
Isdn Switch Types Supported
SwitchType Setting Country or Region
Example
Toggle the respective paths by entering
Configuring the T1/FT1 RJ-48 Telco Port Model 46x
Re-enable the path by entering
Configuring the 56/64 Kbps CSU/DSU WAN Port Model 45x
Re-enable the path using
Set the baud rate 56 or 64 kbps for the DS0 channel using
Set the path clock using
Set the owner of the serial port using
Line type leased
Routing
Where to Go From
Here
Port and path configuration
Basic Configuration of Ports and Paths
Bandwidth Management Feature Description
Advanced Configuration Ports and Paths
Bandwidth Management Features for Dial-Up Lines
Isdn on the WAN Port 43x, 44x, 53x
Scenario 1 Using Each B Channel Separately
Start here
Scenario 2 Using Both B Channels Together
Scenario 3 Connecting to Multiple Destinations
Call
Berkeley
Multiple destinations connect with a dial pool
128 K 28.8 K
Scenario 1 Single Destination per Port
PaloAlto
Scenario 2 Multiple Destinations
Andover Princeton
Set the normal bandwidth if required using
Management for PPP Setting Normal Bandwidth
Kbps. Show the normal bandwidth for a port using
Enabling Dial-On-Demand
Using Manual Dial
Place the call using
Configuring Bandwidth-On-Demand
Configure the back-up line for disaster recovery only using
Configuring Disaster Recovery
Enable disaster recovery using
Configure the dial number list for the back-up line using
Site B Site C
Configuring Frame Relay
Port !5 path
Traffic from one site to another over the same parent port
Site a
Configuring X.25
311041501111
Configure other protocols, see Using Enterprise OS Software
See to configure bridging, IP routing, and IPX routing. To
Advanced Configuration of Ports and Paths
Configuring Bridging Routing
To enable bridging, enter
Configuring IP Routing
Enable IP routing by entering
IP Routing
To delete a static route, use
Routing Between Gateways
Subnet Masks
Adding a Route Statically in a Subnet Masked Environment
To enable Ospf on a specified port, use
Override Option
Ospf over Dial-On-Demand Dial-Up Lines
Using a Static Route
Using Ospf
SHow -IP NETaddr
Configuring IPX
Routing
Defining a Default Route
To provide a name for your path and port, use
Customizing Your Software
Naming Paths and Ports
Module Autobaud Feature
Working with Dial
Number Lists
Phone number is case-sensitive and must be matched exactly
CSU/DSU Port
Using Statistics on
56/64 Kbps
45x
Using Statistics on the T1/FT1 RJ-48 Telco Port 46x
Network Statistics
Displays similar to the following will appear
Display similar to the following appears
Displays similar to the following appear when you enter
Statistics
Compression
Show all T1/FT1 parameters configured using
Configuring Data
T1/FT1 Parameter
Customizing Your Software
Boot
Troubleshooting
Using the Monitor
Utility
Display Files
Configure Flash Load
Clear Eeprom
Dump
Flash Load
Repeat Last Command
Reset
Help
Bridge/router LEDs
Normal LED
Meanings
System LEDs The following figure describes the system LEDs
WAN
LAN LEDs The following figure describes the LAN LEDs
Action Reload the software. See Appendix B
Meaning file system is empty Action
Meaning
Reload the software. See Appendix B
Action Follow these steps At the monitor prompt, enter
Default path is
Image names do not match
Meaning File too large Action
Meaning Unspecified fatal error Action
Meaning File read or decompression error Action
Meaning File checksum error Action
Connected correctly to the Ethernet network
Meaning Unable to transmit Bootp request Action
Configuration and verify the media access control MAC
Be present or is incorrectly configured
Configured
Power off and then on again to retry the system software
Be incorrectly configured
Load. If the load is unsuccessful, contact your network
Contact your network supplier
Phase
Eeprom checksum test failed
WAN
Performing
Loopback Tests
Configure the ports for loopback testing by entering
To dial path 3.1 from path 3.2, enter
Disconnect the call by entering
Start the DLtest using
Stop the DLTest by entering
Change the port owner from loopback to PPP by entering
To stop the loopback test, enter
To disable V.54 detection, enter
Start the loopback test by entering
Performed
Select the loopback test mode by entering
CSU/DSU Port 55x bridge/router 45x
Set the owner of the WAN port to loopback by entering
Specify the number of seconds that the test should run using
Stop the loopback test by entering
Enable the port by entering
To turn on autobaud, enter
To start the remote DSU loopback test on path 2, enter
Start remote loopback test using
To start the remote CSU loopback test on path 2, enter
To view the status of the loopback test in progress, enter
T1/FT1 Port 56x bridge/router
46x
T1/FT1 Port
Reenable the WAN port by entering
Enable V.54 signal detection by entering
Supports ATT
On the T1/FT1 Port
Performing a Loopback Test on a Serial Port
Start the serial loopback test by entering
Memory Dump
Stop the serial loopback test by entering
Select Dump Destination Following options are available
SysInfo
See the Unix system documentation if you have any problems
To create a memory dump file, follow these steps
System responds with the following information
Appendix a Troubleshooting
Software
Reloading the System B Software
Reloading
Load Errors
Syntax Conventions
Full Form Syntax
Command Syntax Symbols
Symbols
Command syntax. These symbols are summarized in Table
SymbolDescription
Examples
Full
Abbreviated Syntax
Command Syntax
Variations
Command Lines
Using Aliases
Service Names
Entering
Command History
Substitution
Syntax Variation
Privilege Level
ISDN-Related
Models 43x
With different options as described in Table
Getting Help
Asterisk, for example
Online Help Syntax Summary
SYS?
Appendix C Syntax Conventions
Cables
Connectors and Cables
Console Connector
PC Cable
Pin to 25-pin Terminal Cable Null Modem-Type
Either 10BASE-T or 100BASE-TX cabling
LAN Connector
Ethernet Connector
To full router software, the second port will be functional
Cable Support and Emissions Compliance
Cabling Standards
Creating a Valid Network
Emissions Compliance
Shows examples of collision domain diameters
For expanded guidelines, refer to the Ieee Standard
Collision Domain Diameter with No Repeater
Collision Domain Diameter with Two Repeaters
Maximum Cable Length in Example Collision Domain Diameters
Shows the pin assignments of the Isdn S/T cable
Shows the pinouts of the Isdn U cable
CSU/DSU Cable
Serial Connectors Flex-WAN Cables
RJ-48S male shielded Name Abbr
Connecting the Bridge/Router to a DTE Using a DCE Cable
10 ft
Flex-WAN Cables
Cable Length Cable Type Part Number Pinouts
Pinouts
RS-232 DTE Cable Pinouts
Flex-WAN and RS-232 DCE Connectors
Flex-WAN Connector Signal Pin Direction Twisted Pair
Flex-WAN and V.35 DTE Connectors
35 DTE Cable Pinouts
Flex-WAN and V.35 DCE Connectors
35 DCE Cable Pinouts
Flex-WAN and X.21 DTE Connectors
21 DTE Cable Pinouts
Flex-WAN and X.21 DCE Connectors
21 DCE Cable Pinouts
Flex-WAN and RS-449 DTE Connectors
RS-449 DTE Cable Pinouts
Flex-WAN and RS-449 DCE Connectors
Flex-WAN and RS-530 DTE Connectors
RS-449 DCE Cable Pinouts
Flex-WAN Connector RS-530 DTE Connector Signal Pin Direction
Canadian Isdn BRI Services
Provisioning Your Isdn Line
Isdn Switch Type
AT&T 5ESS NI1
AT&T 5ESS Custom DMS 100 and National Isdn Siemens Ewsd
AT&T 5ESS Switch
Ordering Isdn Service for an AT&T 5ESS Switch
189
DN must be set as follows Parameter Setting
AT&T 5ESS Custom Switch
Required Information Specification
191
Ordering Isdn Service for a DMS 100 Switch
DMS 100 and National Isdn
Siemens Ewsd Switch
Ordering Isdn Service for a Siemens Ewsd Switch
NT1s and Power Supplies
Isdn BRI Services
Ordering Dutch
Appendix E Provisioning Your Isdn Line
3Com FTP Site
Technical Support
Online Technical
Hours a day, 7 days a week
Access by Analog Modem
Access by Digital Modem
847 262
Support from 3Com
Support from Your
Network Supplier
North America
Country Telephone Number Fax Number
Page
Index
Numerics
Isdn
Index
Ipxwan 109 Isdn
Index
Snmp
DCE connector described
Index
3Com Corporation Limited Warranty