Manuals
/
Black Box
/
Computer Equipment
/
Computer Hardware
Black Box
ACX160-PS Overview, 724-746-5500| blackbox.com, 1 2 -6.CPU board, front view, Page
Models:
ACX080
ACX288-PS
ServSwitch DKM-FX
ACX288
ACX048
ACXIO8-C
ACXSFPS
ACX160-PS
ACXIO8-SM
ACXSFPC
ACX080-PS
ACXIO8-SPF
ACX288-CTL
ACX160
1
25
128
128
Download
128 pages
56 Kb
22
23
24
25
26
27
28
29
<
>
Troubleshooting
Specs
Install
Configuration
Reset
2.6Diagnostics and Status 2.6.1 Status LEDs
6.Mouse commands
video-onlystatus default value: 10 seconds
System Settings
Weight
Page 25
Image 25
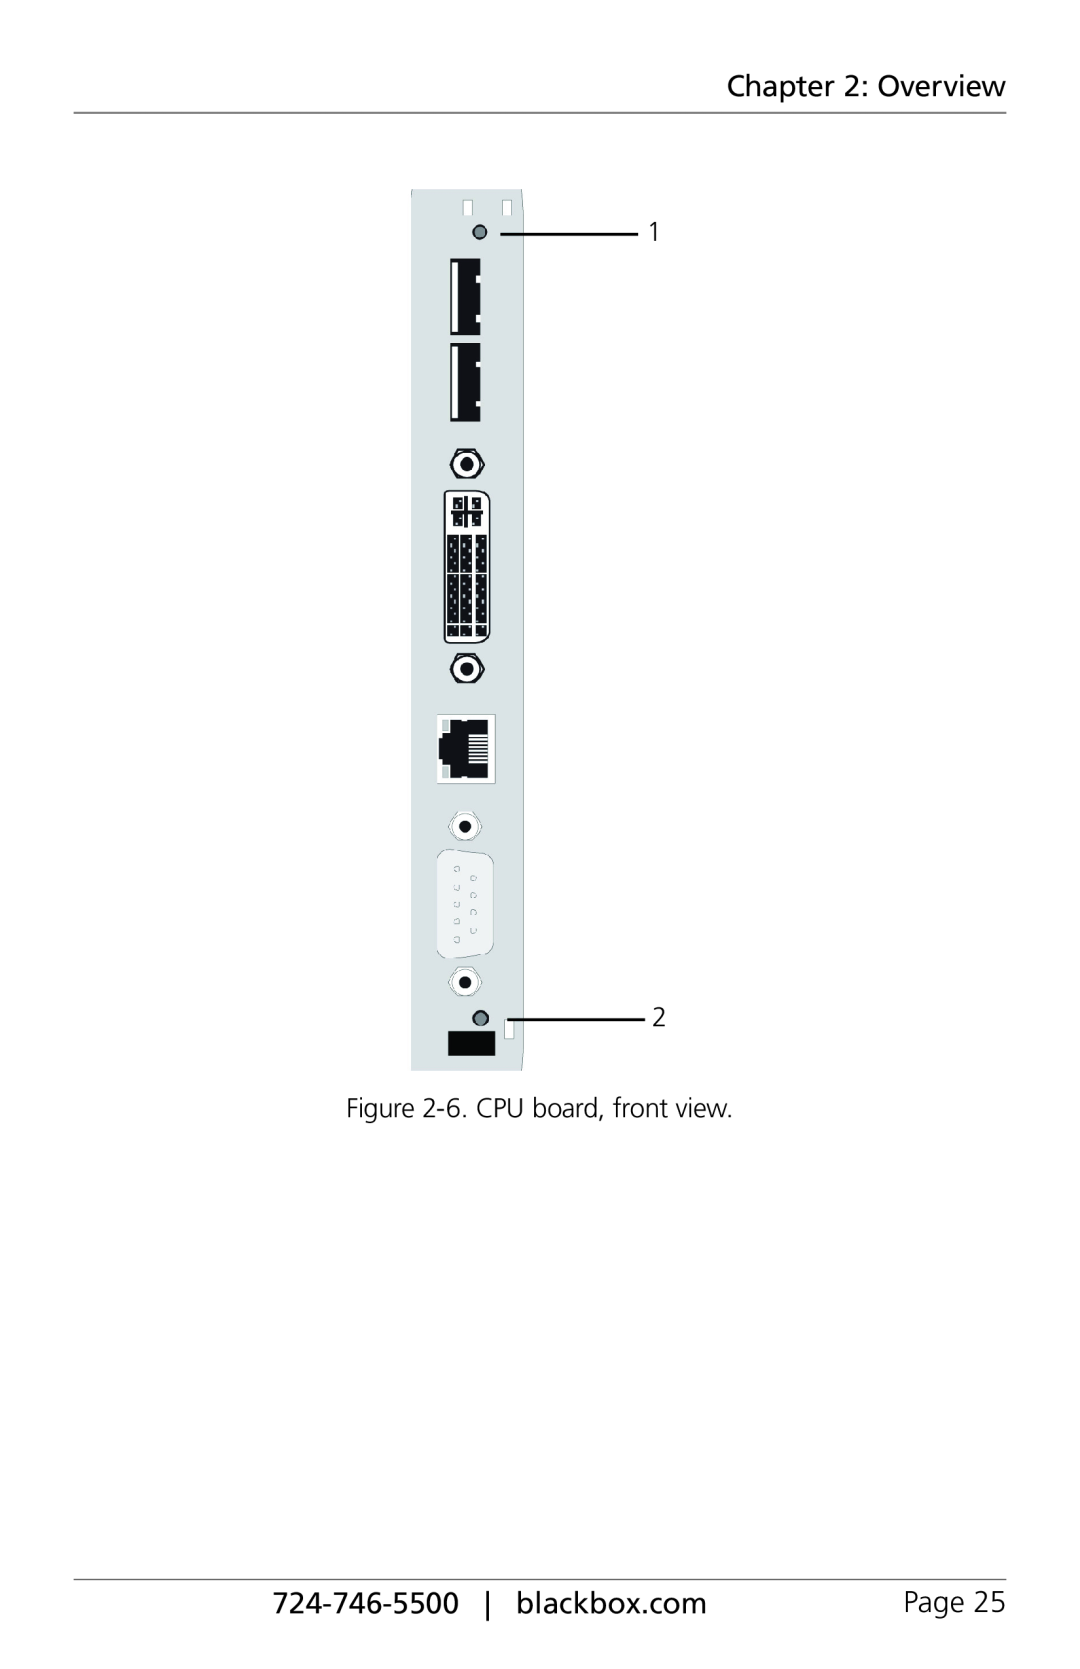
Chapter 2: Overview
1
2
Figure
2-6.
CPU board, front view.
724-746-5500
blackbox.com
Page 25
Page 24
Page 26
Page 25
Image 25
Page 24
Page 26
Contents
Customer Support Information
ServSwitch DKM FX
Page
Trademarks Used in this Manual
724-746-5500| blackbox.com
Trademarks Used in this Manual
FCC and IC RFI Statements/NOM Statement
Electrical Safety Statement
FEDERAL COMMUNICATIONS COMMISSION AND
Normas Oficiales Mexicanas NOM
Page
NOM Statement
724-746-5500| blackbox.com
724-746-5500| blackbox.com
NOM Statement
C:El aparato ha sido expuesto a la lluvia; o
Safety Instructions
Safety Instructions
Installation
Repair
Chapter
Table of Contents
Page
724-746-5500| blackbox.com
Page
Table of Contents
724-746-5500| blackbox.com
Chapter
724-746-5500| blackbox.com
Table of Contents
Chapter
Page
1.Specifications 1.1 Interfaces
Chapter 1: Specifications
1.1.1 DVI-DSingle Link
1.1.2 USB HID
1.1.5 RJ-45Interconnect
1.1.4 RS-232Serial
1.1.6 Fiber SFP Type LC Interconnect
1.1.7 SDI Interconnect
Chapter 1: Specifications
1.2.2 Fiber
Page
724-746-5500| blackbox.com
Chapter 1: Specifications
1.2.3 Coaxial
724-746-5500| blackbox.com
1.3 Supported Peripherals
1.4Connector Pinouts 1.4.1 CPU Board
Chapter 1: Specifications
Page
Table 1-9. DVI-D single-linkconnector pinout
Chapter 1: Specifications
Table 1-10.USB Type A connector
Table 1-11.DB9 connector
1.4.3 I/O Board SFP
1.4.2 I/O Board CATx
1.4.4 I/O Board SDI
Chapter 1: Specifications
1.6 Environmental Conditions
1.8 Shipping Weight
1.7 Size
Chapter 1: Specifications
Chapter 2: Overview
2.1.2 Access Options
2. Overview 2.1Description 2.1.1 Application
Page
Chapter 2: Overview
2.2 System Overview
724-746-5500| blackbox.com
2.4 What’s Included
2.3 Available Products
Chapter 2: Overview
Page
2.5 Device Views
2.5.1 ServSwitch DKM FX 288-Port
Chapter 2: Overview
724-746-5500| blackbox.com
Chapter 2: Overview
2.5.2ServSwitch DKM FX 160-Port
Page
724-746-5500| blackbox.com
Chapter 2: Overview
2.5.3ServSwitch DKM FX 80-Port
724-746-5500| blackbox.com
2.6Diagnostics and Status 2.6.1 Status LEDs
2.5.4 ServSwitch DKM FX 48-Port
Chapter 2: Overview
Page
724-746-5500| blackbox.com
Chapter 2: Overview
1 2 Figure 2-6.CPU board, front view
Page
Page
Chapter 2: Overview
724-746-5500| blackbox.com
Table 2-8.Status LEDs on the CPU board
724-746-5500| blackbox.com
Chapter 2: Overview
CATx
SFP fiber
Page
Chapter 2: Overview
724-746-5500| blackbox.com
Figure 2-8.Ports status LEDs on the I/O boards
724-746-5500| blackbox.com
Chapter 2: Overview
1 2 Figure 2-9.Status LEDs on the fan tray
Table 2-11.Status LEDs on the fan tray
Chapter 2: Overview
2.6.2 Port Status
Page
724-746-5500| blackbox.com
724-746-5500| blackbox.com
Chapter 2: Overview
Java Tool
Page
Chapter 2: Overview
724-746-5500| blackbox.com
Table 2-15.Extender recognized
Chapter 2: Overview
2.6.3 Network Status
724-746-5500| blackbox.com
Page
Chapter 2: Overview
724-746-5500| blackbox.com
Figure 2-15. Status—Networkscreen
Chapter 2: Overview
2.6.4 Firmware Status
724-746-5500| blackbox.com
Page
Chapter 2: Overview
724-746-5500| blackbox.com
Field
Chapter 2: Overview
2.7 Trace Function
724-746-5500| blackbox.com
Page
Chapter 2: Overview
724-746-5500| blackbox.com
You can request various trace views in the menu
3. Installation 3.1 System Setup
Chapter 3: Installation
724-746-5500| blackbox.com
3.2.1 KVM Matrix
3.2 Example Applications
Chapter 3: Installation
Page
Chapter 3: Installation
3.2.2 Video Matrix
724-746-5500| blackbox.com
Chapter 3: Installation
3.2.3Parallel Operation Stacking
Page
724-746-5500| blackbox.com
Chapter 3: Installation
3.2.4 Cascading
724-746-5500| blackbox.com
Page
Chapter 3: Installation
724-746-5500| blackbox.com
Figure 3-4.Cascading application
4. Configuration 4.1 Command Mode
Chapter 4: Configuration
724-746-5500| blackbox.com
Chapter 4: Configuration
4.2 Control Options
Page
724-746-5500| blackbox.com
You can enter the OSD of the ServSwitch DKM FX
Chapter 4: Configuration
724-746-5500| blackbox.com
Page
Chapter 4: Configuration
724-746-5500| blackbox.com
• Lower status area lowest two text lines
Password request
Chapter 4: Configuration
Figure 4-3.Login Menu screen
724-746-5500| blackbox.com
Chapter 4: Configuration
4.2.2 Control via Java Tool
Page
724-746-5500| blackbox.com
724-746-5500| blackbox.com
Chapter 4: Configuration
Start of the Java Tool
Page
Chapter 4: Configuration
724-746-5500| blackbox.com
Menu structure
Table 4-6.Mouse commands
Chapter 4: Configuration
Table 4-7.Keyboard commands
724-746-5500| blackbox.com
Table 4-7Continued. Keyboard commands
Chapter 4: Configuration
Page
724-746-5500| blackbox.com
724-746-5500| blackbox.com
Chapter 4: Configuration
Filter Function
4.3 Assignment
4.2.3 Control via Serial Interface
4.3.1 Virtual CPU to real CPU
Chapter 4: Configuration
724-746-5500| blackbox.com
Chapter 4: Configuration
Java Tool
Chapter 4: Configuration
4.3.2 Real Console to Virtual Console
Page
724-746-5500| blackbox.com
4.4.1 System Data
4.4 System Settings
Chapter 4: Configuration
724-746-5500| blackbox.com
Table 4-10.System data settings
Chapter 4: Configuration
Page
724-746-5500| blackbox.com
Select Configuration > System in the main menu
Chapter 4: Configuration
Figure 4-13.Menu Configuration—Systemscreen
Table 4-11.Cancel and Save selection buttons
Chapter 4: Configuration
4.4.2 Automatic ID
You can access the menu via OSD or Java
Page
You can select between the following settings
Chapter 4: Configuration
Table 4-12.Automatic ID settings
Select Configuration > System in the main menu
Chapter 4: Configuration
4.4.3 Access
Table 4-13.Cancel and Save selection buttons
The access configuration is set in this menu
Table 4-14.Access settings
Chapter 4: Configuration
724-746-5500| blackbox.com
Page
Select Configuration > Access in the main menu
Chapter 4: Configuration
Figure 4-19.Menu Configuration Access screen
Table 4-15.Cancel and Save selection buttons
Chapter 4: Configuration
4.4.4 Switch
Java Tool Select System > Access in the task area
Figure 4-20.Menu System—Accessscreen
You can select between the following settings
Chapter 4: Configuration
Table 4-16.Switch settings
Page
Table 4-16continued. Switch settings
Chapter 4: Configuration
Select Configuration > Switch in the main menu
Figure 4-22.Menu configuration–System
Chapter 4: Configuration
4.4.5 Network
Table 4-17.Cancel and Save selection buttons
Select “System > Switch” in the task area
Table 4-18.Network settings
Chapter 4: Configuration
Select “Configuration > Network” in the main menu
Figure 4-25.Menu Configuration—Networkscreen
Chapter 4: Configuration
4.4.6 Date and Time
Table 4-19.Cancel and Save selection buttons
You can access the menu via OSD
Table 4-20.Date and time settings
Chapter 4: Configuration
724-746-5500| blackbox.com
Page
Chapter 4: Configuration
4.5 User Settings
Page
724-746-5500| blackbox.com
Table 4-22continued. User data settings
Chapter 4: Configuration
Select “Configuration > User” in the main menu
Figure 4-30.Menu Configuration—Userscreen
Table 4-23.OSD settings
Chapter 4: Configuration
Table 4-24.OSD settings
Page
Chapter 4: Configuration
4.6 Extender Settings
724-746-5500| blackbox.com
To access the menu, use OSD or Java
Chapter 4: Configuration
Table 4-26.OSD settings
Page
Table 4-27.Extender EXT units settings
Chapter 4: Configuration
724-746-5500| blackbox.com
Page
Page
Chapter 4: Configuration
724-746-5500| blackbox.com
Select “Definition > EXT Units” in the task area
Chapter 4: Configuration
4.7CPU Settings
724-746-5500| blackbox.com
Figure 4-36.Menu Configuration—CPUDevices screen
Chapter 4: Configuration
Page
724-746-5500| blackbox.com
724-746-5500| blackbox.com
Chapter 4: Configuration
Figure 4-37.Menu Definition—CPUDevices screen
4.8.1 CON Devices
4.8 Console Settings
Chapter 4: Configuration
Page
You can access the menu via OSD or Java
Chapter 4: Configuration
724-746-5500| blackbox.com
Figure 4-40.Menu Configuration—CONDevices screen
Chapter 4: Configuration
Page
724-746-5500| blackbox.com
Table 4-35.Menu configuration—
Chapter 4: Configuration
724-746-5500| blackbox.com
Chapter 4: Configuration
4.8.2 Mouse and Keyboard
Page
724-746-5500| blackbox.com
Table 4-38.Mouse and keyboard settings
Chapter 4: Configuration
Figure 4-42.Menu Configuration—EXTUnits screen
724-746-5500| blackbox.com
4.9.1 Active Configuration
4.9Saving and Loading Configurations
Chapter 4: Configuration
Page
Chapter 4: Configuration
4.9.2 Saving Configurations Internal
724-746-5500| blackbox.com
Figure 4-46.Menu Configuration—SaveAs screen
Chapter 4: Configuration
Page
724-746-5500| blackbox.com
Chapter 4: Configuration
4.9.3Loading of Configurations Internal
724-746-5500| blackbox.com
1.Select “Configuration > Open” in the main menu
Chapter 4: Configuration
Page
724-746-5500| blackbox.com
Chapter 4: Configuration
4.9.4 Saving Configurations External
724-746-5500| blackbox.com
Chapter 4: Configuration
4.9.5 Loading Configurations External
Page
724-746-5500| blackbox.com
4.10.1 Export Options
4.10 Export and Import Options
Chapter 4: Configuration
724-746-5500| blackbox.com
Chapter 4: Configuration
4.10.2 Import Options
Page
724-746-5500| blackbox.com
Chapter 4: Configuration
4.11 Firmware Update
To access the menu, use the Java icon
724-746-5500| blackbox.com
Figure 4-58.Menu Administration–UpdateFirmware screen
Chapter 4: Configuration
Page
724-746-5500| blackbox.com
Chapter 5: Operation
5.1Operation via Hotkeys 5.1.1 Direct Switching
5. Operation
724-746-5500| blackbox.com
5.1.3 Addressing Master and Slave
5.1.2 Scan Mode
Chapter 5: Operation
Page
5.1.4 Function Keys <F1>–<F12>
5.2 KVM Switching
Chapter 5: Operation
724-746-5500| blackbox.com
Figure 5-2.Menu Switch screen
OSD Select “Switch” in the main menu
Table 5-1Menu switch
Chapter 5: Operation
Chapter 5: Operation
Table 5-2.Switching functions
724-746-5500| blackbox.com
Chapter 5: Operation
5.3 Serial Interface
Page
724-746-5500| blackbox.com
5.4.2 Reset
5.4 Power On and Power Down Functions
5.4.3 Power Down
5.4.1 Restart
6. Serial Control
Chapter 6: Serial Control
Page
724-746-5500| blackbox.com
Chapter 6: Serial Control
Switching Functions Telegrams
724-746-5500| blackbox.com
Special characters ACK NAK STX ETX CR 0x0D
Page
Chapter 6: Serial Control
724-746-5500| blackbox.com
Example
724-746-5500| blackbox.com
Chapter 6: Serial Control
Example
Page
Chapter 6: Serial Control
724-746-5500| blackbox.com
with a fixed total port number
724-746-5500| blackbox.com
Chapter 6: Serial Control
Example
Page
Chapter 6: Serial Control
724-746-5500| blackbox.com
Table 6-12.Connection of CPU input with CON output
724-746-5500| blackbox.com
Chapter 6: Serial Control
Table 6-14.Return of CPU input for CON output
Page
Chapter 6: Serial Control
724-746-5500| blackbox.com
Table 6-16.Request of CON input for CPU output
724-746-5500| blackbox.com
Chapter 6: Serial Control
Table 6-18.Connection of CON input with CPU output
Page
Chapter 6: Serial Control
724-746-5500| blackbox.com
Example
724-746-5500| blackbox.com
Chapter 6: Serial Control
Table 6-22.Connection of CON input with CPU output
7. Troubleshooting
Chapter 7: Troubleshooting
7.1 External Failure
7.2 Video Interference
7.5 Network Error
7.4 Power Supply Units Malfunction
7.6 ServSwitch DKM FX Failure
Chapter 7: Troubleshooting
7.8 Contacting Black Box
7.7 Blank Screen
Chapter 7: Troubleshooting
Page
Chapter 7: Troubleshooting
7.9 Shipping and Packaging
724-746-5500| blackbox.com
Appendix. Glossary
Appendix: Glossary
Page
724-746-5500| blackbox.com
724-746-5500| blackbox.com
Appendix: Glossary
Fiber — Single-modeor multimode fiber cables
Appendix: Glossary
A.1 Matrix-SpecificGlossary
Page
724-746-5500| blackbox.com
724-746-5500| blackbox.com
Appendix: Glossary
Page
About Black Box
Tech support the way it should be
Black Box Tech Support: FREE! Live. 24/7
724-746-5500| blackbox.com