BM 2610014415 01-11 E:BM 2610012089 12-10 E 1/10/11 7:17 AM Page 20

TAblE pOINTER AdjUSTMENT

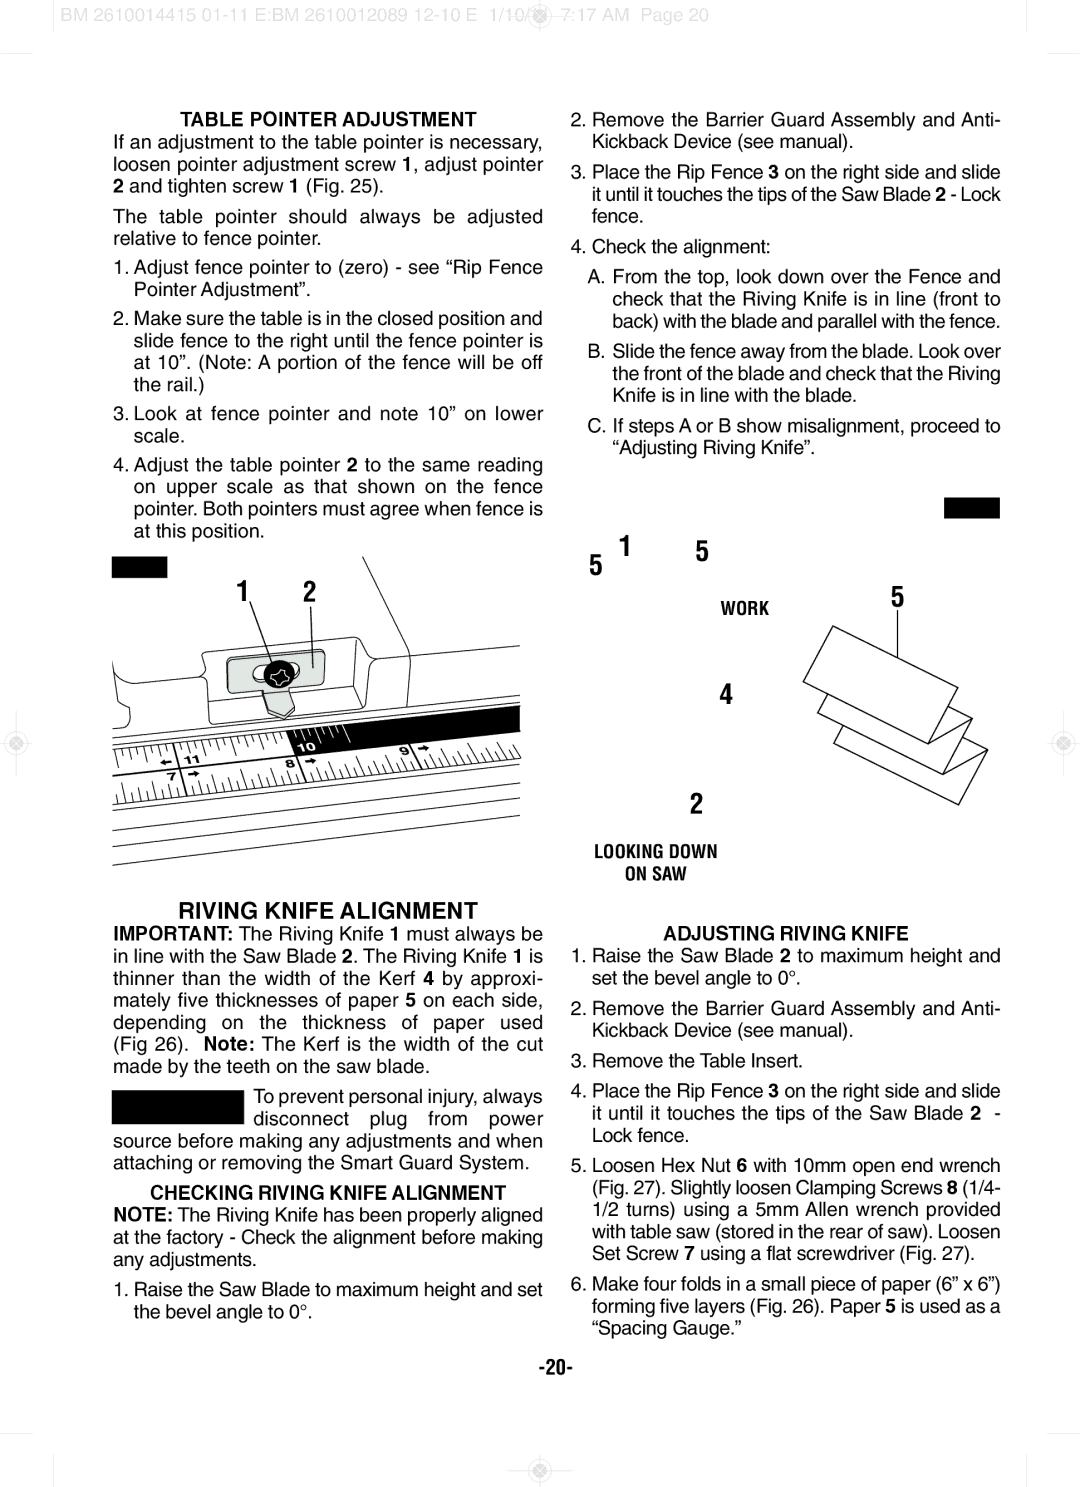
If an adjustment to the table pointer is necessary, loosen pointer adjustment screw 1, adjust pointer

2and tighten screw 1 (Fig. 25).

The table pointer should always be adjusted relative to fence pointer.

1.Adjust fence pointer to (zero) - see “Rip Fence Pointer Adjustment”.

2.Make sure the table is in the closed position and slide fence to the right until the fence pointer is at 10”. (Note: A portion of the fence will be off the rail.)

3.Look at fence pointer and note 10” on lower scale.

4.Adjust the table pointer 2 to the same reading on upper scale as that shown on the fence pointer. Both pointers must agree when fence is at this position.

FIG. 25

1 2

RIVINg KNIfE AlIgNMENT

IMpORTANT: The Riving Knife 1 must always be in line with the Saw Blade 2. The Riving Knife 1 is thinner than the width of the Kerf 4 by approxi- mately five thicknesses of paper 5 on each side, depending on the thickness of paper used (Fig 26). Note: The Kerf is the width of the cut made by the teeth on the saw blade.

! WARNING

To prevent personal injury, always


disconnect plug from power


source before making any adjustments and when attaching or removing the Smart Guard System.

CHECKINg RIVINg KNIfE AlIgNMENT

NOTE: The Riving Knife has been properly aligned at the factory - Check the alignment before making any adjustments.

1.Raise the Saw Blade to maximum height and set the bevel angle to 0°.

2.Remove the Barrier Guard Assembly and Anti- Kickback Device (see manual).

3.Place the Rip Fence 3 on the right side and slide it until it touches the tips of the Saw Blade 2 - Lock fence.

4.Check the alignment:

A.From the top, look down over the Fence and check that the Riving Knife is in line (front to back) with the blade and parallel with the fence.

B.Slide the fence away from the blade. Look over the front of the blade and check that the Riving Knife is in line with the blade.

C.If steps A or B show misalignment, proceed to “Adjusting Riving Knife”.

FIG. 26

1

5

5


WORK5

4

2

LOOKING DOWN

ON SAW

AdjUSTINg RIVINg KNIfE

1.Raise the Saw Blade 2 to maximum height and set the bevel angle to 0°.

2.Remove the Barrier Guard Assembly and Anti- Kickback Device (see manual).

3.Remove the Table Insert.

4.Place the Rip Fence 3 on the right side and slide it until it touches the tips of the Saw Blade 2 - Lock fence.

5.Loosen Hex Nut 6 with 10mm open end wrench (Fig. 27). Slightly loosen Clamping Screws 8 (1/4- 1/2 turns) using a 5mm Allen wrench provided with table saw (stored in the rear of saw). Loosen Set Screw 7 using a flat screwdriver (Fig. 27).

6.Make four folds in a small piece of paper (6” x 6”) forming five layers (Fig. 26). Paper 5 is used as a “Spacing Gauge.”

-20-

Page 20
Image 20
Bosch Power Tools GTS1031 manual TAblE pOINTER AdjUSTMENT, Disconnect plug from power, CHECKINg RIVINg KNIfE AlIgNMENT

GTS1031 specifications

The Bosch Power Tools GTS1031 is a compact job site table saw designed to deliver precision cutting in a portable format. This powerful saw is equipped with a robust 15-amp motor that can easily handle a wide variety of applications, making it an excellent choice for contractors and DIY enthusiasts alike.

One of the standout features of the GTS1031 is its Smart Guard System. This integrated safety feature includes a modular blade guard, riving knife, and anti-kickback pawls. The blade guard helps protect the user from accidental contact with the blade, while the riving knife reduces the risk of kickback during operation. The entire system is designed to be easy to install and adjust, promoting both safety and efficiency on the job.

The GTS1031 boasts a portable, lightweight design that weighs just 52 pounds. This makes it easy to transport, set up, and store. Its foldable stand provides a stable base while offering simple setup and breakdown without the need for additional tools. The compact size of the saw, along with its sturdy construction, makes it extremely convenient for use in tight spaces or on busy job sites.

Another notable characteristic of the GTS1031 is its cutting capacity. With a 10-inch blade, it can make cuts up to 26 inches wide with a depth of 3.5 inches at 90 degrees and 2.5 inches at 45 degrees. The precision machined aluminum table ensures accurate cuts and durability, while the integrated measurements allow for easy adjustments and repeatability.

The saw features an onboard storage system for its accessories, ensuring that everything needed for operation is within arm's reach. This organization helps users stay efficient, reducing downtime during projects. The table saw is also designed for easy blade changes, minimizing interruption and allowing users to switch between different types of blades based on their cutting needs.

With its blend of power, portability, and safety features, the Bosch Power Tools GTS1031 stands out as a reliable choice for both professionals and hobbyists. Its emphasis on precision and user-friendly design makes it an indispensable tool for a wide range of applications, from framing to fine woodworking.