7500/7600
USER’S Guide
PT-7600
Compilation and Publication Notice
Trademarks
Who is covered
What Brother will do
Limitations
Important Information
Save Time Register On-Line
Before Using Your P-touch Labeler
Safety precautions
Rechargeable battery pack for PT-7600 only
AC adapter
Touch labeler
Iii
Batteries Alkaline/Rechargeable
Tape Cutter
Batteries
Tape
Memory
General Precautions
Contents
Vii
Inputting Label Data
How to use P-touch Transfer Manager & P-touch Library
Viii
Getting Started
Unpacking Your P-touch Labeler
PT-7500
General Description
Top view & bottom view
Keyboard & LCD screen
Power Supply
Connecting the AC adapter
Back light
AC Adapter
Installing the batteries
Batteries
Rechargeable battery pack for PT-7600 only
Installing the rechargeable battery pack
Charging the rechargeable battery pack
Replacing the rechargeable battery pack
Installing a tape cassette
Tape Cassettes
Extra Strength Adhesive Tape
Flexible ID Tape
Turning the P-touch Labeler On/Off
Changing the Language
Selecting a Label Type Mode
Normal and Vertical Modes
Rotate and Rotate & Repeat Modes
Frame OFF
Flag Mode
Modes
Port and Panel1 Modes
Panel2 Mode
Front , Reverse
Block
Choosing functions, parameters, settings and groups
Choosing the default setting
Cancelling a choice
Performing Basic Operations
Inputting Label Data
Entering and editing text
Entering characters
Entering spaces
Adding a new line of text
Adding a new text block
Inserting text
Tape Width Maximum Number
Character Accented Characters
Entering an accented character
Deleting text
Parameter Settings
Entering a bar code
Bar width
Numbers printed below bar code
Entering bar code data
Setting bar code parameters
Character Symbol
Symbol Control Character
Entering a symbol
Symbol Character
Category Symbols
Basic
Specifying a margin size
Formatting the Label
Specifying a label length
Frame Sample Setting
Framing the text
Specifying the character size
Formatting the Global character size of all text
Formatting the character size of a line
Tape Width Maximum Text Size
Specifying the character width
Formatting the Global width of all text
Formatting the width of a line
Size
Formatting the character style of a line
Specifying the character style
Formatting the Global character style of all text
Using the pre-formatted Auto Format templates
Specifying the alignment for all lines in the text
Printing Labels
Previewing the label layout
Using special printing functions
Feeding tape
Printing a label
Printing multiple copies of a label
2A-C16 2A-BCC15 2A-C14
Printing multiple copies with incremental characters
Printing a range of text blocks
Printing mirrored labels
Combining special printing functions
Storing and Recalling Files
Storing label text
Recalling text that has been stored
Deleting text that has been stored
Basic Functions
Machine Adjustments
Selecting how tape is fed and cut
Calibrating the label length
Adjusting the display contrast
Using the Auto Reduction function
Changing the units of measure
Displaying version information
Cleaning
Cleaning the print head, rollers and tape cutter
Page
Installing the Software & Printer Driver
Features
Introduction
Touch Editor
System requirements
Installing the P-touch Editor 5.0 and Printer driver
CD-ROM Precautions
Installing the P-touch Editor
Installing the Printer driver
For Windows 2000 Professional
For Windows XP
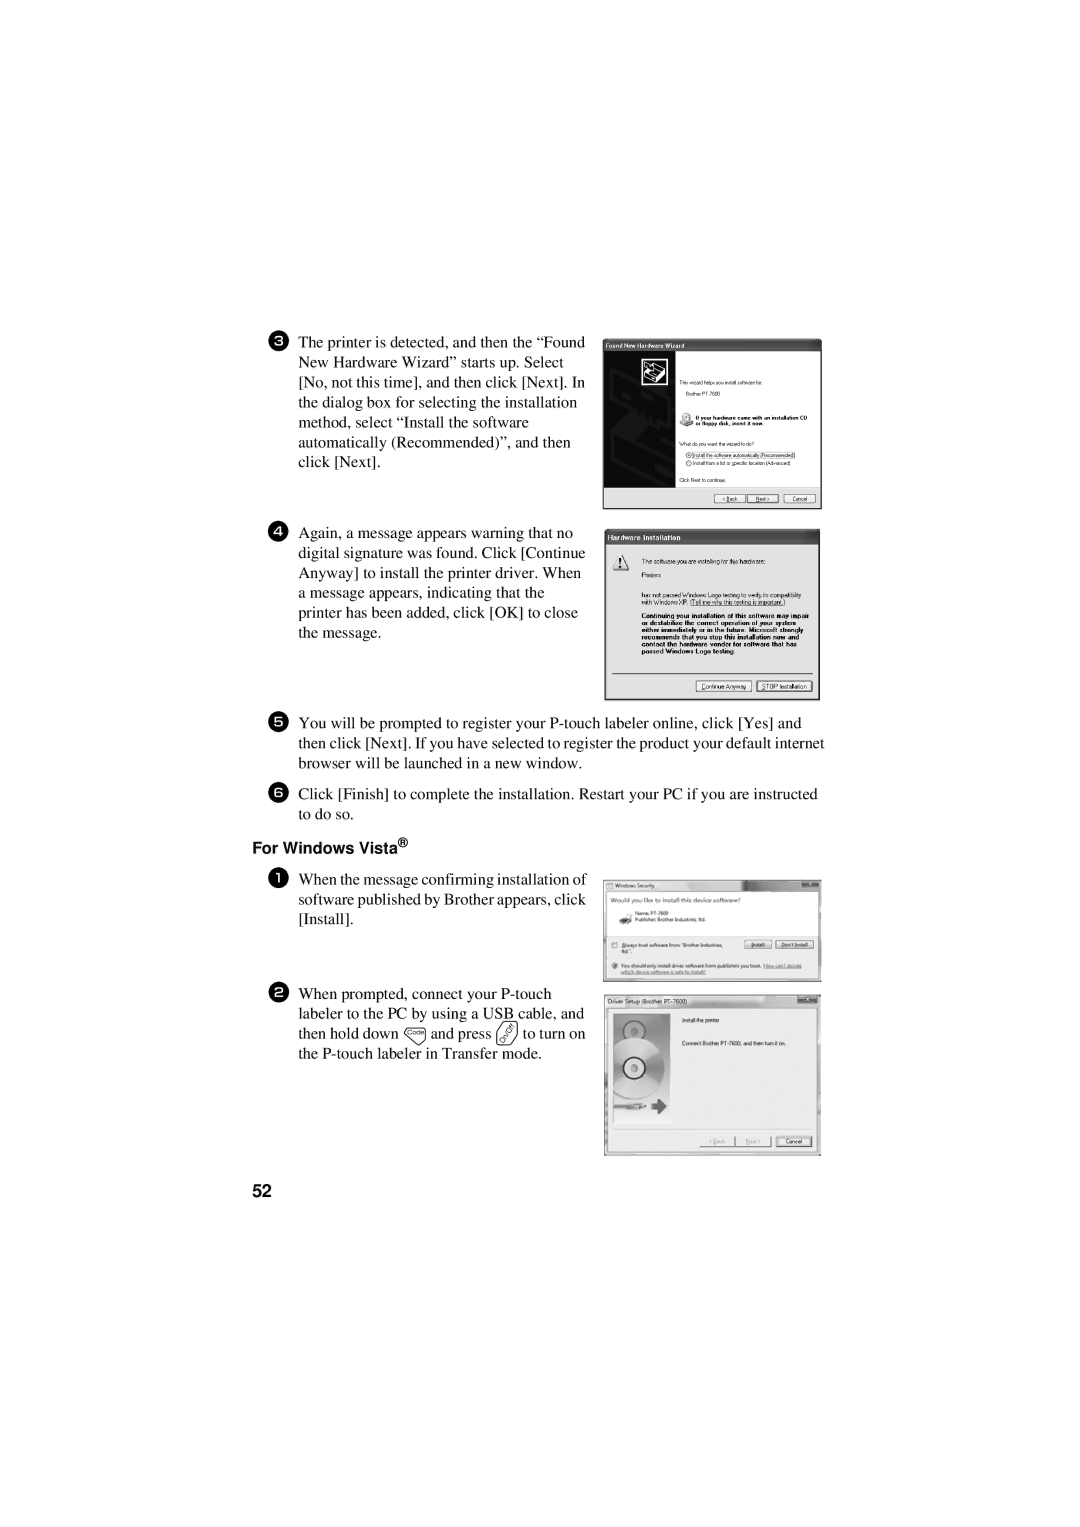
For Windows Vista
For Windows 2000 Professional/XP
Uninstalling the P-touch Editor
Uninstalling / Replacing the printer driver
Using P-touch Editor
Starting P-touch Editor
Page
Express Mode
Layout window
Professional Mode
Starting from Start button
Snap Mode
Starting P-touch Editor Help
Starting from Snap Mode
Starting from P-touch Editor
Printing the Help description
Entering Transfer mode
Transferring Data To/From a Computer
How to use P-touch Transfer Manager & P-touch Library
Starting up P-touch Transfer Manager
Layout window
Transferring label templates from the PC
Explanations of the Icons
Labeler With a PT-7600 only Using P-touch Computer for
Using template data
Adding a user-defined character image to the text
Using a template not linked to a database
Using a template linked to a database
Using downloaded database data
Adding database data to a label
Using database data in a Label Type mode
To display a record with a specific number
Backing up label templates
Searching the database
Deleting all the P-touch labeler data
Opening and editing data
Starting up the P-touch Library
Searching labels
Labeler With a PT-7600 only Using P-touch Computer for
Resetting the P-touch Labeler
Troubleshooting
Problem Cause Solution
Label is not printed
After pressing p
LCD messages are
Error Message List
Error Message Cause Solution
Label files saved
Previously are now empty
Block NO. Change
Check the Number
No Database or
No Files
Margin, Length,
Main Unit
Machine Specifications
Specification
Characters
Operating Environment Windows for PT-7600 only
Index
Backspace key Bar code
LCD screen
Tape
Service Center Locations
Contact Information For USA Only
Page
Guía DE Usuario
Importante
Aviso DE LA FCC
Aviso de recopilación y publicación
Marcas comerciales
Antes de utilizar su Etiquetadora P-touch
Precauciones de seguridad
Batería recargable sólo para PT-7600
Adaptador de CA
Pilas alcalinas/recargables
Etiquetadora P-touch
Memoria
Cortadora de cinta
Cinta
Precauciones generales
Índice
Ajustes de la máquina
Apéndice
Para empezar
PT-7500
Descripción general
Vista superior y vista inferior
Teclado y pantalla LCD
Alimentación
Iluminación de fondo
Adaptador de CA
Conexión del adaptador de CA
Pilas
Observaciones acerca del adaptador de CA
Instalación de las pilas
Observaciones acerca de las pilas
Batería recargable sólo para PT-7600
Instalación de la batería recargable
Carga de la batería recargable
Sustitución de la batería recargable
Observaciones acerca de la batería recargable
Casetes de cinta
Instalación de un casete de cinta
Observaciones acerca de los casetes de cinta
Cinta con fuerza adhesiva extra
Cinta de identificación flexible
Conexión/desconexión de la Etiquetadora P-touch
Cambio del idioma
Selección de un modo de tipo de etiqueta
Modos Normal y Vertical
Modos Girar Rotate y Girar y repetir Rotate & Repeat
Modo Bandera Flag
Band
Modos Puerto Port y Panel 1 PANEL1
Modo Panel 2 PANEL2
Imprimir orden de impresión EN ORDEN, Inverso
BLOQUE?
Cancelación de una elección
Cómo realizar las operaciones básicas
Elección de funciones, parámetros, ajustes y grupos
Elección del ajuste predeterminado
Introducción de los datos de la etiqueta
Introducción y modificación de texto
Introducción de caracteres
Introducción de espacios
Cómo añadir una nueva línea de texto
Cómo añadir un nuevo bloque de texto
Inserción de texto
Anchura de la cinta Número máximo de líneas
Letra Caracteres acentuados
Introducción de un carácter acentuado
Borrado de texto
Introducción de un código de barras
Parámetro Ajustes Protocolo protocolo
Anchura de barra
De barras
Carácter Símbolo
Configuración de los parámetros de código de barras
Carácter
Símbolo Carácter de control
Introducción de un símbolo
Símbolo Carácter
Están disponibles los siguientes símbolos
Básicas
Definición de un tamaño de margen
Cómo formatear la etiqueta
Definición de la longitud de la etiqueta
Cómo enmarcar el texto
Ajuste de Muestra Marco
Definición del tamaño de los caracteres
Cómo formatear el tamaño de los caracteres de todo el texto
Cómo formatear el tamaño de los caracteres de una línea
Anchura de la cinta Tamaño máximo del Texto
Definición de la anchura de los caracteres
Cómo formatear la anchura de todo el texto
Cómo formatear la anchura de una línea
Tamaño
Cómo formatear el estilo de los caracteres de una línea
Definición del estilo de los caracteres
Cómo formatear el estilo de los caracteres de todo el texto
Uso de las plantillas de formato automático
Definición de la alineación de todas las líneas de texto
⋅ 2,80
18 mm ⋅ 70 mm
Impresión de etiquetas
Vista preliminar de la maquetación de la etiqueta
Nombre de
Tecla Campos de la plantilla La plantilla
Avance de la cinta
Impresión de una etiqueta
Uso de funciones de impresión especiales
Impresión de múltiples copias de una etiqueta
2A-C16
Impresión de múltiples copias con caracteres en incremento
Impresión de una serie de bloques de texto
Impresión especular de etiquetas
Combinación de funciones de impresión especiales
Almacenamiento e invocación de archivos
Almacenamiento de texto de etiquetas
Invocación de texto previamente almacenado
Borrado de texto almacenado
Funciones básicas
Selección de la forma de avance y corte de la cinta
Ajuste del contraste del visualizador
Ajuste de la función de reducción automática
Calibración de la longitud de la etiqueta
Cambio de las unidades de medida
Visualización de información sobre la versión
Limpieza
Observaciones acerca de la limpieza del cortador de la cinta
Funciones
Driver de impresora
Precauciones relativas al CD-ROM
Sistema operativo
Duro
Interfaz
Instalación del programa P-touch Editor
Instalación del controlador de impresión
En Windows 2000 Professional
En Windows XP
En Windows Vista
Desinstalación DE P-TOUCH Editor / Quick Editor
En Windows 2000 Professional/XP
Uso de P-touch Editor
Observaciones acerca de la creación de plantillas
Inicio de P-touch Editor
Page
Ventana de diseño
Professional Mode
Inicio de la ayuda de P-touch Editor
Iniciar desde el botón Inicio
Iniciar desde Snap Mode
Iniciar desde P-touch Editor
Impresión de la descripción de la ayuda
Transferencia de datos a/desde un PC
Para entrar en el modo Transfer
Uso de P-touch Transfer Manager y P-touch Library
Inicio de P-touch Transfer Manager
Ventana de diseño
Transferencia de las plantillas de etiquetas desde el PC
Explicaciones de los iconos
La Etiquetadora P-touch PC sólo para PT-7600 Uso de Con un
Uso de los datos de plantilla
Uso de una plantilla no vinculada a una base de datos
Uso de una plantilla vinculada a una base de datos
Uso de los datos de la base de datos descargada
Cómo añadir datos de la base de datos a una etiqueta
La Etiquetadora P-touch PC sólo para PT-7600 Uso de Con un
Para visualizar un registro con un número concreto
Copia de seguridad de plantillas de etiquetas
Búsqueda en la base de datos
Eliminación de todos los datos de la etiquetadora P-touch
Apertura y edición de datos
Inicio de P-touch Library
Búsqueda de etiquetas
La Etiquetadora P-touch PC sólo para PT-7600 Uso de Con un
Solución de problemas
Restablecimiento de la Etiquetadora P-touch
Problema Causa Solución
La etiqueta no se imprime
Cuando se pulsa la tecla
Los mensajes en la
Lista de mensajes de error
Comprobar Config
LÍM. Ancho Cinta
Introduzca Casete
No HAY Archivos
Longitud o longitud de
Elemento Especificación
Características técnicas de la máquina
Unidad principal
Máximo de 2000 caracteres
Entorno operativo Windows sólo PT-7600
Índice alfabético
Función de longitud Función de marcos
Imagen de carácter definida por el
Versión Vista preliminar Visualizador Contraste
Información de contacto sólo para EE.UU
Page
Page
Page